Student-Contributed Wiki
An awesome team of students from our education program made this wiki.
The trigger is stiff or stuck
The trigger is difficult or impossible to press.
Debris in the Trigger
Inspect the trigger for any debris that is preventing you from pulling the trigger. If there is no visible debris on the outside of the trigger, the drill will need to be disassembled to check inside for debris by using the following steps:
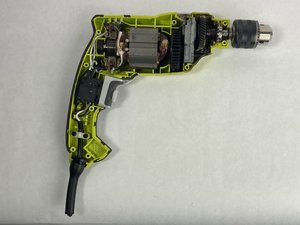
- Unplug the drill, unscrew the nine screws on the device's side, and lift off the top shell from the rest of the drill.
- Examine the trigger mechanism, looking for debris and signs of damage
- Clean any debris you find that could cause the trigger to become stuck
- While the drill is still unplugged and disassembled, test the trigger action to ensure that the issue is resolved. If the issue persists, the switch box may be broken and will need to be replaced by following our Trigger Replacement Guide
- If the issue is resolved, install the top shell back onto the body of the drill and tighten the nine screws
You may now plug the drill in and test for functionality. If the trigger now works, but the drill still doesn’t function, something else may be wrong. Take a look at our troubleshooting guide for There is no power when pressing the trigger.
Broken Switch Box
If there is no debris in the trigger but the trigger is still jammed, the switch box is likely broken and will need to be replaced by following our Trigger Replacement Guide.
There is no power when pressing the trigger
There are no issues with the trigger, but the drill doesn’t do anything when it’s pressed.
Broken Switch Box
The switch box that controls the trigger could have stopped functioning while still allowing the trigger to move normally. The switch box will need to be replaced by following our Trigger Replacement Guide.
Loose or Damaged Wiring
A connection inside the drill may have shorted or become loose, causing the drill to stop functioning. Follow these steps to open the drill and check for issues:
- Unplug the drill, unscrew the nine screws on the device's side, and lift off the top shell from the rest of the drill.
- Carefully inspect the wiring connections looking for damaged, loose, or missing wires or other potential issues
- If a wire is damaged, loose, or missing; follow our Internal Wiring Guide for detailed instructions on repair and replacement
Broken Motor
The motor may be broken and needs to be replaced.
The drill doesn’t spin but it’s making noise
When pressing the trigger, the drill makes a sound but produces no motion
Damaged Geartrain
Gears and shafts in the geartrain could be damaged, causing a loss of power while still allowing for noise to be created.
- Unplug the drill, unscrew the nine screws on the device's side, and lift off the top shell from the rest of the drill.
- Carefully inspect the geartrain looking for damaged teeth, snapped shafts, or other damage
- If some components are damaged, refer to Ryobi D620H Chuck Replacement Guide, following only the Gear Replacement section
Broken Motor
The motor may be broken and needs to be replaced.
The chuck doesn't tighten or loosen
The chuck does not tighten all the way or, when it is tightened, I can't get it loose.
The chuck can be adjusted by a chuck key to loosen or tighten the chuck. The chuck should tighten when turned clockwise, securing the bit, and loosen when turned counter-clockwise, freeing the bit.
Lack of Lubricant
If the chuck doesn't have enough lubricant in the mechanism is may become stuck.
- Try using a common metal lubricant on the inside of the chuck to unstick it (WD-40 or all purpose lubricant)
Debris in the Chuck
The chuck could be stuck because debris has become lodged in the mechanism.
- Vigorously move the chuck back and forth, sometimes debris can become jammed inside and it will need to be crushed to open or close the chuck all the way
If these solutions don't work, you may refer to the Ryobi D620H Chuck Replacement Guide for instructions on disassembly, repair, and replacement.
The drill smells like it's burning
During operation, the drill emits a burning smell.
Motor is Overheating
Leave the drill unplugged and let it cool down for at least 30 minutes. There are a number of reasons the motor could be overheating, including:
- Cutting materials too tough for the drill
- Constant extended use
- A buildup of dust and debris causing poor ventilation
After the drill has cooled down, plug it in and try to run it for a short time. If the burning smell is no longer present you may continue using the drill.
Age Causing Wear on the Motor
If your drill is relatively old, the motor could be at the end of its life and will need to be replaced.
Defects in the Motor
If you suspect the motor is defective, or broken due to external damage, you will need to replace it.
Receiving the Wrong Amount of Power
Check that the power cord of your drill is plugged into the proper type of outlet relative to the power rating for the drill, which may vary based on regional power standards. Also inspect the cord for damage, especially exposed wires, as these can cause the drill to short circuit. If the cord is damaged beyond light repair it can be replaced by following our Power Cord Replacement Guide.
Power intermittently cutting out
While in use the drill keeps slowing down and seizing up.
Damaged Motor Brushes
Power may be intermittent or non-existent because some or all of the brushes for the motor are damaged or missing.
- Unplug the drill, unscrew the nine screws on the device's side, and lift off the top shell from the rest of the drill.
- Inspect the motor brushes for damage and wear. If the brushes are damaged they must be replaced by following our Motor Brush Replacement Guide.
Loose or Damaged Wiring
A connection inside the drill may have shorted or become loose, causing the drill to stop functioning.
- Unplug the drill, unscrew the nine screws on the device's side, and lift off the top shell from the rest of the drill.
- Carefully inspect the wiring connections looking for damaged, loose, or missing wires or other potential issues
- If a wire is damaged, loose, or missing; follow our Internal Wiring Guide for detailed instructions on repair and replacement.
Damaged Power Cord
The power cord may be damaged because of wear and tear over time from age. Check for knicks, tears and scuffs in the rubber of the cord, and be especially weary of openings with exposed wires. The power cord should be replaced if wires are exposed and the drill should never be turned on while the cord is damaged.

Team

UMass Dartmouth, Team 1-2, Petersen Fall 2023 Member of UMass Dartmouth, Team 1-2, Petersen Fall 2023
UMASSD-PETERSEN-F23S1G2
4 Members
72 Guides authored

0 Comments