Free Shipping on Domestic Orders $75+

Nokia 225 4G 2020 Camera Replacement

What you need

  1. Nokia 225 4G 2020 Camera Replacement, Battery: step 1, image 1 of 3 Nokia 225 4G 2020 Camera Replacement, Battery: step 1, image 2 of 3 Nokia 225 4G 2020 Camera Replacement, Battery: step 1, image 3 of 3
    • Insert an iFixit opening pick into the seam along the bottom edge of the phone’s back cover.

    • Slide the pick around the edges of the cover to release the retaining clips.

    • Remove the back casing to expose the battery.

    Ask FixBot

    Add Comment

  2. Nokia 225 4G 2020 Camera Replacement: step 2, image 1 of 3 Nokia 225 4G 2020 Camera Replacement: step 2, image 2 of 3 Nokia 225 4G 2020 Camera Replacement: step 2, image 3 of 3
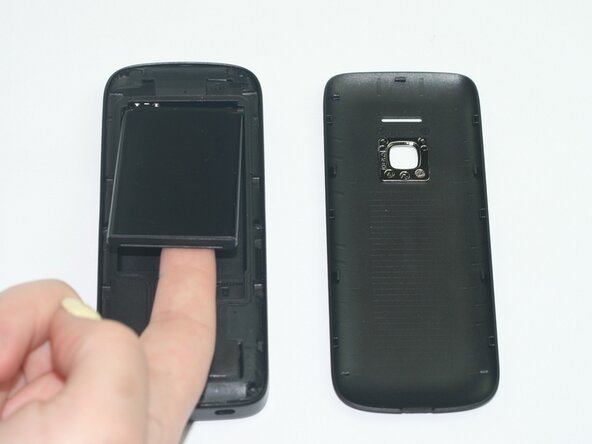
    • Remove the battery by lifting it from the edge near the microSD card slot.

    • Install the battery, ensuring the metal contacts align with the connector at the bottom right of the compartment.

    Ask FixBot

    Add Comment

  3. Nokia 225 4G 2020 Camera Replacement, Motherboard: step 3, image 1 of 2 Nokia 225 4G 2020 Camera Replacement, Motherboard: step 3, image 2 of 2
    • Use a T3 Torx screwdriver to remove the six screws along the edge of the bottom cover.

    Ask FixBot

    Add Comment

  4. Nokia 225 4G 2020 Camera Replacement: step 4, image 1 of 3 Nokia 225 4G 2020 Camera Replacement: step 4, image 2 of 3 Nokia 225 4G 2020 Camera Replacement: step 4, image 3 of 3
    • Insert an iFixit opening tool into the seam between the display and midframe and slide it around the edges to release the retaining clips.

    • Hold the device on both sides, then separate the display and the midframe to expose the motherboard.

    • Remove the motherboard.

    Ask FixBot

    Add Comment

  5. Nokia 225 4G 2020 Camera Replacement, Camera: step 5, image 1 of 3 Nokia 225 4G 2020 Camera Replacement, Camera: step 5, image 2 of 3 Nokia 225 4G 2020 Camera Replacement, Camera: step 5, image 3 of 3
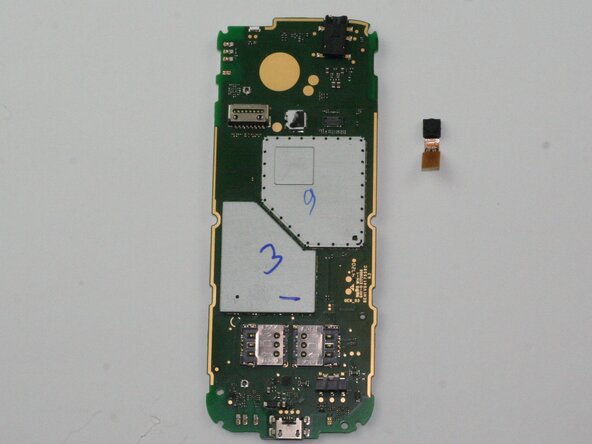
    • Place a spudger or an opening tool under the edge of the camera connector and pry straight up to disconnect it.

    • Make sure to pry under the edge of the connector itself, and not under the socket on the board. Otherwise, you risk permanently damaging the socket.

    • Work carefully: don't pry on or accidentally scrape any small, surface mounted components on the board.

    • To reconnect, align the connector carefully over its socket and press down with your fingertip—first on one of the short sides, then the other—until it clicks into place. Don't try to force the connector into place. If you're having trouble, reposition it and try again.

    Ask FixBot

    Add Comment

  6. Nokia 225 4G 2020 Camera Replacement: step 6, image 1 of 3 Nokia 225 4G 2020 Camera Replacement: step 6, image 2 of 3 Nokia 225 4G 2020 Camera Replacement: step 6, image 3 of 3
    • Use a nylon spudger to pry the camera from the motherboard.

    • The camera is glued to the motherboard, so if you have trouble removing it, refer to the How to Use iFixit Adhesive Remover guide.

    • Metal spudgers and similar prying tools can cause damage. Choose a tool that's ESD-safe to avoid accidental damage to the device.

    Ask FixBot

    Add Comment

Conclusion

To reassemble your device, follow these instructions in reverse order. Take your e-waste to an R2 or e-Stewards certified recycler.

Cancel: I did not complete this guide.

Whitley O.

Member since: 02/05/26

521 Reputation

5 Guides authored

Team

Texas Tech, Team 11-3, Weston Spring 2026 Member of Texas Tech, Team 11-3, Weston Spring 2026

TTU-WESTON-S26S11G3

5 Members

10 Guides authored

0 Guide Comments

Add Comment

View Statistics:

Past 24 Hours: 1

Past 7 Days: 4

Past 30 Days: 20

All Time: 106