Free Shipping on Domestic Orders $75+

Minolta Dimage Xt Flash Capacitor Replacement

What you need

  1. Minolta Dimage Xt Flash Capacitor Replacement, Casing: step 1, image 1 of 3 Minolta Dimage Xt Flash Capacitor Replacement, Casing: step 1, image 2 of 3 Minolta Dimage Xt Flash Capacitor Replacement, Casing: step 1, image 3 of 3
    • Locate and remove the silver screws on each side of the camera.

    • Use the Phillips #00 Screwdriver to unscrew all 2.0mm (4 instances) and 4.0mm (2 instances) screws.

    Ask FixBot

    Add Comment

  2. Minolta Dimage Xt Flash Capacitor Replacement: step 2, image 1 of 3 Minolta Dimage Xt Flash Capacitor Replacement: step 2, image 2 of 3 Minolta Dimage Xt Flash Capacitor Replacement: step 2, image 3 of 3
    • Then, carefully pry apart the front and back outer casing away from the internal components.

    • Be aware of the ribbon wire that will disconnect when the casing is detached.

    Ask FixBot

    Add Comment

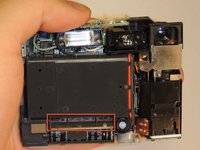
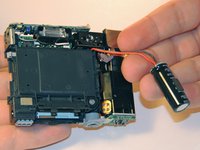
  3. Minolta Dimage Xt Flash Capacitor Replacement, Flash Capacitor: step 3, image 1 of 2 Minolta Dimage Xt Flash Capacitor Replacement, Flash Capacitor: step 3, image 2 of 2
    • Caution: Touching the capacitor leads may cause serious injury. Use a capacitor discharge probe to safely rid the capacitors of dangerous charges.

    • On the front side of the camera, locate the flash battery holder.

    • Lift the housing and remove the battery.

    • After removing the battery, clip the wires and solder the replacement battery.

    Ask FixBot

    Add Comment

Conclusion

To reassemble your device, follow these instructions in reverse order.

Cancel: I did not complete this guide.

One other person completed this guide.

Qqq

Member since: 03/11/13

19 Reputation

1 Guide authored

1 Guide Comment

Its a cap not a battery :D

Eigirdas Gedgaudas - Reply Share

Add Comment

View Statistics:

Past 24 Hours: 0

Past 7 Days: 4

Past 30 Days: 27

All Time: 1,462