Free Shipping on Domestic Orders $75+

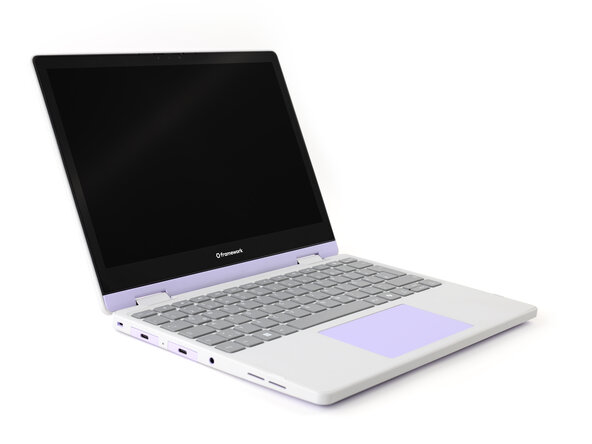
Framework Laptop 12 Mainboard Replacement

What you need

  1. Framework Laptop 12 Mainboard Replacement, Software preparations: step 1, image 1 of 1
    • If you're running Windows, perform these steps before you begin repairs:

    • Make sure you back up your data.

    • If you’re running a Pro version of Windows, suspend BitLocker by following these directions.

    • If you're running a Home version of Windows and have enabled Windows Device Encryption, you will want to disable it. To disable it, press Win + I to open Settings and select Privacy & Security. Select Device Encryption, then toggle the Device Encryption setting to Off.

    • Find your product key or link your Windows license to a Microsoft account to make sure you can re-activate Windows after the change.

    Ask FixBot

    Add Comment

  2. Framework Laptop 12 Mainboard Replacement, Power down your laptop: step 2, image 1 of 3 Framework Laptop 12 Mainboard Replacement, Power down your laptop: step 2, image 2 of 3 Framework Laptop 12 Mainboard Replacement, Power down your laptop: step 2, image 3 of 3
    • Before you begin repairs, unplug your laptop and shut it down from the operating system. This ensures that the laptop isn't in standby/suspend mode.

    • The indicator LEDs along the edges should be unlit. The laptop should be silent.

    • If you accidentally turn on the laptop during repair, hold the power button down for 10 seconds to shut it down.

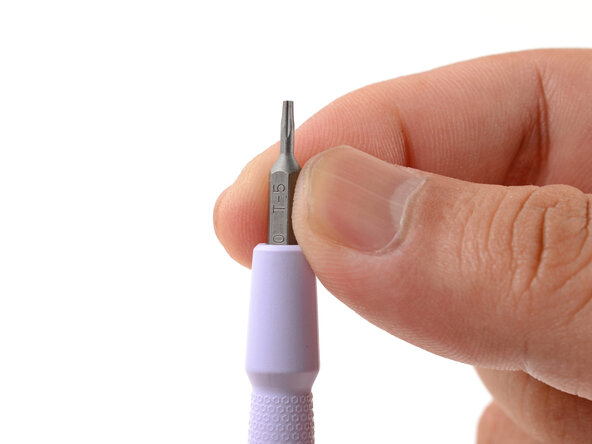
    • Make sure your Framework Screwdriver has the T5 Torx bit (labeled as T-5) facing outwards. If it's not, pull the bit out and flip it.

    Ask FixBot

    Add Comment

  3. Framework Laptop 12 Mainboard Replacement, Set your laptop down: step 3, image 1 of 1
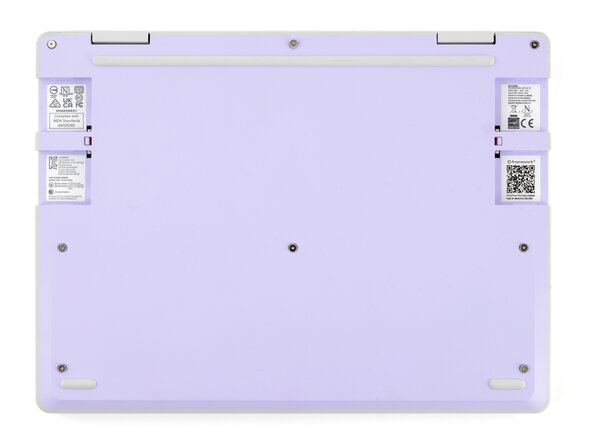
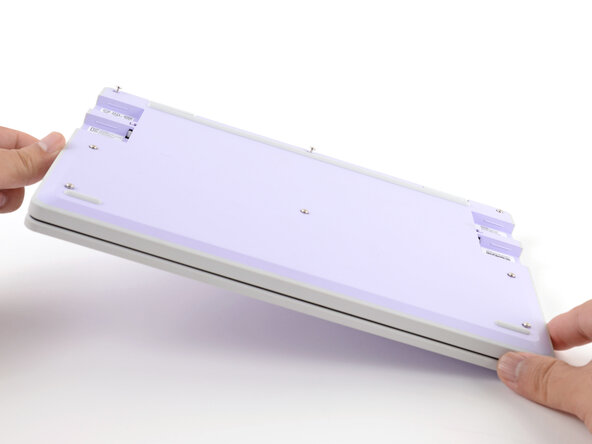
    • Set your Framework Laptop face-down on a clean work surface.

    Ask FixBot

    Add Comment

  4. Framework Laptop 12 Mainboard Replacement, Remove the Expansion Cards: step 4, image 1 of 2 Framework Laptop 12 Mainboard Replacement, Remove the Expansion Cards: step 4, image 2 of 2
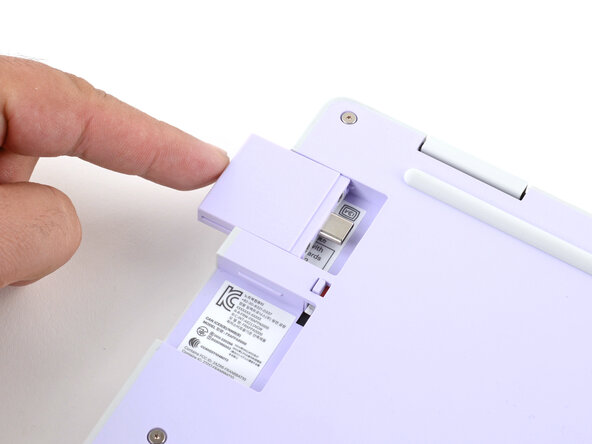
    • Use your fingers to flip the two Expansion Card latches (one for each side) into the unlocked position.

    • The latches display a red bar when they're unlocked.

    Ask FixBot

    Add Comment

  5. Framework Laptop 12 Mainboard Replacement: step 5, image 1 of 3 Framework Laptop 12 Mainboard Replacement: step 5, image 2 of 3 Framework Laptop 12 Mainboard Replacement: step 5, image 3 of 3
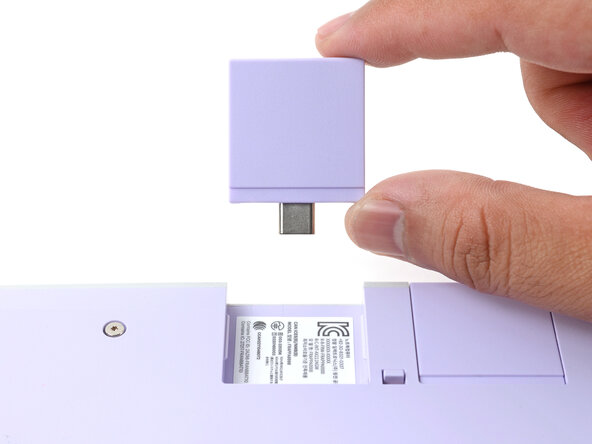
    • Grip the lip of an Expansion Card with your fingers.

    • Pull the Expansion Card out of its slot and remove it.

    • If you have trouble pulling the Expansion Card out, you can also use the flat end of your Framework Screwdriver to push against the lip.

    • Repeat this procedure to remove all remaining Expansion Cards.

    Ask FixBot

    Add Comment

  6. Framework Laptop 12 Mainboard Replacement, Loosen the bottom screws: step 6, image 1 of 2 Framework Laptop 12 Mainboard Replacement, Loosen the bottom screws: step 6, image 2 of 2
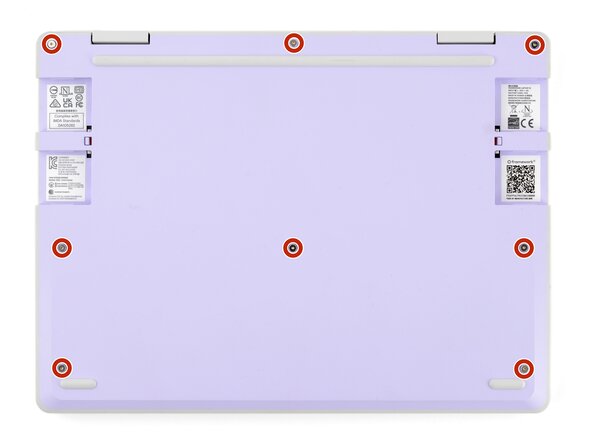
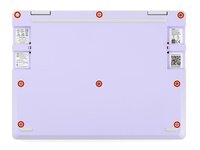
    • Use your Framework Screwdriver to fully loosen the eight captive T5 Torx screws on the bottom of your laptop.

    • Most screws in your Framework Laptop (including these) are captive—they're designed to stay in place after you loosen them.

    • Your laptop comes with a spare set of screws in the frame above the battery. Be careful—the replacement screws aren't captive.

    Ask FixBot

    Add Comment

  7. Framework Laptop 12 Mainboard Replacement, Flip your laptop over: step 7, image 1 of 1
    • Flip your laptop face-up on your work surface.

    Ask FixBot

    Add Comment

  8. Framework Laptop 12 Mainboard Replacement, Open your laptop: step 8, image 1 of 2 Framework Laptop 12 Mainboard Replacement, Open your laptop: step 8, image 2 of 2
    • Open the laptop lid so that both the screen and the base lie flat on your work surface.

    Ask FixBot

    Add Comment

  9. Framework Laptop 12 Mainboard Replacement, Remove the Input Cover: step 9, image 1 of 3 Framework Laptop 12 Mainboard Replacement, Remove the Input Cover: step 9, image 2 of 3 Framework Laptop 12 Mainboard Replacement, Remove the Input Cover: step 9, image 3 of 3
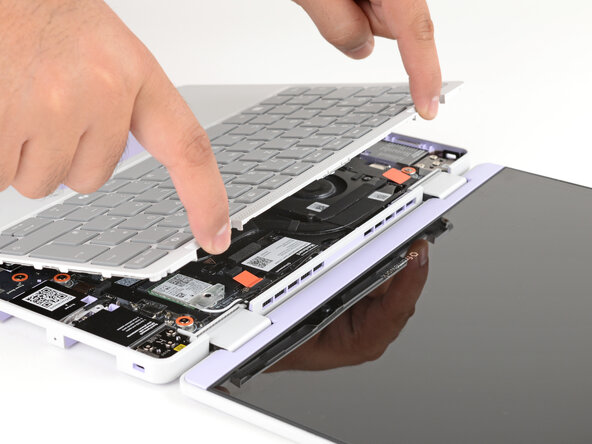
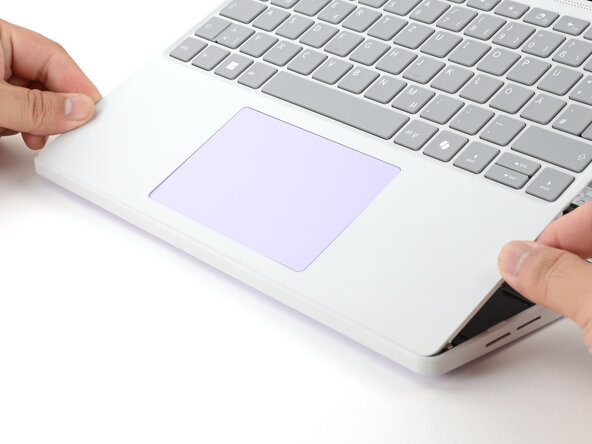
    • Use your fingers to grip the Input Cover in the hinge cutouts.

    • Lift upwards to swing the Input Cover up from the base of the laptop.

    • You may feel resistance from the magnets. If the cover feels like it's snagged, check that you've fully loosened the screws on the bottom of your laptop.

    • Remove the Input Cover.

    Ask FixBot

    Add Comment

  10. Framework Laptop 12 Mainboard Replacement, Loosen the battery screws: step 10, image 1 of 1
    • Use your Framework Screwdriver to loosen the six captive T5 Torx screws securing the battery.

    Ask FixBot

    Add Comment

  11. Framework Laptop 12 Mainboard Replacement, Disconnect the battery: step 11, image 1 of 2 Framework Laptop 12 Mainboard Replacement, Disconnect the battery: step 11, image 2 of 2
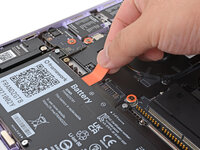
    • Grab the orange battery tab with your fingers and lift straight up to disconnect the battery.

    • The battery connector can be tight, requiring some force. If it feels like part of the battery won't come up, check that the battery screws are fully loosened.

    Ask FixBot

    Add Comment

  12. Framework Laptop 12 Mainboard Replacement, Remove the battery: step 12, image 1 of 2 Framework Laptop 12 Mainboard Replacement, Remove the battery: step 12, image 2 of 2
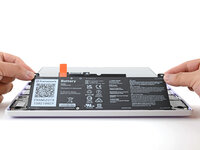
    • Lift and remove the battery from the laptop.

    Ask FixBot

    Add Comment

  13. Framework Laptop 12 Mainboard Replacement, Open the memory flap: step 13, image 1 of 2 Framework Laptop 12 Mainboard Replacement, Open the memory flap: step 13, image 2 of 2
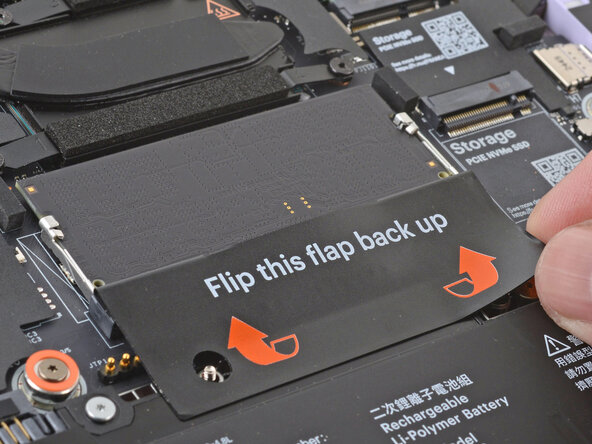
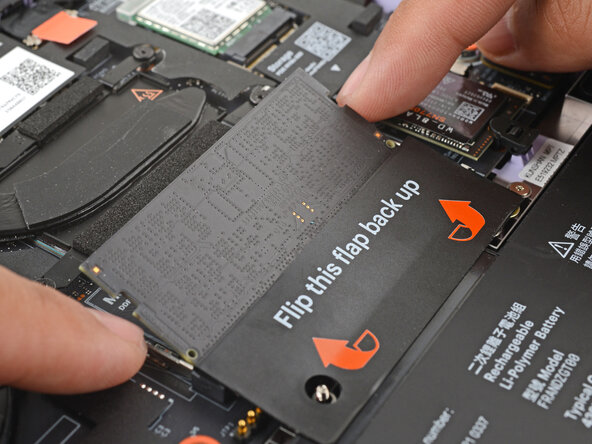
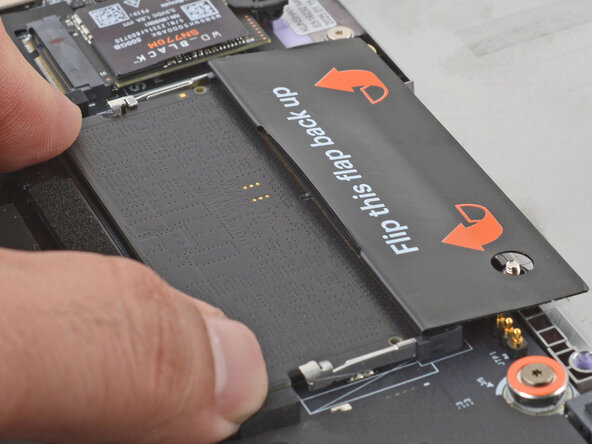
    • Use your fingers to flip open the memory flap.

    Ask FixBot

    Add Comment

  14. Framework Laptop 12 Mainboard Replacement, Remove the memory module: step 14, image 1 of 2 Framework Laptop 12 Mainboard Replacement, Remove the memory module: step 14, image 2 of 2
    • Use your fingers to spread the clips on both sides of the memory module apart to unclip the memory.

    • The memory module will pop up to an angle when it's unclipped.

    Ask FixBot

    Add Comment

  15. Framework Laptop 12 Mainboard Replacement: step 15, image 1 of 2 Framework Laptop 12 Mainboard Replacement: step 15, image 2 of 2
    • Use your fingers to grab the memory module by its edges.

    • Slide the memory module out of its socket and remove it.

    Ask FixBot

    Add Comment

  16. Framework Laptop 12 Mainboard Replacement, Unlatch the SSD: step 16, image 1 of 2 Framework Laptop 12 Mainboard Replacement, Unlatch the SSD: step 16, image 2 of 2
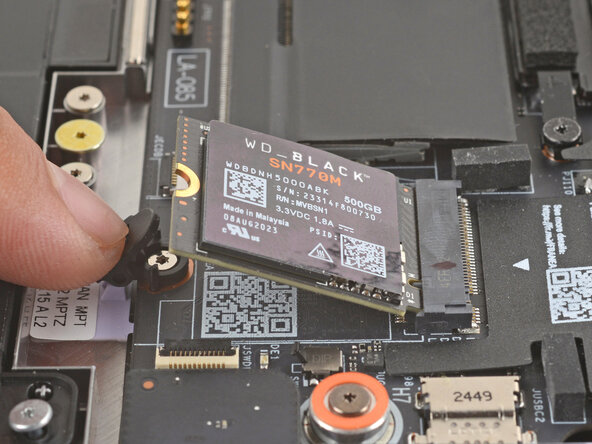
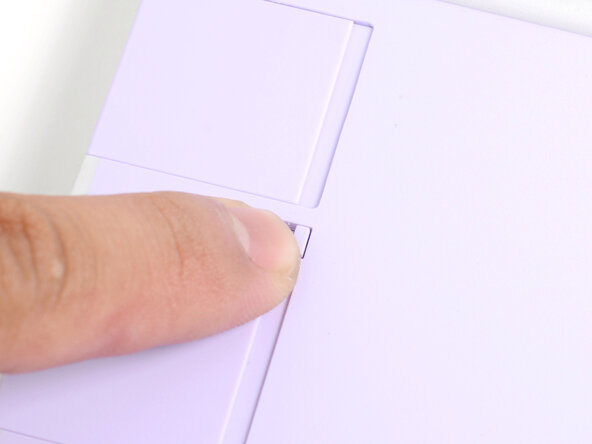
    • Use your finger to press down on the black SSD latch to unlatch the SSD.

    • The SSD will pop up to an angle when it's unlatched.

    Ask FixBot

    Add Comment

  17. Framework Laptop 12 Mainboard Replacement, Remove the SSD: step 17, image 1 of 3 Framework Laptop 12 Mainboard Replacement, Remove the SSD: step 17, image 2 of 3 Framework Laptop 12 Mainboard Replacement, Remove the SSD: step 17, image 3 of 3
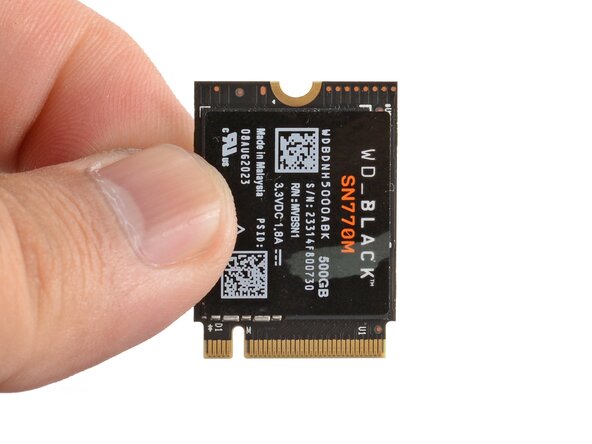
    • Grab the SSD by its edges and pull it out of its socket.

    • Remove the SSD.

    Ask FixBot

    Add Comment

  18. Framework Laptop 12 Mainboard Replacement, Loosen the Audio Board screw: step 18, image 1 of 1
    • Use your Framework Screwdriver to loosen the captive T5 Torx screw securing the Audio Board along the left edge of the laptop.

    Ask FixBot

    Add Comment

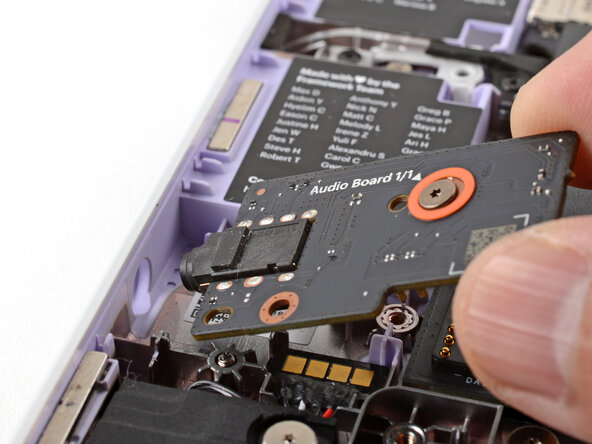
  19. Framework Laptop 12 Mainboard Replacement, Remove the Audio Board: step 19, image 1 of 3 Framework Laptop 12 Mainboard Replacement, Remove the Audio Board: step 19, image 2 of 3 Framework Laptop 12 Mainboard Replacement, Remove the Audio Board: step 19, image 3 of 3
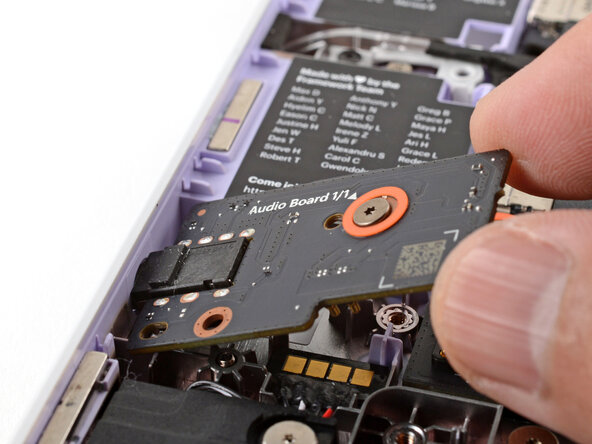
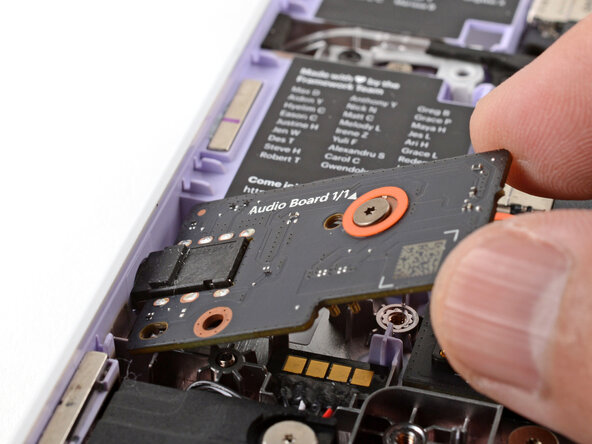
    • Use your fingers to lift the right edge of the Audio Board and pull it out of its recess.

    • Remove the Audio Board.

    Ask FixBot

    Add Comment

  20. Framework Laptop 12 Mainboard Replacement, Loosen the Power Button Board screw: step 20, image 1 of 1
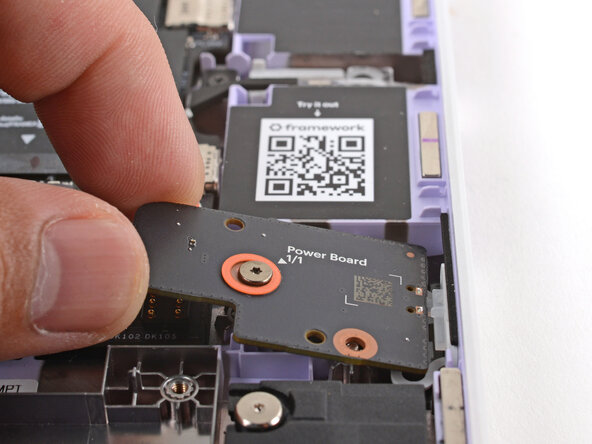
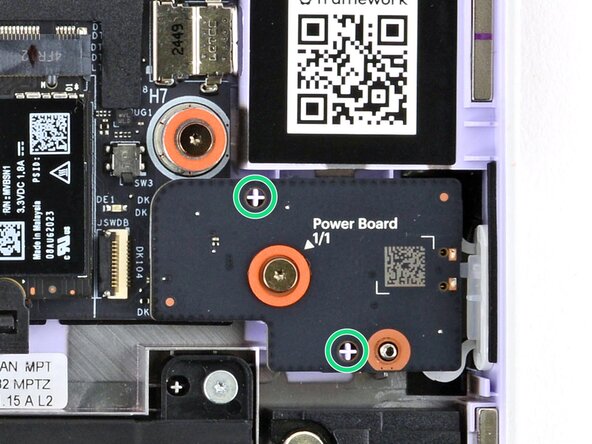
    • Use your Framework Screwdriver to loosen the captive T5 Torx screw securing the Power Button Board (labeled "Power Board").

    Ask FixBot

    Add Comment

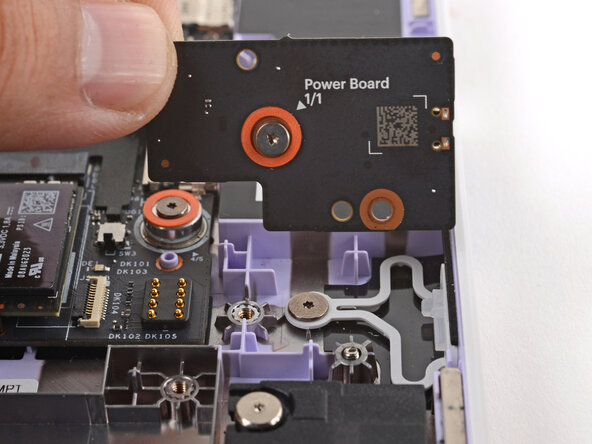
  21. Framework Laptop 12 Mainboard Replacement, Remove the Power Button Board: step 21, image 1 of 2 Framework Laptop 12 Mainboard Replacement, Remove the Power Button Board: step 21, image 2 of 2
    • Use your fingers to lift and remove the Power Button Board.

    Ask FixBot

    Add Comment

  22. Framework Laptop 12 Mainboard Replacement, Loosen the Wi-Fi card screw: step 22, image 1 of 1
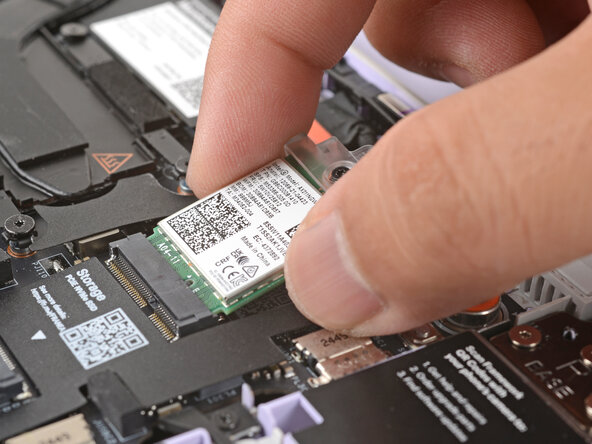
    • Use your Framework Screwdriver to loosen the captive T5 Torx screw securing the Wi-Fi card bracket.

    • The Wi-Fi card will pop up slightly when you unfasten the bracket.

    Ask FixBot

    Add Comment

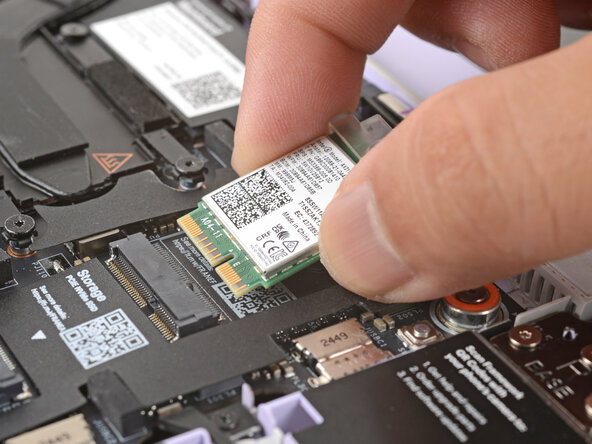
  23. Framework Laptop 12 Mainboard Replacement, Reposition the Wi-Fi card: step 23, image 1 of 2 Framework Laptop 12 Mainboard Replacement, Reposition the Wi-Fi card: step 23, image 2 of 2
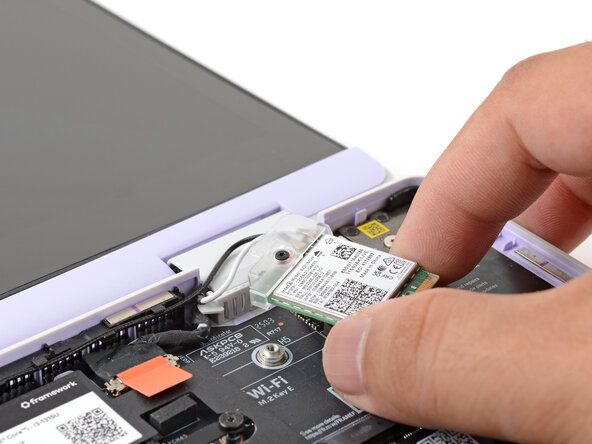
    • Be careful not to strain the two delicate antenna cables attached to the Wi-Fi card.

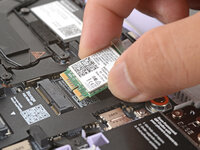
    • Grab the Wi-Fi card by its edges and slide it out of its socket.

    Ask FixBot

    Add Comment

  24. Framework Laptop 12 Mainboard Replacement: step 24, image 1 of 2 Framework Laptop 12 Mainboard Replacement: step 24, image 2 of 2
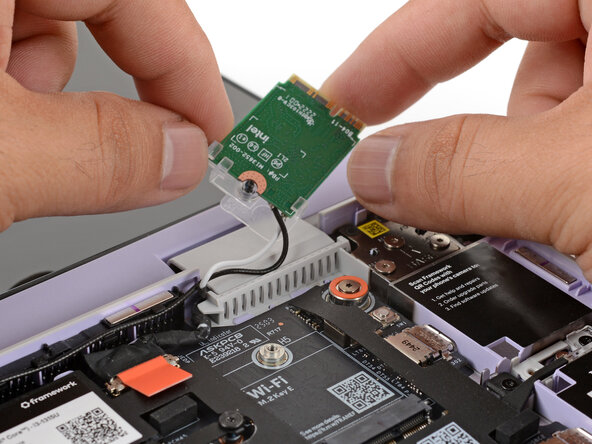
    • Carefully reposition the Wi-Fi card away from the Mainboard.

    • If the clear bracket or an antenna cable detaches from the Wi-Fi card, don't worry! You can reattach it during reassembly.

    Ask FixBot

    Add Comment

  25. Framework Laptop 12 Mainboard Replacement, Disconnect the webcam cable: step 25, image 1 of 2 Framework Laptop 12 Mainboard Replacement, Disconnect the webcam cable: step 25, image 2 of 2
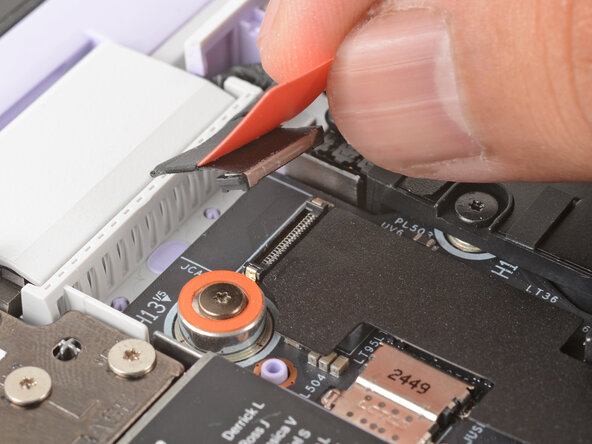
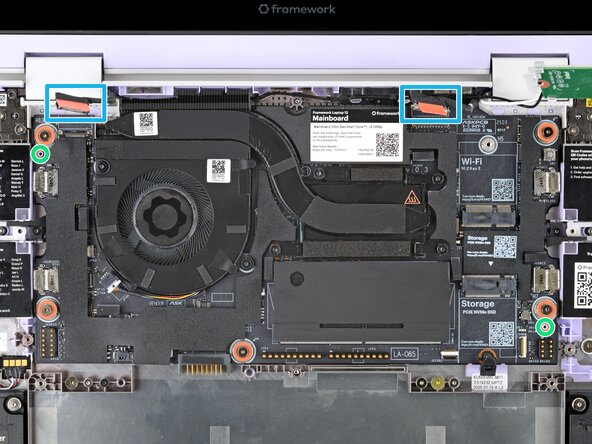
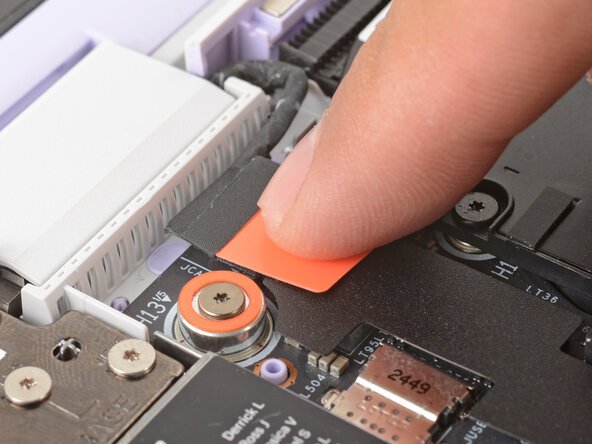
    • Use your fingers to grab the orange tab on the webcam cable, located near the left hinge.

    • Lift straight up to disconnect the cable.

    Ask FixBot

    Add Comment

  26. Framework Laptop 12 Mainboard Replacement, Disconnect the display cable: step 26, image 1 of 2 Framework Laptop 12 Mainboard Replacement, Disconnect the display cable: step 26, image 2 of 2
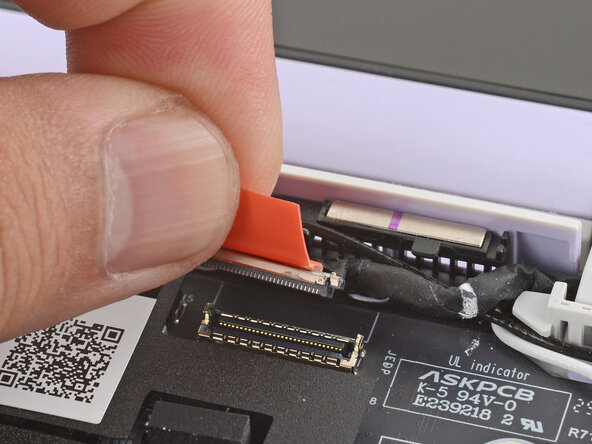
    • Use your fingers to grab the orange tab on the display cable, located near the right hinge.

    • Lift straight up to disconnect the cable.

    Ask FixBot

    Add Comment

  27. Framework Laptop 12 Mainboard Replacement, Loosen the Mainboard screws: step 27, image 1 of 1
    • Use your Framework Screwdriver to loosen the five captive T5 Torx screws securing the Mainboard.

    • These screws are also physically marked with an orange ring on the Mainboard.

    Ask FixBot

    Add Comment

  28. Framework Laptop 12 Mainboard Replacement, Remove the Mainboard: step 28, image 1 of 2 Framework Laptop 12 Mainboard Replacement, Remove the Mainboard: step 28, image 2 of 2
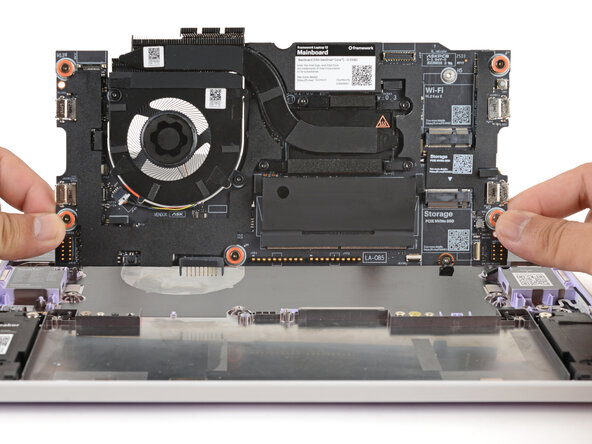
    • Make sure you've removed all Expansion Cards. Installed cards will hold the Mainboard in place.

    • Use your fingers to grab the Mainboard by its edges.

    • Lift and remove the Mainboard.

    Ask FixBot

    Add Comment

  29. Framework Laptop 12 Mainboard Replacement, Disassembly complete: step 29, image 1 of 1
    • Congratulations on completing disassembly! The remaining steps will show how to reassemble your Framework Laptop.

    Ask FixBot

    Add Comment

  30. Framework Laptop 12 Mainboard Replacement, Install the Mainboard: step 30, image 1 of 2 Framework Laptop 12 Mainboard Replacement, Install the Mainboard: step 30, image 2 of 2
    • Carefully lay the Mainboard in the laptop.

    • Use the two alignment pins to help align the Mainboard to the laptop.

    • Be careful not to trap the webcam or display cables under the Mainboard as you set it in place.

    Ask FixBot

    Add Comment

  31. Framework Laptop 12 Mainboard Replacement: step 31, image 1 of 1
    • Use your Framework Screwdriver to tighten the five captive T5 Torx screws to secure the Mainboard.

    • Tighten the screws until they're snug. Don't over-tighten them, or you may strip the screws.

    Ask FixBot

    Add Comment

  32. Framework Laptop 12 Mainboard Replacement: step 32, image 1 of 2 Framework Laptop 12 Mainboard Replacement: step 32, image 2 of 2
    • Use your fingers to grab the display cable by its orange tab.

    • Align and press the display cable straight down onto its connector.

    Ask FixBot

    Add Comment

  33. Framework Laptop 12 Mainboard Replacement: step 33, image 1 of 2 Framework Laptop 12 Mainboard Replacement: step 33, image 2 of 2
    • Use your fingers to grab the webcam cable by its orange tab.

    • Align and press the webcam cable straight down onto its connector.

    Ask FixBot

    Add Comment

  34. Framework Laptop 12 Mainboard Replacement, Install the Wi-Fi card: step 34, image 1 of 2 Framework Laptop 12 Mainboard Replacement, Install the Wi-Fi card: step 34, image 2 of 2
    • Use your fingers to carefully move the Wi-Fi card over the Mainboard.

    Ask FixBot

    Add Comment

  35. Framework Laptop 12 Mainboard Replacement: step 35, image 1 of 2 Framework Laptop 12 Mainboard Replacement: step 35, image 2 of 2
    • Hold the Wi-Fi card by its edges. Don't touch the gold contacts with your fingers. If you do, wipe the contacts with a clean, lint-free cloth to remove any finger oils.

    • Align the Wi-Fi card's gold contacts and notch with the socket on the Mainboard.

    • Insert the Wi-Fi card into the socket at a shallow angle. The gold contacts should mostly be covered by the socket.

    • If the clear Wi-Fi card bracket or antenna cables got disconnected during the repair, go to the next step. If they're still attached, skip down three steps.

    Ask FixBot

    Add Comment

  36. Framework Laptop 12 Mainboard Replacement, Reconnect a disconnected antenna cable: step 36, image 1 of 3 Framework Laptop 12 Mainboard Replacement, Reconnect a disconnected antenna cable: step 36, image 2 of 3 Framework Laptop 12 Mainboard Replacement, Reconnect a disconnected antenna cable: step 36, image 3 of 3
    • Follow the next two steps if an antenna cable disconnected from the Wi-Fi card.

    • Hold the Wi-Fi card down with your finger.

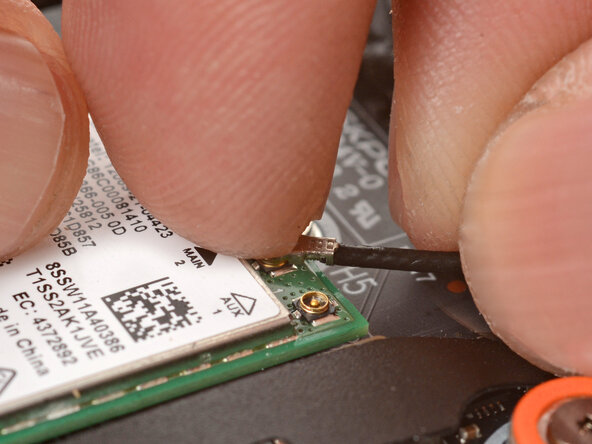
    • Position the black antenna cable connector over the left Wi-Fi card's coaxial socket.

    • Tweezers can help position the connector.

    • Use your finger to press the connector into place. You should feel a faint click, and the cable will stay attached to the socket by itself.

    • These connectors are very delicate! If the connector doesn't feel like it's clicking in place, reposition the connector and try again.

    • Repeat the procedure with the white antenna cable.

    Ask FixBot

    Add Comment

  37. Framework Laptop 12 Mainboard Replacement: step 37, image 1 of 2 Framework Laptop 12 Mainboard Replacement: step 37, image 2 of 2
    • Slide the Wi-Fi bracket over the top edge of the Wi-Fi card.

    Ask FixBot

    Add Comment

  38. Framework Laptop 12 Mainboard Replacement, Tighten the Wi-Fi card screw: step 38, image 1 of 1
    • Use your Framework Screwdriver to tighten the captive T5 Torx screw to secure the Wi-Fi card.

    Ask FixBot

    Add Comment

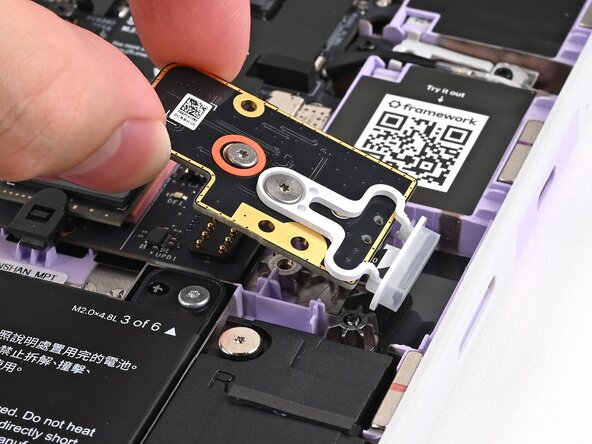
  39. Framework Laptop 12 Mainboard Replacement, Install the Power Button Board: step 39, image 1 of 3 Framework Laptop 12 Mainboard Replacement, Install the Power Button Board: step 39, image 2 of 3 Framework Laptop 12 Mainboard Replacement, Install the Power Button Board: step 39, image 3 of 3
    • Use your fingers to lay the Power Button Board in place.

    • Use the two plastic pins on the laptop to align the Power Button Board.

    Ask FixBot

    Add Comment

  40. Framework Laptop 12 Mainboard Replacement: step 40, image 1 of 1
    • Use your Framework Screwdriver to tighten the captive T5 Torx screw to secure the Power Button Board.

    • Tighten the screw until it's snug. Don't over-tighten it, or you may strip the screw.

    Ask FixBot

    Add Comment

  41. Framework Laptop 12 Mainboard Replacement, Install the Audio Board: step 41, image 1 of 3 Framework Laptop 12 Mainboard Replacement, Install the Audio Board: step 41, image 2 of 3 Framework Laptop 12 Mainboard Replacement, Install the Audio Board: step 41, image 3 of 3
    • Insert the Audio Board into the laptop at an angle to help align the headphone jack.

    • Use the two plastic alignment pins on the laptop to help with final alignment.

    Ask FixBot

    Add Comment

  42. Framework Laptop 12 Mainboard Replacement: step 42, image 1 of 1
    • Use your Framework Screwdriver to tighten the captive T5 Torx screw to secure the Audio Board.

    • Tighten the screw until it's snug. Don't over-tighten it, or you may strip the screw.

    Ask FixBot

    Add Comment

  43. Framework Laptop 12 Mainboard Replacement, Install the SSD: step 43, image 1 of 2 Framework Laptop 12 Mainboard Replacement, Install the SSD: step 43, image 2 of 2
    • Hold the SSD by its edges. Don't touch the gold contacts with your fingers. If you do, wipe the contacts with a clean, lint-free cloth to remove any finger oils.

    • Align the SSD's gold contacts with its socket.

    • Insert the SSD into the socket at a shallow angle. The gold contacts should mostly be covered by the socket.

    • The SSD fits into the socket in one orientation. If it doesn't feel like it fits, try flipping the module.

    Ask FixBot

    Add Comment

  44. Framework Laptop 12 Mainboard Replacement: step 44, image 1 of 3 Framework Laptop 12 Mainboard Replacement: step 44, image 2 of 3 Framework Laptop 12 Mainboard Replacement: step 44, image 3 of 3
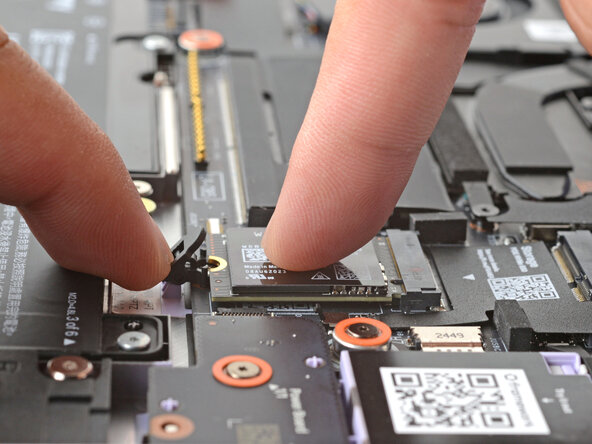
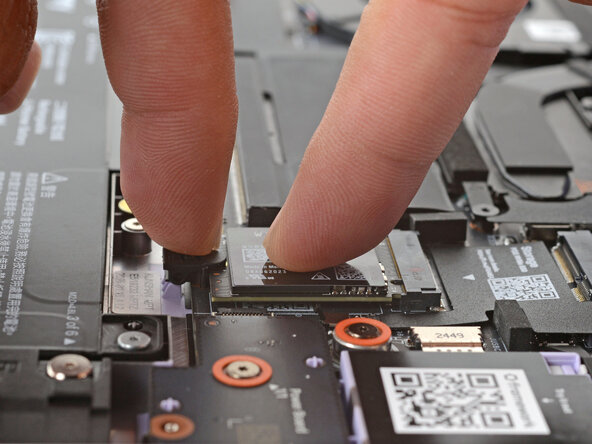
    • Use your finger to press down on the black SSD latch to keep it open.

    • Use another finger to press the SSD down until it lays flat.

    • If the SSD doesn't fit in the latch, you may need to insert the SSD further into its socket.

    • Use your finger to close the latch to secure the SSD.

    • You should hear a click, and the SSD should no longer pop up.

    Ask FixBot

    Add Comment

  45. Framework Laptop 12 Mainboard Replacement, Install the memory module: step 45, image 1 of 3 Framework Laptop 12 Mainboard Replacement, Install the memory module: step 45, image 2 of 3 Framework Laptop 12 Mainboard Replacement, Install the memory module: step 45, image 3 of 3
    • Hold the memory module by its edges. Don't touch the gold contacts with your fingers. If you do, wipe the contacts with a clean, lint-free cloth to remove any finger oils.

    • Orient the module with the label facing down and align the gold contacts with the socket.

    • Insert the contact edge into the socket at a shallow angle. The gold contacts should mostly be covered by the socket.

    • Press the edges of the memory module down until the side clips lock it in place.

    Ask FixBot

    Add Comment

  46. Framework Laptop 12 Mainboard Replacement: step 46, image 1 of 2 Framework Laptop 12 Mainboard Replacement: step 46, image 2 of 2
    • Flip the memory flap back over the memory module.

    Ask FixBot

    Add Comment

  47. Framework Laptop 12 Mainboard Replacement, Install the battery: step 47, image 1 of 1
    • Lay the battery in its recess in the laptop.

    Ask FixBot

    Add Comment

  48. Framework Laptop 12 Mainboard Replacement: step 48, image 1 of 2 Framework Laptop 12 Mainboard Replacement: step 48, image 2 of 2
    • Use your finger to push the battery down near its connector to reconnect it.

    Ask FixBot

    Add Comment

  49. Framework Laptop 12 Mainboard Replacement: step 49, image 1 of 1
    • Use your Framework Screwdriver to tighten the six captive T5 Torx screws to secure the battery.

    • Tighten the screws until they're snug. Don't over-tighten them, or you may strip the screws.

    Ask FixBot

    Add Comment

  50. Framework Laptop 12 Mainboard Replacement, Install the Input Cover: step 50, image 1 of 3 Framework Laptop 12 Mainboard Replacement, Install the Input Cover: step 50, image 2 of 3 Framework Laptop 12 Mainboard Replacement, Install the Input Cover: step 50, image 3 of 3
    • Angle the bottom edge of the Input Cover towards the base of the laptop.

    • Align and insert the bottom edge of the Input Cover into the base of the laptop.

    • Make sure the slots along the bottom edge of the Input Cover slide into the tabs in the base.

    • Lower the Input Cover's top edge onto the laptop until the magnets snap it in place.

    • Make sure the Input Cover sits neatly within the laptop frame and no corners are popping up.

    Ask FixBot

    Add Comment

  51. Framework Laptop 12 Mainboard Replacement: step 51, image 1 of 2 Framework Laptop 12 Mainboard Replacement: step 51, image 2 of 2
    • Close the laptop lid.

    • Flip your laptop face-down on a clean work surface.

    Ask FixBot

    Add Comment

  52. Framework Laptop 12 Mainboard Replacement, Tighten the bottom screws: step 52, image 1 of 2 Framework Laptop 12 Mainboard Replacement, Tighten the bottom screws: step 52, image 2 of 2
    • Use your Framework Screwdriver to tighten the eight captive T5 Torx screws on the bottom of your laptop.

    • Tighten the screws until they're snug. Don't over-tighten them, or you may strip the screws.

    Ask FixBot

    Add Comment

  53. Framework Laptop 12 Mainboard Replacement, Install the Expansion Cards: step 53, image 1 of 3 Framework Laptop 12 Mainboard Replacement, Install the Expansion Cards: step 53, image 2 of 3 Framework Laptop 12 Mainboard Replacement, Install the Expansion Cards: step 53, image 3 of 3
    • Slide each Expansion Card into its Expansion Card slot.

    Ask FixBot

    Add Comment

  54. Framework Laptop 12 Mainboard Replacement, Lock the Expansion Card slots: step 54, image 1 of 2 Framework Laptop 12 Mainboard Replacement, Lock the Expansion Card slots: step 54, image 2 of 2
    • If there's a red bar showing under either Expansion Card latch, use your finger to flip the latch and lock the Expansion Card into its slot.

    • Locking the Expansion Card slots helps keep the cards in place when you unplug cables from them.

    Ask FixBot

    Add Comment

Conclusion

You finished fixing your Framework Laptop!

Take your e-waste to an R2 or e-Stewards certified recycler.

If you need help, contact Framework support.

Cancel: I did not complete this guide.

Arthur Shi

Member since: 01/03/18

343,000 Reputation

914 Guides authored

Team

Guide Team Member of Guide Team

Staff

10 Members

19,238 Guides authored

0 Guide Comments

Add Comment

View Statistics:

Past 24 Hours: 2

Past 7 Days: 67

Past 30 Days: 104

All Time: 1,199