Introduction
Adhesive patching is a quick and easy way to repair gear in the field.
If you're new to gear tape, start with Patch an Insulated Jacket with Repair Tape for the basics. This guide goes further, covering advanced techniques, practical tips, and creative solutions for using adhesive patches in a variety of situations.
Tenacious Tape® and other gear tapes will only stick to synthetic, non-stretch fabrics such as Down Sweaters™, Nano Puff® Jackets, rain shells and ski gear. They will not adhere to natural fabrics (like denim or cotton), high-stretch fabrics, or anything with a high pile like fleece.
Tenacious Tape® can be acquired here, on the Gear Aid website, or by contacting Patagonia Customer Service.
Alternatively, Patagonia products can be taken to a local retail store for repair evaluation or sent in to Patagonia through their mail-in repair service.
Let's get fixing!
What you need
-
-
The patch should extend at least ¼–½in (~6–13 mm) beyond the hole on all sides. This ensures the tape has a strong grip on undamaged fabric.
-
Avoid tiny patches. Anything smaller than ½ in (~13 mm) may not adhere effectively.
-
You can cut your own shapes or use pre-cut patches.
-
Pre-cut patches have been die or laser cut, giving them clean and consistent edges.
-
-
-
If the holes are more than 2 in (~5 cm) apart, cover them with two patches.
-
If multiple holes are close together, you can use one large patch or overlap smaller ones.
-
Overlapping smaller patches is especially useful for irregular-shaped damage such as L-shaped tears.
-
-
-
If down or synthetic fill is escaping through the hole, use your fingers or the back of a pen to gently push it back inside before patching.
-
-
-
Whenever possible, choose or cut a patch that follows the garment’s design lines. This improves the look of the repair and helps avoid patching over seams.
-
Diamond baffles
-
Curved seams
-
Sharp angular fabric pieces
-
-
-
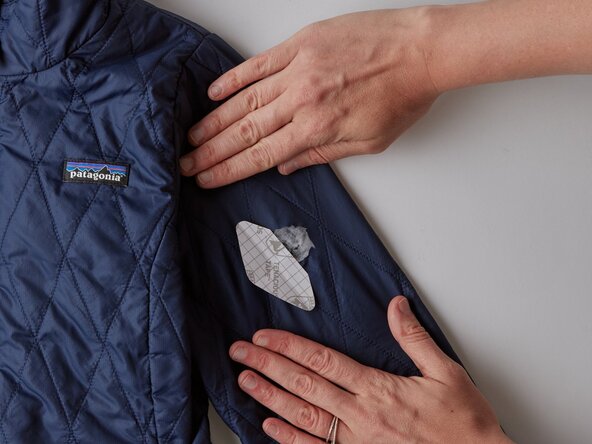
Arrange the fabric first: Lay the damaged area flat in the position you want before applying gear tape. Use pattern weights to hold it in place if needed.
-
Tuck insulation inside: Make sure feathers or synthetic fill are pushed back into the hole.
-
Peel patch carefully: Don’t peel the entire backing at once. Start with one edge, place it down, then peel and apply gradually.
-
Apply slowly: Smooth as you go to avoid wrinkles and ensure strong adhesion.
-
-
-
Cut two patches that each extend at least ½" (~13 mm) beyond the damaged area on all sides.
-
Apply one patch to the inside and one to the outside.
-
If the item is semi-transparent, make the outer patch at least ¼" (~6 mm) larger than the inside patch on all sides. Align them so the inside patch isn’t visible from the outside.
-
-
-
-
Cover multiple holes at once: Cut strips of gear tape up to 4 in (~10 cm) long to span a worn section.
-
Seam overlap is okay: It’s fine for the tape to cross over the seam, its unavoidable in this repair!
-
-
-
Light test: Hold the item up to the light. If light passes through the area more easily than the rest of the fabric, it’s threadbare.
-
Extend the patch: Treat threadbare fabric as damage. Cut a patch that extends at least ¼" in (~6 mm) beyond the entire threadbare zone on all sides.
-
-
-
Cut a piece of similar fabric that is slightly larger than the open area.
-
Use tweezers to Insert the fabric into the hole so it sits on top of the insulation but behind the damaged fabric, completely covering the gap.
-
Apply gear tape over the hole.
-
-
-
When there is damage within ⅛ in (~3 mm) of an edge, use an edge wrap technique to ensure full coverage and durability.
-
Wrap the patch snugly around the edge without pinching or folding.
-
-
-
The same edge wrapping technique in the previous step also applies to damaged cuffs, hems and collars.
-
-
-
Cut a patch: Shape the patch to match the area’s design lines (see Step 4).
-
Create a slit: Cut a slit in the patch to create tabs that can wrap smoothly around the damaged area without bunching.
-
Corners of welt pockets or zipper vents
-
Areas that are curved or three-dimensional
-
-
-
Lightly apply heat to the patched surface to quickly activate the glue at ~250° Fahrenheit / ~120° Celsius.
-
Immediately after heating, apply firm pressure with a cold press for 15–30 seconds. An iron pattern weight or a metal cup works well.
-
-
-
If you don't have Tenacious Tape® or another professional gear tape when your item tears, use whatever is available.
-
If you have a choice between tapes, pick one that won’t leave sticky residue, this makes it easier to replace with Tenacious Tape® later:
-
-
-
If professional gear tape wasn’t available in the field and another tape was used, remove it before applying Tenacious Tape®:
-
Remove the old tape slowly to avoid tearing or enlarging the damaged area.
-
Use rubbing alcohol to remove any adhesive residue:
-
Coat any residue with rubbing alcohol and let it sit.
-
Wipe away with cotton balls or a rag, then let the area dry completely.
-
The new tape won’t stick if any moisture remains, use heat from an iron (see Step 14) to speed drying.
-
-
-
Hold the area taught with one hand.
-
Use the other hand to rub the adhesive eraser over the sticky area in straight motions.
-
If the residue can't be removed, cut away the soiled fabric and apply a larger patch.
-
-
-
Get the right tools: Metal dies are available online for public purchase.
-
Use a proper surface: Place the die on a self-healing cutting mat and strike with a rubber mallet.
-
Optional hot-cut method: For cleaner edges and increased durability, heat the edge of the die with a lighter before pressing.
-