Free Shipping on Domestic Orders $75+

What you need

This teardown is not a repair guide. To repair your Picstart Plus Development Programmer, use our service manual.

    1. Picstart Plus Development Programmer Teardown, Picstart Plus Development Programmer Teardown: step 1, image 1 of 3 Picstart Plus Development Programmer Teardown, Picstart Plus Development Programmer Teardown: step 1, image 2 of 3 Picstart Plus Development Programmer Teardown, Picstart Plus Development Programmer Teardown: step 1, image 3 of 3
      • Remove 4 Phillips screws located on the back side of the holding plate.

      • After the screws are removed, remove the case of the development programmer.

      • Carefully take out the circuit board with component side facing up. Put the case aside.

      Ask FixBot

      Add Comment

    2. Picstart Plus Development Programmer Teardown: step 2, image 1 of 2 Picstart Plus Development Programmer Teardown: step 2, image 2 of 2
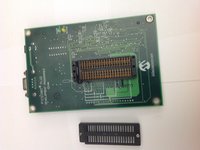
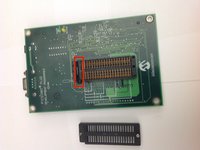
      • Disconnect the microcontroller module from the main board using a spudger or a similar tool.

      • Set the microcontroller module aside.

      Ask FixBot

      Add Comment

    3. Picstart Plus Development Programmer Teardown: step 3, image 1 of 2 Picstart Plus Development Programmer Teardown: step 3, image 2 of 2
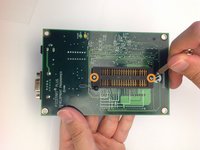
      • Flip over the mainboard so that the component side is facing down and remove the small Pan head screws that holds the cover of the IC holder

      • Remove the cover of the IC holder.

      Ask FixBot

      Add Comment

    4. Picstart Plus Development Programmer Teardown: step 4, image 1 of 2 Picstart Plus Development Programmer Teardown: step 4, image 2 of 2
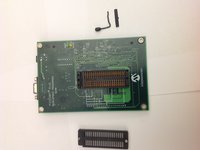
      • Remove the IC holder lever along with the small metal plate that covers the lever.

      • Set the lever and the lever cover aside.

      Ask FixBot

      Add Comment

    5. Picstart Plus Development Programmer Teardown: step 5, image 1 of 1
      • Congratulations! You have completely dismantled the PICSTART Plus Development Programmer!

      • All the extracted components are shown in the picture.

      Ask FixBot

      Add Comment

Brad

Member since: 11/17/13

656 Reputation

2 Guides authored

0 Guide Comments

Add Comment

View Statistics:

Past 24 Hours: 1

Past 7 Days: 10

Past 30 Days: 52

All Time: 3,159