Free Shipping on Domestic Orders $75+

What you need

Tools

This teardown is not a repair guide. To repair your Nvidia Shield Controller, use our service manual.

    1. Nvidia Shield Controller Teardown, Nvidia Shield Controller Teardown: step 1, image 1 of 2 Nvidia Shield Controller Teardown, Nvidia Shield Controller Teardown: step 1, image 2 of 2
      • Nvidia Shield Normal Controller, without Display, so it's just a controller if you don't have other shield device

      • Micro-USB 2.0

      • 3.5 mm stereo headphone jack

      • Charge indicator

      • Still don't know how this controller connected to PC without cables, the controller can be connected to a Nvidia Shield through WiFi but no idea if this works with pc.

      Ask FixBot

      Add Comment

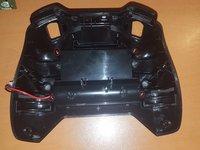
    2. Nvidia Shield Controller Teardown: step 2, image 1 of 3 Nvidia Shield Controller Teardown: step 2, image 2 of 3 Nvidia Shield Controller Teardown: step 2, image 3 of 3
      • Flipping over the device reveals 6 screws. No hidden screws here.

      • 6*screws, use T7 screwdriver for all of screws。

      • Careful, you will need some force to open the clips holding the device together.

      • Once you are inside the device remove the two ribbon cables.

      Ask FixBot

      Add Comment

    3. Nvidia Shield Controller Teardown, Vibration Motors: step 3, image 1 of 2 Nvidia Shield Controller Teardown, Vibration Motors: step 3, image 2 of 2
      • Remove two cable for the vibration motors and one cable for the battery.

      • There are 2 Vibration motors

      Ask FixBot

      Add Comment

      • Remove the two screws holding the logic board to the device.

      • Carefully remove the logic board.

      Ask FixBot

      Add Comment

    4. Nvidia Shield Controller Teardown, Battery: step 5, image 1 of 2 Nvidia Shield Controller Teardown, Battery: step 5, image 2 of 2
      • we can found battery part under the motherboard

      • Screw*4

      • LC18650 Lithium-ion Battery: 3.6V/2200mAh/7.92Wh

      Ask FixBot

      Add Comment

    5. Nvidia Shield Controller Teardown, Motherboard: step 6, image 1 of 2 Nvidia Shield Controller Teardown, Motherboard: step 6, image 2 of 2
      • Main PCB - Front:

      • TLV320AIC3204 (Very Low-Power Stereo Audio CODEC)

      • Atmel ATXMEGA32A4U-AU (8-bit Microcontroller)

      • Potentiometers

      • Main PCB - Back:

      • Microchip SST25WF020A (SPI Flash 2Mbit 1.8V)

      • Ozmo2000 431-B0 (WiFi Integrated Chip)

      • ADG3 3088CP (Unknown)

      Ask FixBot

      Add Comment

    6. Nvidia Shield Controller Teardown, LT&RT: step 7, image 1 of 3 Nvidia Shield Controller Teardown, LT&RT: step 7, image 2 of 3 Nvidia Shield Controller Teardown, LT&RT: step 7, image 3 of 3
      • Remove 6*screw

      • careful,don't broke the potentiometer

      Ask FixBot

      Add Comment

    7. Nvidia Shield Controller Teardown: step 8, image 1 of 3 Nvidia Shield Controller Teardown: step 8, image 2 of 3 Nvidia Shield Controller Teardown: step 8, image 3 of 3
      • cover part

      • 4*screw

      • PIC32MX120F032D-I/PT (32-bit Microcontroller)

      • PIC18F26K22-I/ML (8-bit Microcontroller)

      Ask FixBot

      Add Comment

13314877

Member since: 11/24/15

90 Reputation

1 Guide authored

19 Guide Comments

Where is the Shield console teardown?

Steve Hanson - Reply Share

I brought the controller to the hardware store and found that a T6 fit perfect. I bought it and used it, worked fine. I know the description says T7. May be a mistake

Farrid Mailloux - Reply Share

Farrid is Correct I have both a T7 and T6 Screwdriver and the T7 IS TOO BIG!, T6 fits perfectly. Just a heads up to anyone who needs to go out and but a Single screwdriver.

drestine - Reply Share

You are right. It’s T6, not T7.

nguyen bui thanh - Reply Share

Looking to replace ribbon cables. Anyone know where i can buy them?

Dave Miller - Reply Share

Add Comment

View Statistics:

Past 24 Hours: 3

Past 7 Days: 31

Past 30 Days: 117

All Time: 13,378