
Free Shipping on Domestic Orders $75+

This teardown is not a repair guide. To repair your Apple Wireless Keyboard, use our service manual.

  1. Apple Wireless Keyboard Teardown, Apple Wireless Keyboard Teardown: step 1, image 1 of 3 Apple Wireless Keyboard Teardown, Apple Wireless Keyboard Teardown: step 1, image 2 of 3 Apple Wireless Keyboard Teardown, Apple Wireless Keyboard Teardown: step 1, image 3 of 3
    • This is a teardown and chip ID of an Apple A1255 wireless keyboard.

    • This teardown is mainly featuring the removal process of the main board and not how to remove the keycaps.

    • This keyboard was made in 2007, and is made out of aluminum. It also features a QWERTY layout, and a sleek modern look, similar to Apple devices of today.

  2. Apple Wireless Keyboard Teardown: step 2, image 1 of 3 Apple Wireless Keyboard Teardown: step 2, image 2 of 3 Apple Wireless Keyboard Teardown: step 2, image 3 of 3
    • For step one, just use any coin to turn and release the battery latch/screw.

    • This keyboard uses 3 AA batteries for power.

  3. Apple Wireless Keyboard Teardown: step 3, image 1 of 3 Apple Wireless Keyboard Teardown: step 3, image 2 of 3 Apple Wireless Keyboard Teardown: step 3, image 3 of 3
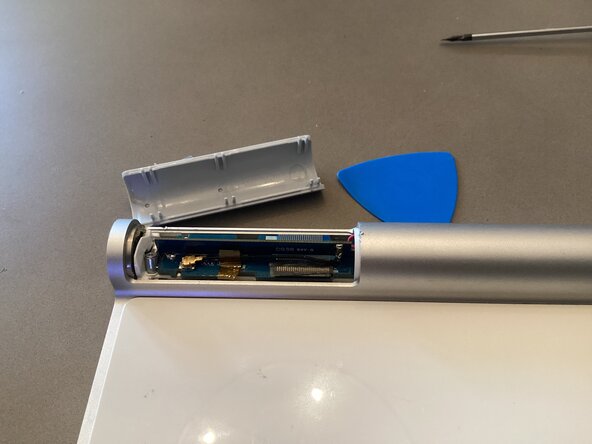
    • To start actual disassembly, use a flathead or opening pick to pry off the plastic covering the antenna and the main board underneath.

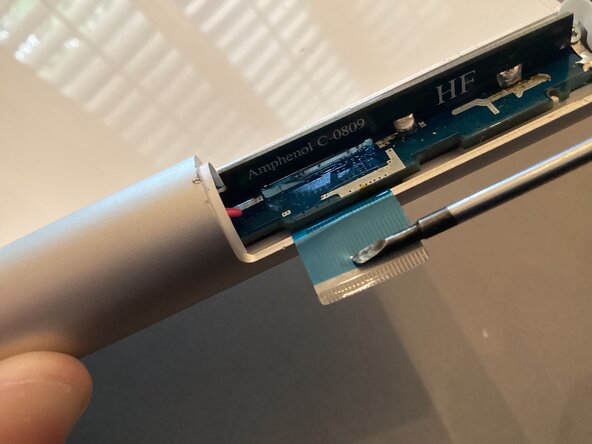
    • Be careful, as there is a coax cable, a ribbon cable to the keyboard membrane, and the antenna board right underneath. You don’t want to risk damaging any of these.

  4. Apple Wireless Keyboard Teardown: step 4, image 1 of 3 Apple Wireless Keyboard Teardown: step 4, image 2 of 3 Apple Wireless Keyboard Teardown: step 4, image 3 of 3
    • For the next step, use a flathead or a toothpick to unlatch the flex cable connecting to the keyboard membrane. Try very carefully as you can easily damage the flex cable.

    • Disconnecting the coax cable isn’t necessary unless you were to replace the antenna board.

  5. Apple Wireless Keyboard Teardown: step 5, image 1 of 3 Apple Wireless Keyboard Teardown: step 5, image 2 of 3 Apple Wireless Keyboard Teardown: step 5, image 3 of 3
    • Using a Philips head screwdriver, unscrew the small screw to the right of the main board holding it down.

    • After this, use a flathead or opening pick to slowly lift out the main PCB. Do not pull it out fully, as there are two cables that need to be released.

  6. Apple Wireless Keyboard Teardown: step 6, image 1 of 3 Apple Wireless Keyboard Teardown: step 6, image 2 of 3 Apple Wireless Keyboard Teardown: step 6, image 3 of 3
    • Carefully pull out the PCB.

    • Disconnect the two wires on each side of the PCB to fully remove it. The PCB is blue and has two main chips on it.

    • Make sure to be careful around the antenna board, as it is very fragile and can break off easily.

  7. Apple Wireless Keyboard Teardown: step 7, image 1 of 2 Apple Wireless Keyboard Teardown: step 7, image 2 of 2
    • Here is the main PCB:

    • The main chip is a Broadcom BCM 2042 SoC, with Bluetooth 2.0 capabilities. It is a transceiver, keyboard scanner, and a baseband processor in one small BGA type chip.

    • The secondary main chip is a small flash memory/EEPROM chip from ST microelectronics. It stores device configuration data.

    • There is also a small voltage regulator for the battery too.

  8. Apple Wireless Keyboard Teardown: step 8, image 1 of 1
    • That’s the end of this teardown. I hope someone finds this interesting or helpful. Thanks for viewing.

Mr.CircuitBoard

Member since: 04/30/25

1,347 Reputation

14 Guides authored

0 Guide Comments

Add Comment

View Statistics:

Past 24 Hours: 7

Past 7 Days: 42

Past 30 Days: 208

All Time: 208