Free Shipping on Domestic Orders $75+

why! W650SZ Hard Drive Replacement

What you need

  1. why! W650SZ Hard Drive Replacement, Battery: step 1, image 1 of 3 why! W650SZ Hard Drive Replacement, Battery: step 1, image 2 of 3 why! W650SZ Hard Drive Replacement, Battery: step 1, image 3 of 3
    • Slide the latch on the right to the unlocked position.

    • Slide the latch on the left to the unlocked position.

    • Remove the battery pack from the slot.

    Ask FixBot

    Add Comment

  2. why! W650SZ Hard Drive Replacement, why! W650SZ Bottom Cover Replacement: step 2, image 1 of 3 why! W650SZ Hard Drive Replacement, why! W650SZ Bottom Cover Replacement: step 2, image 2 of 3 why! W650SZ Hard Drive Replacement, why! W650SZ Bottom Cover Replacement: step 2, image 3 of 3
    • With your #0 Philips screwdriver remove the 2 screws from the bottom panel.

    • Now you can remove the bottom cover.

    Ask FixBot

    Add Comment

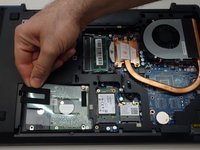
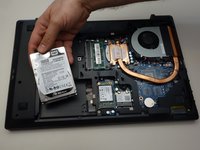
  3. why! W650SZ Hard Drive Replacement, Hard Drive: step 3, image 1 of 2 why! W650SZ Hard Drive Replacement, Hard Drive: step 3, image 2 of 2
    • Lift out the plastic tab (including the rubber part that holds the HDD in its slot).

    • Slide the drive to the left to disengage the connector then lift to remove the HDD from its SATA3 port.

    Ask FixBot

    Add Comment

Conclusion

To reassemble your device, follow these instructions in reverse order.

Cancel: I did not complete this guide.

Special thanks to these translators:

fr en

100%

Jerry Wheeler is helping us fix the world! Want to contribute?
Start translating ›

Felice Suglia

Member since: 06/15/13

33,589 Reputation

283 Guides authored

0 Guide Comments

Add Comment

View Statistics:

Past 24 Hours: 0

Past 7 Days: 9

Past 30 Days: 31

All Time: 390