Free Shipping on Domestic Orders $75+

This translation was generated by a machine and has not been reviewed by a person yet. Speak this language? Review it.

why! NS5xAU Motherboard Replacement

Views: 205

View statistics:

Past 24 Hours:
3
Past 7 Days:
12
Past 30 Days:
57
All Time:
205
Comments: 0

No one has left comments on this guide. Will you be first?

Go to guide comments
Completed: 0

No one has marked this guide "completed." Will you be the first?

Favorites: 0

No one has favorited (and subscribed to) this guide. Will you be the first?

Time Required: 25 minutes
Difficulty: Moderate
Community-Contributed Guide

An awesome member of our community made this guide. It was not created by iFixit staff.

Action Shots

Be an action hero! This guide needs images that better demonstrate how to perform specific actions.

why! NS5xAU Motherboard Replacement

Introduction

Go to step 1 ↓

This guide shows you how to replace the motherboard of the why! NS5xAU.

    1. why! NS5xAU Motherboard Replacement, Cover 1: step 1, image 1 of 3 why! NS5xAU Motherboard Replacement, Cover 1: step 1, image 2 of 3 why! NS5xAU Motherboard Replacement, Cover 1: step 1, image 3 of 3
      • Unscrew the screws circled in red.

      • Unscrew the screws circled in blue.

      • Insert the opening pick.

      Ask FixBot

      Add Comment

    2. why! NS5xAU Motherboard Replacement, Cover 2: step 2, image 1 of 2 why! NS5xAU Motherboard Replacement, Cover 2: step 2, image 2 of 2
      • Lift the cover.

      Ask FixBot

      Add Comment

    1. why! NS5xAU Motherboard Replacement, Battery cable: step 3, image 1 of 2 why! NS5xAU Motherboard Replacement, Battery cable: step 3, image 2 of 2
      • Unplug the cable.

      Ask FixBot

      Add Comment

    1. why! NS5xAU Motherboard Replacement, Keyboard 1: step 4, image 1 of 3 why! NS5xAU Motherboard Replacement, Keyboard 1: step 4, image 2 of 3 why! NS5xAU Motherboard Replacement, Keyboard 1: step 4, image 3 of 3
      • Insert the opening pick and unclip the keyboard.

      • Gently lift the keyboard to access the cables.

      Ask FixBot

      Add Comment

    2. why! NS5xAU Motherboard Replacement, Keyboard 2: step 5, image 1 of 3 why! NS5xAU Motherboard Replacement, Keyboard 2: step 5, image 2 of 3 why! NS5xAU Motherboard Replacement, Keyboard 2: step 5, image 3 of 3
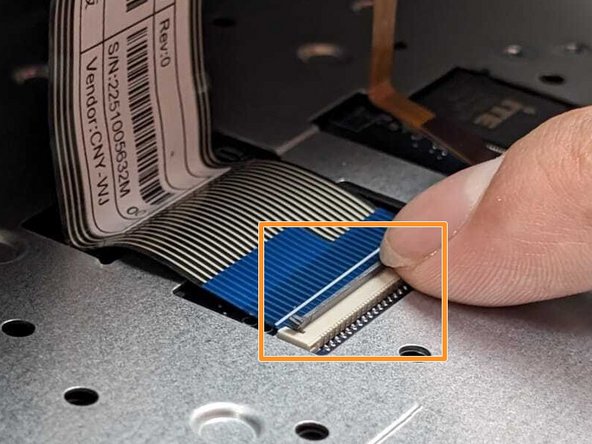
      • Disconnect the cable connectors.

      • Remove the cables and the keyboard.

      Ask FixBot

      Add Comment

    1. why! NS5xAU Motherboard Replacement, SSD: step 6, image 1 of 3 why! NS5xAU Motherboard Replacement, SSD: step 6, image 2 of 3 why! NS5xAU Motherboard Replacement, SSD: step 6, image 3 of 3
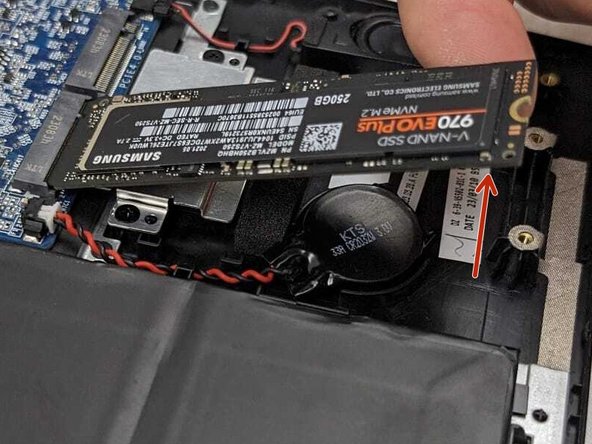
      • Unscrew the screw.

      • Lift the SSD and remove it.

      Ask FixBot

      Add Comment

    1. why! NS5xAU Motherboard Replacement, RAM: step 7, image 1 of 2 why! NS5xAU Motherboard Replacement, RAM: step 7, image 2 of 2
      • Spread the two metal arms apart.

      • Remove the RAM.

      Ask FixBot

      Add Comment

    1. why! NS5xAU Motherboard Replacement, Wifi 1: step 8, image 1 of 3 why! NS5xAU Motherboard Replacement, Wifi 1: step 8, image 2 of 3 why! NS5xAU Motherboard Replacement, Wifi 1: step 8, image 3 of 3
      • Remove the adhesive strip.

      • Unscrew the screw.

      • Remove the Wifi card.

      Ask FixBot

      Add Comment

    2. why! NS5xAU Motherboard Replacement, Wifi 2: step 9, image 1 of 2 why! NS5xAU Motherboard Replacement, Wifi 2: step 9, image 2 of 2
      • Unclip the cables.

      Ask FixBot

      Add Comment

    1. why! NS5xAU Motherboard Replacement, Heatsink 1: step 10, image 1 of 3 why! NS5xAU Motherboard Replacement, Heatsink 1: step 10, image 2 of 3 why! NS5xAU Motherboard Replacement, Heatsink 1: step 10, image 3 of 3
      • Peel off the adhesive strip.

      • Unscrew the 6 screws, following the numerical order.

      Ask FixBot

      Add Comment

    2. why! NS5xAU Motherboard Replacement, CPU Cooler 2: step 11, image 1 of 3 why! NS5xAU Motherboard Replacement, CPU Cooler 2: step 11, image 2 of 3 why! NS5xAU Motherboard Replacement, CPU Cooler 2: step 11, image 3 of 3
      • Finish unscrewing the screws.

      • Unplug the cable.

      Ask FixBot

      Add Comment

    3. why! NS5xAU Motherboard Replacement, Heat Sink 3: step 12, image 1 of 2 why! NS5xAU Motherboard Replacement, Heat Sink 3: step 12, image 2 of 2
      • Remove the heat sink.

      Ask FixBot

      Add Comment

    1. why! NS5xAU Motherboard Replacement, HPG 1: step 13, image 1 of 3 why! NS5xAU Motherboard Replacement, HPG 1: step 13, image 2 of 3 why! NS5xAU Motherboard Replacement, HPG 1: step 13, image 3 of 3
      • Remove the speaker.

      Ask FixBot

      Add Comment

    2. why! NS5xAU Motherboard Replacement, HPG 2: step 14, image 1 of 2 why! NS5xAU Motherboard Replacement, HPG 2: step 14, image 2 of 2
      • Disconnect the cable.

      Ask FixBot

      Add Comment

    1. why! NS5xAU Motherboard Replacement, Motherboard 1: step 15, image 1 of 3 why! NS5xAU Motherboard Replacement, Motherboard 1: step 15, image 2 of 3 why! NS5xAU Motherboard Replacement, Motherboard 1: step 15, image 3 of 3
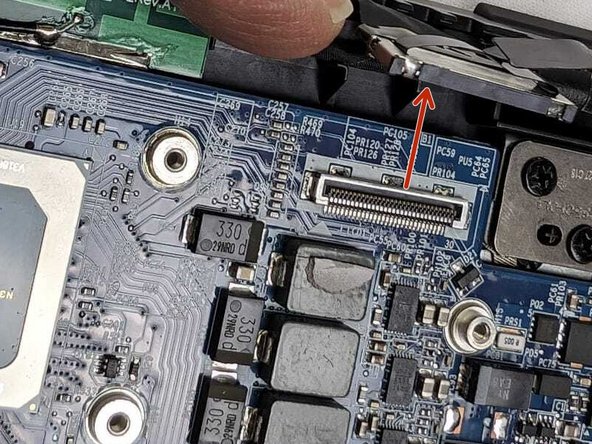
      • Unplug the CMOS battery.

      • Peel off the adhesive strip.

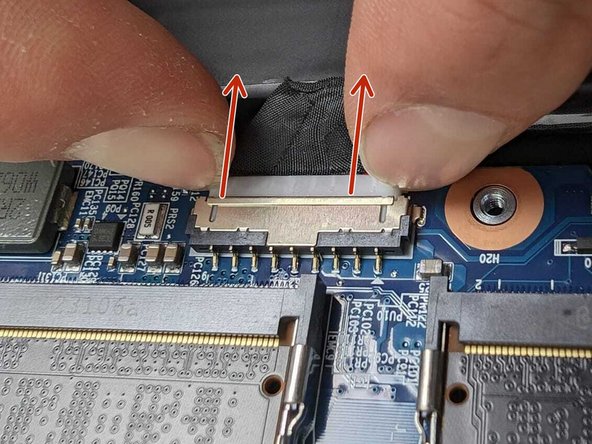
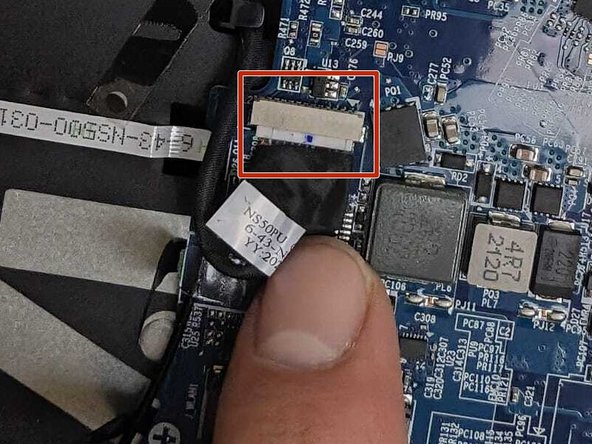
      • Unclip the cables.

      Ask FixBot

      Add Comment

    2. why! NS5xAU Motherboard Replacement, Motherboard 2: step 16, image 1 of 3 why! NS5xAU Motherboard Replacement, Motherboard 2: step 16, image 2 of 3 why! NS5xAU Motherboard Replacement, Motherboard 2: step 16, image 3 of 3
      • Unplug the cables.

      Ask FixBot

      Add Comment

    3. why! NS5xAU Motherboard Replacement, Motherboard 3: step 17, image 1 of 3 why! NS5xAU Motherboard Replacement, Motherboard 3: step 17, image 2 of 3 why! NS5xAU Motherboard Replacement, Motherboard 3: step 17, image 3 of 3
      • Unplug the cables.

      Ask FixBot

      Add Comment

    4. why! NS5xAU Motherboard Replacement, Motherboard 4: step 18, image 1 of 3 why! NS5xAU Motherboard Replacement, Motherboard 4: step 18, image 2 of 3 why! NS5xAU Motherboard Replacement, Motherboard 4: step 18, image 3 of 3
      • Unplug the cables.

      • Unscrew the screws.

      Ask FixBot

      Add Comment

    5. why! NS5xAU Motherboard Replacement, Motherboard 5: step 19, image 1 of 3 why! NS5xAU Motherboard Replacement, Motherboard 5: step 19, image 2 of 3 why! NS5xAU Motherboard Replacement, Motherboard 5: step 19, image 3 of 3
      • Unclip and remove the cable located underneath the keyboard.

      Ask FixBot

      Add Comment

    6. why! NS5xAU Motherboard Replacement, Motherboard 6: step 20, image 1 of 2 why! NS5xAU Motherboard Replacement, Motherboard 6: step 20, image 2 of 2
      • Lift the motherboard in the direction of the red arrows and remove it in the direction of the blue arrows.

      Ask FixBot

      Add Comment

Conclusion

To reassemble your device, follow the instructions in reverse order.

Cancel: I did not complete this guide.

Felice Suglia

Member since: 06/15/13

33,634 Reputation

283 Guides authored

0 Guide Comments

Add Comment

View Statistics:

Past 24 Hours: 3

Past 7 Days: 12

Past 30 Days: 57

All Time: 205