Free Shipping on Domestic Orders $75+

This translation was generated by a machine and has not been reviewed by a person yet. Speak this language? Review it.

why! L140/1PU Trackpad Replacement

What you need

    1. why! L140/1PU Trackpad Replacement, Cover: step 1, image 1 of 2 why! L140/1PU Trackpad Replacement, Cover: step 1, image 2 of 2
      • Unscrew the screws.

      • Lift the cover.

      Ask FixBot

      Add Comment

    1. why! L140/1PU Trackpad Replacement, Disconnection: step 2, image 1 of 2 why! L140/1PU Trackpad Replacement, Disconnection: step 2, image 2 of 2
      • For safety reasons, the battery must be disconnected before each intervention.

      • Disconnect the battery your fingers.

      • Other components can now be replaced safely.

      Ask FixBot

      Add Comment

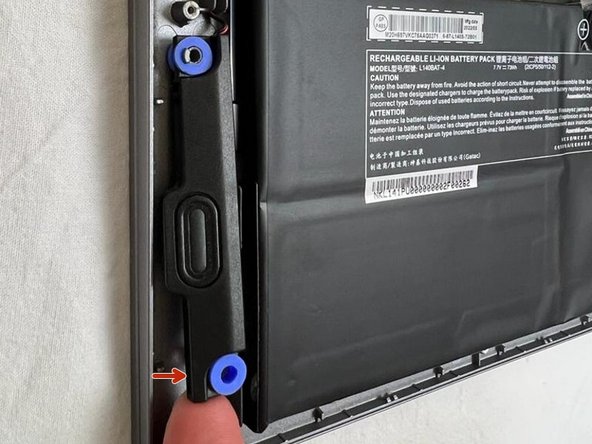
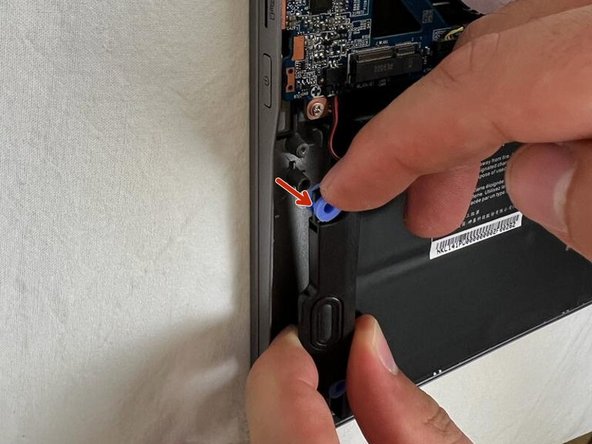
    1. why! L140/1PU Trackpad Replacement, Right Speaker: step 3, image 1 of 3 why! L140/1PU Trackpad Replacement, Right Speaker: step 3, image 2 of 3 why! L140/1PU Trackpad Replacement, Right Speaker: step 3, image 3 of 3
      • Remove the bottom of the speaker, (red arrow) then the top.

      • Unplug the connector, third photo, red rectangle

      Ask FixBot

      Add Comment

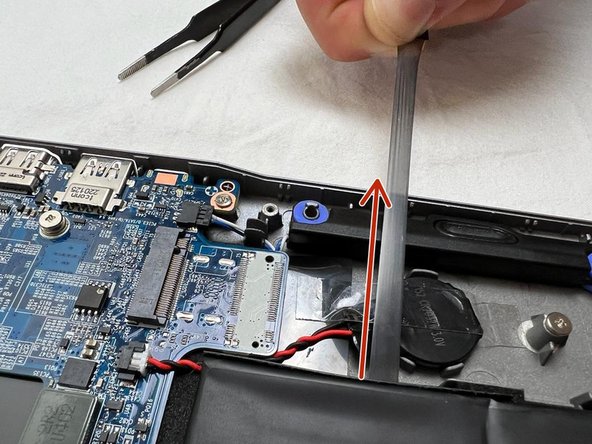
    1. why! L140/1PU Trackpad Replacement, Battery 1: step 4, image 1 of 1
      • There are 6 adhesive strips.

      Ask FixBot

      Add Comment

    2. why! L140/1PU Trackpad Replacement, Battery 2: step 5, image 1 of 3 why! L140/1PU Trackpad Replacement, Battery 2: step 5, image 2 of 3 why! L140/1PU Trackpad Replacement, Battery 2: step 5, image 3 of 3
      • You have to pull gently and steadily as indicated by the red arrows to remove them.

      Ask FixBot

      Add Comment

    3. why! L140/1PU Trackpad Replacement, Battery 3: step 6, image 1 of 3 why! L140/1PU Trackpad Replacement, Battery 3: step 6, image 2 of 3 why! L140/1PU Trackpad Replacement, Battery 3: step 6, image 3 of 3
      • Repeat on the other five tapes...

      Ask FixBot

      Add Comment

    4. why! L140/1PU Trackpad Replacement, Battery 4: step 7, image 1 of 2 why! L140/1PU Trackpad Replacement, Battery 4: step 7, image 2 of 2
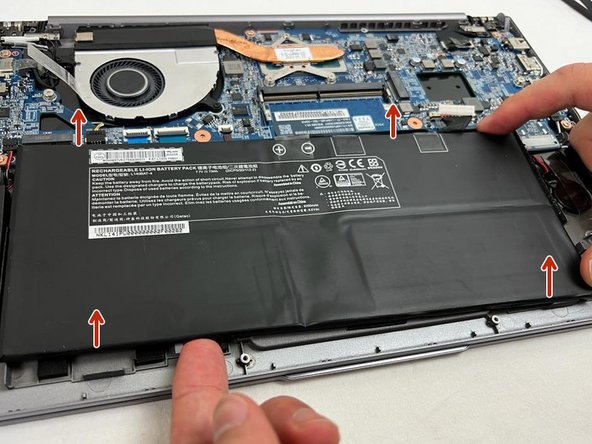
      • Remove the battery. (Lifting as per red arrows)

      Ask FixBot

      Add Comment

    1. why! L140/1PU Trackpad Replacement, Trackpad 1: step 8, image 1 of 3 why! L140/1PU Trackpad Replacement, Trackpad 1: step 8, image 2 of 3 why! L140/1PU Trackpad Replacement, Trackpad 1: step 8, image 3 of 3
      • Unclip the cable.

      • Remove the cable.

      Ask FixBot

      Add Comment

    2. why! L140/1PU Trackpad Replacement, Trackpad 2: step 9, image 1 of 3 why! L140/1PU Trackpad Replacement, Trackpad 2: step 9, image 2 of 3 why! L140/1PU Trackpad Replacement, Trackpad 2: step 9, image 3 of 3
      • Peel off the adhesive strip from the keyboard.

      • Unscrew the 3 screws.

      • Slightly open the cover.

      Ask FixBot

      Add Comment

    3. why! L140/1PU Trackpad Replacement, Trackpad 3: step 10, image 1 of 3 why! L140/1PU Trackpad Replacement, Trackpad 3: step 10, image 2 of 3 why! L140/1PU Trackpad Replacement, Trackpad 3: step 10, image 3 of 3
      • Gently lift the trackpad by pushing it from underneath.

      • Slide the trackpad in the direction of the orange arrow to remove it.

      Ask FixBot

      Add Comment

Conclusion

To reassemble your device, follow the instructions in reverse order.

Cancel: I did not complete this guide.

Felice Suglia

Member since: 06/15/13

33,634 Reputation

283 Guides authored

0 Guide Comments

Add Comment

View Statistics:

Past 24 Hours: 2

Past 7 Days: 8

Past 30 Days: 53

All Time: 312