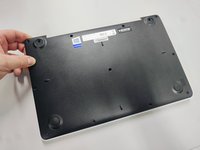
Free Shipping on Domestic Orders $75+

jp.ik Leap T304 Battery Replacement Replacement

What you need

  1. jp.ik Leap T304 Battery Replacement Replacement, Rear Cover: step 1, image 1 of 1
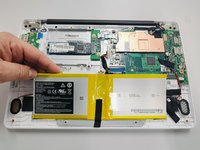
    • First ensure your laptop is turned off and check if you have the necessary tools

  2. jp.ik Leap T304 Battery Replacement Replacement: step 2, image 1 of 2 jp.ik Leap T304 Battery Replacement Replacement: step 2, image 2 of 2
    • All screws are identified by circles. Pay special attention to the yellow circles, as the rubber feet hide screws.

  3. jp.ik Leap T304 Battery Replacement Replacement: step 3, image 1 of 3 jp.ik Leap T304 Battery Replacement Replacement: step 3, image 2 of 3 jp.ik Leap T304 Battery Replacement Replacement: step 3, image 3 of 3
    • With the opening tool, remove a rubber foot.

    • For this action you will have to exert some force, because the foot is glued with a resistant glue.

  4. jp.ik Leap T304 Battery Replacement Replacement: step 4, image 1 of 1
    • Remove all screws with a Philips screwdriver PH1

    • All screws are the same so don't worry about identifying them.

  5. jp.ik Leap T304 Battery Replacement Replacement: step 5, image 1 of 3 jp.ik Leap T304 Battery Replacement Replacement: step 5, image 2 of 3 jp.ik Leap T304 Battery Replacement Replacement: step 5, image 3 of 3
    • With the plastic tool, insert between the plastics and gently pry open.

    • With your fingers continue to force open the bottom cover on the side indicated in the figure.

    • You will feel and hear several clicks, perfectly normal, nothing is breaking. Remove the cover completely.

  6. jp.ik Leap T304 Battery Replacement Replacement: step 6, image 1 of 1
    • Finally, we have the laptop open and ready to replace most of its components. Look elsewhere on how to replace a component.

    • To close the laptop just follow this guide in reverse.

  7. jp.ik Leap T304 Battery Replacement Replacement, Battery Replacement or Removal: step 7, image 1 of 1
    • Be careful. Don't touch, if not necessary, any electrical part of the product and ensure you're properly grounded.

  8. jp.ik Leap T304 Battery Replacement Replacement: step 8, image 1 of 1
    • Remove mylers shown in the picture.

    • Save them for the battery assembly steps.

  9. jp.ik Leap T304 Battery Replacement Replacement: step 9, image 1 of 2 jp.ik Leap T304 Battery Replacement Replacement: step 9, image 2 of 2
    • Disconnect the cable marked in the figure gently, pulling it out of the connector.

  10. jp.ik Leap T304 Battery Replacement Replacement: step 10, image 1 of 2 jp.ik Leap T304 Battery Replacement Replacement: step 10, image 2 of 2
    • Gently remove the battery.

    • CAUTION!!

    • Some products may have this battery fixed with double-sided adhesive tape. In these cases, use a wide spatula to remove the battery without bending it.

    • SAFETY WARNING!

    • Never bend or puncture the battery. Danger of explosion. If you detect a swollen or damaged battery, handle it with extreme care and place it in a protective container.

Conclusion

To reassemble your device, follow these instructions in reverse order.

One other person completed this guide.

Nelson Oliveira

Member since: 02/03/23

741 Reputation

4 Guides authored

0 Guide Comments

Add Comment

View Statistics:

Past 24 Hours: 1

Past 7 Days: 13

Past 30 Days: 46

All Time: 1,276