
ionvac SmartClean V2 Battery Replacement

Dylan and 3 other contributors
Last updated on Aug 18, 2025
Views: 3.9K
View statistics:
- Past 24 Hours:
- 3
- Past 7 Days:
- 30
- Past 30 Days:
- 108
- All Time:
- 3,902
Comments: 3
1 comment on steps, 2 guide comments.
Go to guide commentsCompleted: 1 2
1 person has marked this guide "completed." Will you be next?
2 people have marked this guide "completed." Including you — great job!
Favorites: 0 1
No one has favorited (and subscribed to) this guide. Will you be the first?
1 person has favorited (and subscribed to) this guide — and that's you!
Featured Student Guide
This guide has been the hard work of our awesome students and is found to be exceptionally cool by the iFixit staff.
Introduction
Go to step 1 ↓If you notice that your ionvac SmartClean V2 has a shorter runtime or decreased performance, it may be time to replace the batteries. This guide demonstrates how to remove the lithium-ion battery unit from the bottom of the robot vacuum.
This is a quick and simple repair, but handle all parts gently during removal and reinstallation. Before you begin, power off your ionvac SmartClean V2 and disconnect it from the charging dock.
Caution: If you notice the battery is puffy or smells strange, it may be swollen. Be careful when handling a swollen battery as it can be a fire risk. For more information on swollen batteries and what to do with them, take a look at the What to Do With a Swollen Battery guide.
What you need
Tools


-
-
-
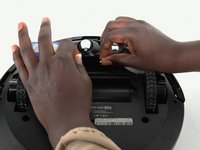
Flip your ionvac upside down so the wheels are pointed upwards and the side brushes are furthest from you.
 Ask FixBot
-
-
-
Remove the 2 screws that secure the battery door.
-
Lift the battery door to reveal the lithium ion battery.
-
-
-
-
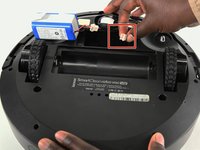
Disconnect the battery by squeezing down on the cream-colored tabs of the battery connectors and pulling them apart.
-
-


To reassemble your device, follow these instructions in reverse order.
Cancel: I did not complete this guide.
One other person completed this guide.

Team

University of Colorado Denver, Team 1-1, Campeau Fall 2023 Member of University of Colorado Denver, Team 1-1, Campeau Fall 2023
UCDENVER-CAMPEAU-F23S1G1
7 Members
132 Guides authored
2 Guide Comments
need instructions for installation of battery in TZUMI ion vac smart clean robo vac V4
need instructions for installation of battery in TZUMI ionvac smart clean robovac V4
