Introduction
The battery gives the iRobot the capability to clean smoothly and efficiently for hours. The device may need a battery replacement due to being warned out over time or overcharging the battery.
What you need
-
-
-
After locating the panel, locate the screw (should be around the top center).
-
-
-
-
Insert the screwdriver and turn counter clockwise (left) to loosen the screw.
-
-
-
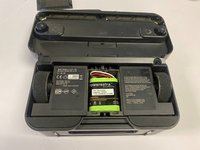
Once the screw is completely taken off, remove the panel to reveal the battery.
-
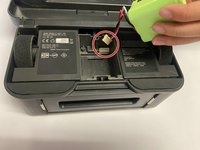
The battery will have a wire, follow the wire which will lead to a plastic white clip (pin). Pull the wire clip upwards carefully until the all pins are separated.
-

 Ask FixBot


To reassemble your device, follow these instructions in reverse order.
Cancel: I did not complete this guide.
One other person completed this guide.

Team

CSU Los Angeles, Team 5-5, Adachi Fall 2022 Member of CSU Los Angeles, Team 5-5, Adachi Fall 2022
CSULA-ADACHI-F22S5G5
6 Members
48 Guides authored
