Free Shipping on Domestic Orders $75+

iNet M1001 Motherboard Replacement

What you need

  1. iNet M1001 Motherboard Replacement, Back Cover: step 1, image 1 of 2 iNet M1001 Motherboard Replacement, Back Cover: step 1, image 2 of 2
    • Remove the two 4.1 mm PH1 screws with a Philips screwdriver.

    Ask FixBot

    Add Comment

  2. iNet M1001 Motherboard Replacement: step 2, image 1 of 2 iNet M1001 Motherboard Replacement: step 2, image 2 of 2
    • Press the small suction cup on the back cover, and then pull the small suction cup to remove the back cover.

    Ask FixBot

    Add Comment

  3. iNet M1001 Motherboard Replacement, Motherboard: step 3, image 1 of 3 iNet M1001 Motherboard Replacement, Motherboard: step 3, image 2 of 3 iNet M1001 Motherboard Replacement, Motherboard: step 3, image 3 of 3
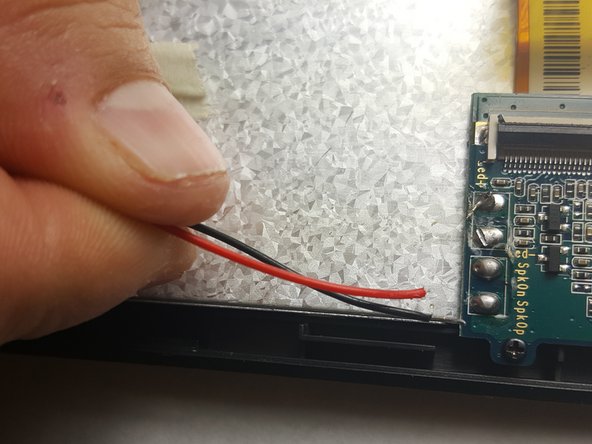
    • Desolder the black and red wires and pull them off of the motherboard.

    • Check out this awesome guide for tips on soldering and desoldering.

    Ask FixBot

    Add Comment

  4. iNet M1001 Motherboard Replacement: step 4, image 1 of 3 iNet M1001 Motherboard Replacement: step 4, image 2 of 3 iNet M1001 Motherboard Replacement: step 4, image 3 of 3
    • Desolder the grey wire and pull it off the motherboard.

    Ask FixBot

    Add Comment

  5. iNet M1001 Motherboard Replacement: step 5, image 1 of 3 iNet M1001 Motherboard Replacement: step 5, image 2 of 3 iNet M1001 Motherboard Replacement: step 5, image 3 of 3
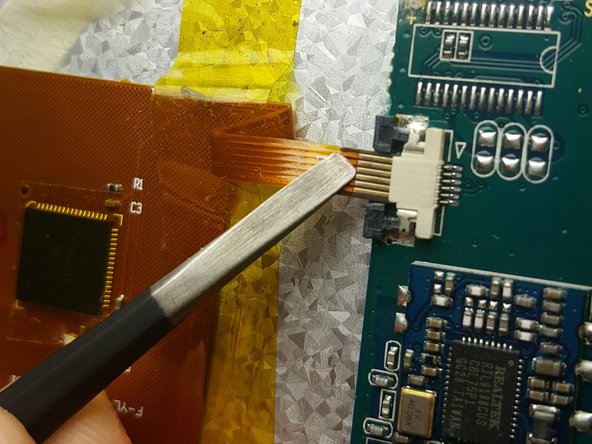
    • Push out the ribbon cable connectors with a tweezer and pull out the ribbon cable.

    Ask FixBot

    Add Comment

  6. iNet M1001 Motherboard Replacement: step 6, image 1 of 3 iNet M1001 Motherboard Replacement: step 6, image 2 of 3 iNet M1001 Motherboard Replacement: step 6, image 3 of 3
    • Lift up the zero insertion force clip with a tweezer and pull out the ribbon cable.

    Ask FixBot

    Add Comment

  7. iNet M1001 Motherboard Replacement: step 7, image 1 of 3 iNet M1001 Motherboard Replacement: step 7, image 2 of 3 iNet M1001 Motherboard Replacement: step 7, image 3 of 3
    • Lift up the zero insertion force clip with a plastic opening tool and pull out the ribbon cable.

    Ask FixBot

    Add Comment

  8. iNet M1001 Motherboard Replacement: step 8, image 1 of 3 iNet M1001 Motherboard Replacement: step 8, image 2 of 3 iNet M1001 Motherboard Replacement: step 8, image 3 of 3
    • Remove the five 5.7mm PH00 screws with a screwdriver and pull out the motherboard.

    Ask FixBot

    Add Comment

Conclusion

To reassemble your device, follow these instructions in reverse order.

Cancel: I did not complete this guide.

Abdulateef Abola

Member since: 03/08/17

401 Reputation

4 Guides authored

Team

IUPUI, Team 4-1, Baechle Spring 2017 Member of IUPUI, Team 4-1, Baechle Spring 2017

IUPUI-BAECHLE-S17S4G1

2 Members

8 Guides authored

0 Guide Comments

Add Comment

View Statistics:

Past 24 Hours: 0

Past 7 Days: 6

Past 30 Days: 28

All Time: 522