
iHome IH11 Control Buttons Replacement

Courtney Steinberg and 6 other contributors
Last updated on Nov 5, 2015
Views: 690
View statistics:
- Past 24 Hours:
- 0
- Past 7 Days:
- 13
- Past 30 Days:
- 36
- All Time:
- 690
Comments: 0
No one has left comments on this guide. Will you be first?
Go to guide commentsCompleted: 1 2
1 person has marked this guide "completed." Will you be next?
2 people have marked this guide "completed." Including you — great job!
Favorites: 0 1
No one has favorited (and subscribed to) this guide. Will you be the first?
1 person has favorited (and subscribed to) this guide — and that's you!
Better Introduction
Improve this guide by completing or revising its introduction.
Introduction
Go to step 1 ↓This guide will show how to install new control buttons. For help troubleshooting click the link to our troubleshooting page iHome IH11 Troubleshooting.
What you need
Tools

-
-
-
Unscrew the two 9.0 mm screws with the Phillips #1 screwdriver.
-
Remove the translucent bottom case.
 Ask FixBot
-
-
-
Remove the two 9.0mm screws on the back of the iHome with the Phillips #1 screwdriver.
-
Repeat the previous step for the two screws on the bottom.
-
-
-
Remove the two 9mm screws from the top of the iHome with a Phillips #1 Screwdriver.
-
-
-
Pop the dock connector out of the iHome and gently pull the white plastic plug from the dock connector.
-
-
-
-
Carefully pull apart the device.
-
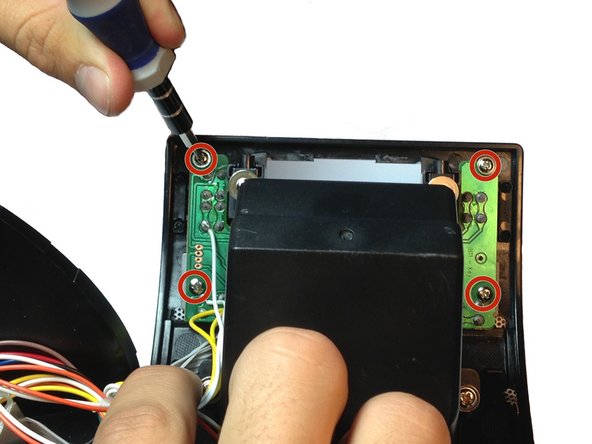
Remove the four screws that hold the circuit board for the buttons.
-
-
-
Desolder the four connections for the broken button.
-
Solder the new button in the place of the old one.
-
-



To reassemble your device, follow these instructions in reverse order.
Cancel: I did not complete this guide.
One other person completed this guide.

Team

Cal Poly, Team 14-9, Maness Spring 2013 Member of Cal Poly, Team 14-9, Maness Spring 2013
CPSU-MANESS-S13S14G9
4 Members
60 Guides authored
