
iDevices iGrill Probe Replacement

Michelle Nguyen and 7 other contributors
Last updated on May 7, 2024
Views: 1.7K
View statistics:
- Past 24 Hours:
- 1
- Past 7 Days:
- 14
- Past 30 Days:
- 95
- All Time:
- 1,668
Comments: 0
No one has left comments on this guide. Will you be first?
Go to guide commentsCompleted: 0 1
No one has marked this guide "completed." Will you be the first?
1 person has marked this guide "completed." It's you — great job!
Favorites: 0 1
No one has favorited (and subscribed to) this guide. Will you be the first?
1 person has favorited (and subscribed to) this guide — and that's you!
Introduction
Go to step 1 ↓The probes may need to be replaced if your device is not reading the temperature properly. In this guide you will learn how to replace the connectors.
What you need
Tools


-
-
-
Remove the back plastic cover from the device; this should allow you access to the batteries.
 Ask FixBot
-
-
-
Remove five black 10 mm Phillips #0 screws from the back side of the device.
-
Remove two silver-colored 5 mm screws using a Phillips screwdriver. The screws are located on the left side of the internal cover.
-
Remove the accompanying plastic tabs under the screws.
-
Gently pull off the back cover from the device.
-
-
-
If you have not removed the 2 silver-colored screws; you must remove them now.
-
Remove the metal terminals from the battery slot closest you.
-
Pull the remaining metal terminals out of their slots. Position them such that when removing the internal cover they will not be caught.
-
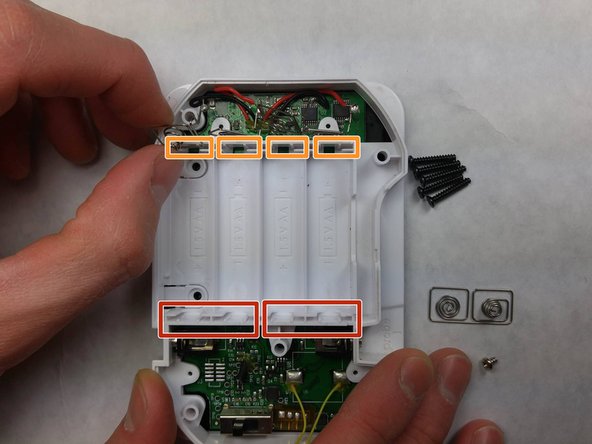
Remove the internal cover.
-
-
-
-
After the internal plastic case has been removed, you will have access to the probe contacts.
-
You should then insert the probes to check their connection to the probe terminals.
-
-
Tool used on this step:Tweezers$4.99
-
Using a pair of tweezers, bend the probe contacts back in place. The tweezers will touch the probe terminals when inserted.
-
-




To reassemble your device, follow these instructions in reverse order.

Team

IUPUI, Team 3-4, Harley Spring 2016 Member of IUPUI, Team 3-4, Harley Spring 2016
IUPUI-HARLEY-S16S3G4
4 Members
48 Guides authored
