
Free Shipping on Domestic Orders $75+

iBook G4 12" 800 MHz-1.2 GHz Top Shield Replacement

What you need

  1. iBook G4 12" 800 MHz-1.2 GHz Top Shield Replacement, Battery: step 1, image 1 of 1
    • Use a coin to rotate the battery locking screw 90 degrees clockwise.

    Ask FixBot
  2. iBook G4 12" 800 MHz-1.2 GHz Top Shield Replacement: step 2, image 1 of 1
    • Lift the battery out of the computer.

    Ask FixBot
  3. iBook G4 12" 800 MHz-1.2 GHz Top Shield Replacement, Keyboard: step 3, image 1 of 1
    • Pull the keyboard release tabs toward you and lift up on the keyboard until it pops free.

    • If the keyboard does not come free, use a small flathead screwdriver to turn the keyboard locking screw 180 degrees in either direction and try again.

    • Flip the keyboard over, away from the screen, and rest it face-down on the trackpad area.

    Ask FixBot
  4. iBook G4 12" 800 MHz-1.2 GHz Top Shield Replacement: step 4, image 1 of 1
    • If the computer has an AirPort card installed, follow the next three steps to remove it.

    • Push the wire clasp away from the AirPort card and toward the display, then rotate up to free it from the RAM shield.

    Ask FixBot
  5. iBook G4 12" 800 MHz-1.2 GHz Top Shield Replacement: step 5, image 1 of 1
    • Grasp the clear plastic tab on the AirPort card and pull toward the display.

    Ask FixBot
  6. iBook G4 12" 800 MHz-1.2 GHz Top Shield Replacement: step 6, image 1 of 1
    • Hold the AirPort card in one hand and use your other hand to remove the antenna cable.

    Ask FixBot
  7. iBook G4 12" 800 MHz-1.2 GHz Top Shield Replacement: step 7, image 1 of 1
    • Remove the four silver Phillips screws that secure the RAM shield.

    Ask FixBot
  8. iBook G4 12" 800 MHz-1.2 GHz Top Shield Replacement: step 8, image 1 of 1
    • Grasp the metal bracket on top of the RAM shield and pull upward to remove the shield.

    Ask FixBot
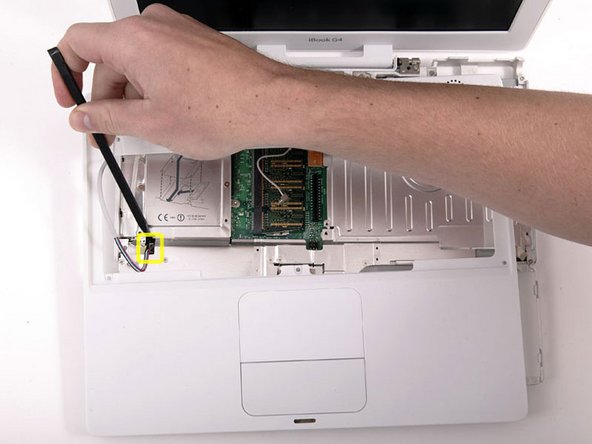
  9. iBook G4 12" 800 MHz-1.2 GHz Top Shield Replacement: step 9, image 1 of 1
    • Pull the keyboard cable up from the logic board, holding the cable as close to the connector as possible.

    • Make sure that you reconnect the keyboard cable before replacing the RAM shield.

    Ask FixBot
  10. iBook G4 12" 800 MHz-1.2 GHz Top Shield Replacement, Lower Case: step 10, image 1 of 1
    • Use a pin (or anything you like) to remove the three rubber feet from the lower case.

    Ask FixBot
  11. iBook G4 12" 800 MHz-1.2 GHz Top Shield Replacement: step 11, image 1 of 1
    • Remove the three newly-revealed Phillips screws.

    Ask FixBot
  12. iBook G4 12" 800 MHz-1.2 GHz Top Shield Replacement: step 12, image 1 of 1
    • Use a spudger or small flathead screwdriver to pry up the three metal rings that housed the rubber bumpers.

    Ask FixBot
  13. iBook G4 12" 800 MHz-1.2 GHz Top Shield Replacement: step 13, image 1 of 1
    • Remove the three Torx screws using a T8 Torx screwdriver.

    • The shorter screw is in the center of the computer.

    Ask FixBot
  14. iBook G4 12" 800 MHz-1.2 GHz Top Shield Replacement: step 14, image 1 of 1
    • Remove the two Phillips screws on either side of the battery contacts.

    Ask FixBot
  15. iBook G4 12" 800 MHz-1.2 GHz Top Shield Replacement: step 15, image 1 of 1
    • Breathe deeply. Trying times are ahead, but we promise the lower case does come off.

    • Push the thin rims of the lower case surrounding the battery compartment in, bending them past the tabs, and then lift up to free that corner of the lower case.

    Ask FixBot
  16. iBook G4 12" 800 MHz-1.2 GHz Top Shield Replacement: step 16, image 1 of 1
    • There is a slot on the wall of the battery compartment that locks the lower case in place. Use a small flathead screwdriver to pry out the slot's lower rim and pull up on the lower case to free the slot from the tabs holding it.

    Ask FixBot
  17. iBook G4 12" 800 MHz-1.2 GHz Top Shield Replacement: step 17, image 1 of 1
    • Run a spudger along the seam between the lower case and upper case on the front of the computer to free the tabs locking the lower case. Pull up on the lower case and continue to use the spudger as necessary until you hear three distinct clicks.

    Ask FixBot
  18. iBook G4 12" 800 MHz-1.2 GHz Top Shield Replacement: step 18, image 1 of 1
    • Continue to run the spudger around the front, right corner. There are two tabs on the port side of the computer, one near the front corner and one near the sound-out port.

    Ask FixBot
  19. iBook G4 12" 800 MHz-1.2 GHz Top Shield Replacement: step 19, image 1 of 1
    • There are three tabs over the optical drive that must be released before the lower case can come off. Slide the spudger into the lower case above the optical drive and run it toward the back of the computer until you hear three distinct clicks.

    Ask FixBot
  20. iBook G4 12" 800 MHz-1.2 GHz Top Shield Replacement: step 20, image 1 of 1
    • Once the front and sides of the lower case are free, turn the computer so that the back is facing you and pull the lower case up and away from you until the back tabs pop free.

    • It may be helpful to jiggle the case up and down.

    Ask FixBot
  21. iBook G4 12" 800 MHz-1.2 GHz Top Shield Replacement: step 21, image 1 of 1
    • Remove the small greasy springs with white plastic caps from either side of the battery contacts.

    Ask FixBot
  22. iBook G4 12" 800 MHz-1.2 GHz Top Shield Replacement, Bottom Shield: step 22, image 1 of 1
    • Remove the 4 Phillips screws from the bottom shield.

    • The two longer screws are along the computer's edge, near the ports.

    Ask FixBot
  23. iBook G4 12" 800 MHz-1.2 GHz Top Shield Replacement: step 23, image 1 of 1
    • Lift the bottom shield off.

    Ask FixBot
  24. iBook G4 12" 800 MHz-1.2 GHz Top Shield Replacement, DC-In Board: step 24, image 1 of 1
    • Remove the two Phillips screws securing the DC-In board.

    Ask FixBot
  25. iBook G4 12" 800 MHz-1.2 GHz Top Shield Replacement: step 25, image 1 of 1
    • Disconnect the DC-In cable from the logic board.

    Ask FixBot
  26. iBook G4 12" 800 MHz-1.2 GHz Top Shield Replacement: step 26, image 1 of 1
    • Deroute the cable from around the optical drive, removing tape as necessary, and angle the DC-In board out of its compartment.

    Ask FixBot
  27. iBook G4 12" 800 MHz-1.2 GHz Top Shield Replacement, Upper Case: step 27, image 1 of 1
    • Remove the two Phillips screws from the battery compartment.

    Ask FixBot
  28. iBook G4 12" 800 MHz-1.2 GHz Top Shield Replacement: step 28, image 1 of 1
    • We recommend placing the computer on a slab of grey anti-static packing foam from this point on to prevent damaging the logic board.

    • Turn over the computer and open it.

    • Pry up the magnet covering a Phillips screw near the middle of the computer.

    Ask FixBot
  29. iBook G4 12" 800 MHz-1.2 GHz Top Shield Replacement: step 29, image 1 of 1
    • Remove the following 7 screws from the edges of the keyboard area.

    • Three 2 mm Phillips along the right edge.

    • One 4.5 mm Phillips underneath where the magnet was.

    • One 6 mm Phillips with a small head in the lower left corner.

    • Two 6 mm Phillips with large heads, one in the upper left corner and one in the middle

    Ask FixBot
  30. iBook G4 12" 800 MHz-1.2 GHz Top Shield Replacement: step 30, image 1 of 1
    • Before you can yank the upper case off, you must disconnect the trackpad connector, the blue and white power cable, and speaker cable as described in the next steps.

    • Lift the upper case from the right side and use a spudger or your finger to disconnect the trackpad connector hidden beneath the white plastic tab. Due to model variatons your trackpad connector may be different from the one pictured.

    Ask FixBot
  31. iBook G4 12" 800 MHz-1.2 GHz Top Shield Replacement: step 31, image 1 of 1
    • Carefully lift the upper case about half of an inch and move it so that you can access the power and speaker cables.

    • If the upper case is sticking, it may be necessary to free the tabs holding the upper case to the metal framework along the outer edge of the battery compartment.

    Ask FixBot
  32. iBook G4 12" 800 MHz-1.2 GHz Top Shield Replacement: step 32, image 1 of 1
    • The connectors at the ends of the cables are attached very firmly to the sockets on the logic board. Pulling directly on the cable will either separate the cable from its connector or the socket from the logic board.

    • Lift the upper case enough to disconnect the blue and white power cable from the logic board. Using your fingernails or a dental pick, carefully pry the connector from its socket. Make sure you're pulling only on the connector and not on the socket.

    Ask FixBot
  33. iBook G4 12" 800 MHz-1.2 GHz Top Shield Replacement: step 33, image 1 of 1
    • Lift the upper case off completely and disconnect the multicolored speaker cable from the logic board. As before, make sure you're pulling only on the connector and not on the socket.

    • Tip: the multi-coloured cable may be easier and less daunting to disconnect after removing the top heat shield. Prop the top case upright while removing the shield - the connector is then much more accessible.

    Ask FixBot
  34. iBook G4 12" 800 MHz-1.2 GHz Top Shield Replacement, Top Shield: step 34, image 1 of 1
    • Remove the following 15 screws:

    • Fourteen 3 mm Phillips.

    • One 5.5 mm Phillips in the upper left corner.

    • Mind the magnet position in the lower right corner

    Ask FixBot
  35. iBook G4 12" 800 MHz-1.2 GHz Top Shield Replacement: step 35, image 1 of 1
    • Lift the top shield up from the right side, minding the upper left corner, which may catch on the metal framework.

    Ask FixBot
Conclusion

To reassemble your device, follow these instructions in reverse order.

3 other people completed this guide.

Attached Documents

iRobot

Member since: 09/24/09

1 Reputation

636 Guides authored

0 Guide Comments

Add Comment

View Statistics:

Past 24 Hours: 3

Past 7 Days: 13

Past 30 Days: 78

All Time: 6,578