
Zipper Insertion Pin Replacement

Caitlin Dillon and 3 other contributors
Last updated on Jan 12, 2023
Views: 300K
View statistics:
- Past 24 Hours:
- 103
- Past 7 Days:
- 553
- Past 30 Days:
- 1,931
- All Time:
- 299,884
Comments: 16
2 comments on steps, 14 guide comments.
Go to guide commentsCompleted: 21 22
21 people have marked this guide "completed." Will you be next?
22 people have marked this guide "completed." Including you — great job!
Favorites: 4 5
4 people have favorited (and subscribed to) this guide. Will you be next?
5 people have favorited (and subscribed to) this guide — including you!
Featured Student Guide
This guide has been the hard work of our awesome students and is found to be exceptionally cool by the iFixit staff.
Introduction
Go to step 1 ↓Broken zipper ruin your favorite clothing? Don’t throw it away just yet! The most common issue with zippers is a broken or missing insertion pin, the part of the zipper that goes inside the other. While there are zipper-repair kits sold at Walmart, they commonly do not last due to the amount of stress the insertion pin receives in daily use. The best way to replace the pin is to sew in a new one, including the fabric and plastic backing surrounding it. No kit required— just some scissors, needle, and thread!
What you need
Parts
Tools


-
-
-
Cut the broken insertion pin off the zipper. If the pin is missing (like in the photo), cut the frayed fabric. Do not cut the zipper teeth.
-
-
-
Find an article of clothing no longer in use with a zipper. The insertion pin must be the same length as the broken/ missing one, but it does not matter if it is plastic or metal.
-
-
-
Cut the working insertion pin from the old clothing off the zipper. Do not cut the plastic square backing or too much material. You must have enough fabric to sew.
-
-

 Ask FixBot


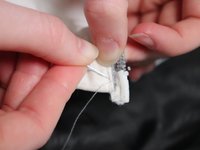


If the pin does not line up correctly, take out the thread and re-sew.
Cancel: I did not complete this guide.
21 other people completed this guide.

Team

Missouri Western, Team S1-G6, Cools Stephens Spring 2019 Member of Missouri Western, Team S1-G6, Cools Stephens Spring 2019
MWSU-COOLS STEPHENS-S19S1G6
1 Member
12 Guides authored
14 Guide Comments
Hi, I have a north face jacket and the zipper is fine but the plastic square backing is what’s missing so I can’t zip it up. Do you know what that’s really called so I can find a replacement? Or do you know what I can replace it with? Thanks, Amy
Instead of cutting a notch out, I removed the stitching at the edge of the coat to expose the entire zipper body end, and completely cut the end off. Then I stitched a complete new end on. The advantage was that it provided the maximum mechanical strength to keep the insertion pin aligned.
Careful when at the cut lines, do not pull on any threads, some are loose, but I have a way to fix that later. Then stitch using long stiches to avoid the areas too close to the cut lines where the threads are loose.
Finally, I zip the 2 halves together in order to align all the parts together into their final relative positions, and use a Bondic glue pen on all stitches and areas around the cuts where the loose threads are. When I cure with the UV light, the result is much stronger than just the threads. I was careful to not apply any of the epoxy close to the zipper, so that I don’t block the passage of the zipper slider.
Then I lightly sand to remove any sharp edges, and sew the zipper tape back to the jacket.
I will need to see a YouTube video on that lol
That’s a great solution. I considered that, but it seemed like way more work, so I opted for a simpler fix. You could also replace the entire zipper if you wanted!

