Free Shipping on Domestic Orders $75+

Xbox One Wireless Controller Model 1537 Analog Sticks Replacement

What you need

  1. Xbox One Wireless Controller Model 1537 Analog Sticks Replacement, Battery Pack: step 1, image 1 of 1
    • Remove the battery pack cover.

    • Remove batteries.

  2. Xbox One Wireless Controller Model 1537 Analog Sticks Replacement, Side Handles: step 2, image 1 of 2 Xbox One Wireless Controller Model 1537 Analog Sticks Replacement, Side Handles: step 2, image 2 of 2
    • We recommend using a nylon spudger for this step. A metal spudger is shown.

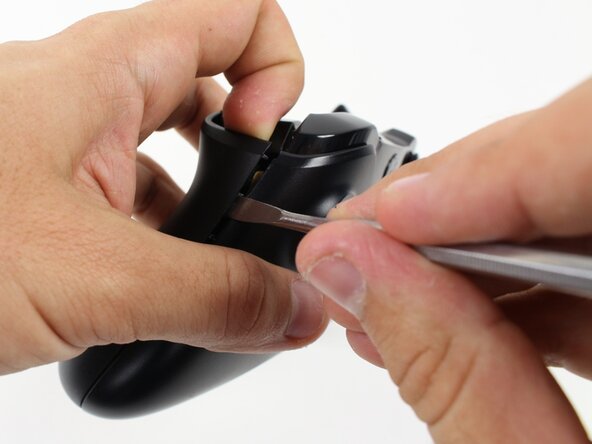
    • Grip the controller firmly to remove the side handles, wedging a spudger into the seam between the front and handle plates.

    • Pry the side plate away from the front plate by moving the spudger back and forth. You will need to do this all the way around the side plate's seam.

  3. Xbox One Wireless Controller Model 1537 Analog Sticks Replacement, Screws: step 3, image 1 of 2 Xbox One Wireless Controller Model 1537 Analog Sticks Replacement, Screws: step 3, image 2 of 2
    • There is a hidden screw located in the middle of the controller behind the label.

    • Use a screwdriver and punch a hole directly in the center of the label.

    • You may also lift the label if you do not want to puncture it.

    • Remove the five 10mm screws located on the back of the controller using the TR8 Security Torx Screwdriver.

  4. Xbox One Wireless Controller Model 1537 Analog Sticks Replacement, Backplate: step 4, image 1 of 1
    • Remove the backplate.

  5. Xbox One Wireless Controller Model 1537 Analog Sticks Replacement, Faceplate: step 5, image 1 of 1
    • Remove the faceplate.

  6. Xbox One Wireless Controller Model 1537 Analog Sticks Replacement, Top Motherboard: step 6, image 1 of 2 Xbox One Wireless Controller Model 1537 Analog Sticks Replacement, Top Motherboard: step 6, image 2 of 2
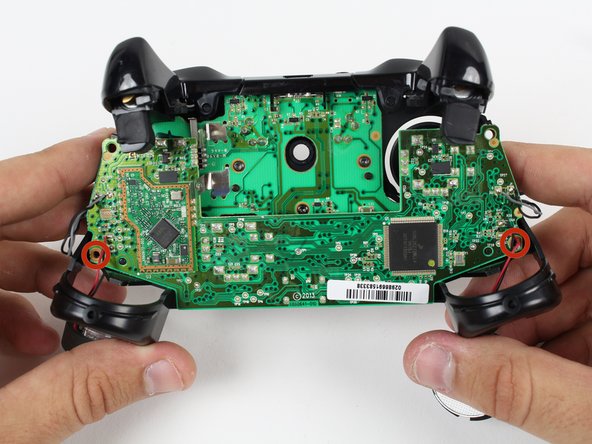
    • You may let the rumble motors hang freely out of their sockets.

    • De-solder the soldered joints while holding the red and black wires down on the top motherboard.

    • De-solder the black and gray wires that are attached to the top motherboard.

    • Remove the rumble motors and set them aside.

    • Be careful while using the soldering iron not to damage other components or hurt yourself.

    • For information on how to solder, Click Here

  7. Xbox One Wireless Controller Model 1537 Analog Sticks Replacement: step 7, image 1 of 1
    • Unscrew the two 7mm T6 screws located near the rumble motor sockets.

  8. Xbox One Wireless Controller Model 1537 Analog Sticks Replacement: step 8, image 1 of 2 Xbox One Wireless Controller Model 1537 Analog Sticks Replacement: step 8, image 2 of 2
    • Firmly grip sides of motherboard near the middle.

    • Lift upwards while slightly wiggling the motherboard forward and backward.

    • Lifting the motherboard will require some force cause there's connections.

  9. Xbox One Wireless Controller Model 1537 Analog Sticks Replacement, Cleaning & Flux: step 9, image 1 of 2 Xbox One Wireless Controller Model 1537 Analog Sticks Replacement, Cleaning & Flux: step 9, image 2 of 2
    • if there's any corrosion or rust on the pads clean that before you continue.

    • if you want you can apply flux to help with soldering but it is not needed.

    • do the same for the other side

  10. Xbox One Wireless Controller Model 1537 Analog Sticks Replacement, Desoldering: step 10, image 1 of 3 Xbox One Wireless Controller Model 1537 Analog Sticks Replacement, Desoldering: step 10, image 2 of 3 Xbox One Wireless Controller Model 1537 Analog Sticks Replacement, Desoldering: step 10, image 3 of 3
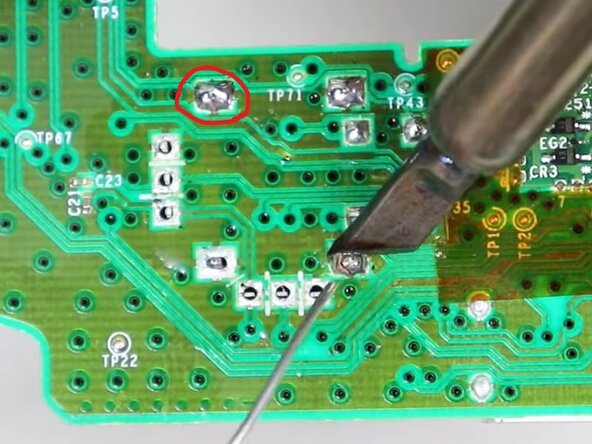
    • you can use a desoldering iron,solder sucker or a copper wick

    • remove all the solder.

    • Be careful while using the soldering iron not to damage other components or hurt yourself.

    • if there's any left you can resolder those points and try again

    • do the same for the other side

  11. Xbox One Wireless Controller Model 1537 Analog Sticks Replacement, Removal: step 11, image 1 of 2 Xbox One Wireless Controller Model 1537 Analog Sticks Replacement, Removal: step 11, image 2 of 2
    • check to make sure all the points are loose.

    • pull the analog stick down.

    • do the same for the other side

  12. Xbox One Wireless Controller Model 1537 Analog Sticks Replacement, Resoldering: step 12, image 1 of 2 Xbox One Wireless Controller Model 1537 Analog Sticks Replacement, Resoldering: step 12, image 2 of 2
    • resolder the pads and make sure to get it on the correct side of the board

    • do the same for the other side

    • Be careful while using the soldering iron not to damage other components or hurt yourself.

    • the solder joints should look like the second image

Conclusion

To reassemble your device, follow these instructions in reverse order.

One other person completed this guide.

archer horst

Member since: 04/29/26

1 Reputation

2 Guides authored

0 Guide Comments

Add Comment

View Statistics:

Past 24 Hours: 6

Past 7 Days: 51

Past 30 Days: 230

All Time: 230