
Xbox One S All Digital Edition IR Blaster Replacement

Jules Hajjar and 2 other contributors
Last updated on Dec 30, 2019
Views: 3.3K
View statistics:
- Past 24 Hours:
- 3
- Past 7 Days:
- 28
- Past 30 Days:
- 103
- All Time:
- 3,265
Comments: 1
1 guide comment.
Go to guide commentsCompleted: 4 5
4 people have marked this guide "completed." Will you be next?
5 people have marked this guide "completed." Including you — great job!
Favorites: 0 1
No one has favorited (and subscribed to) this guide. Will you be the first?
1 person has favorited (and subscribed to) this guide — and that's you!
Introduction
Go to step 1 ↓This replacement guide provides a step by step process on replacing the IR Blaster of The Xbox One S All Digital Edition (Model 1681). The IR Blaster is responsible for many of the consoles vital power functions. The IR Blaster contains the consoles power switch and manages the connection of Bluetooth accessories paired to the Xbox One S All Digital Edition. Symptoms of a broken IR Blaster are a malfunctioning power button or a faulty Bluetooth connection to Xbox accessories. Disconnect all cables prior to disassembly.
What you need
Parts

Tools


-
-
-
Position the iFixit Opening Tool's riveted edge in between the top and bottom cover of the plastic enclosure.
-
Apply downward pressure on the iFixit Opening Tool until the security clip unlocks.
-
Repeat on different points of the plastic enclosure until the bottom cover is removed.
 Ask FixBot
-
-
-
Remove the six 50 mm green screws (labeled F1-F6) from the metal chassis using a Torx 10 screwdriver.
-
-
-
Apply pressure to peel off the sides of the casing.
-
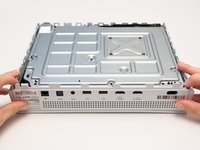
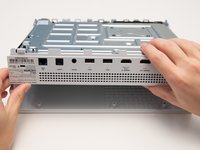
Separate the metal chassis from the top cover, lifting the back of the chassis up and away from the top cover.
-
-
-
-
-
-
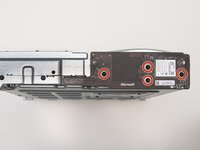
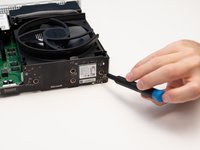
Remove the four 15mm screws attaching the IR Blaster to the metal chassis with the Torx T8 Security screwdriver.
-
-






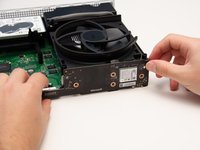
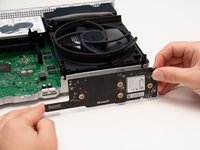
To reassemble your device, follow these instructions in reverse order.
Cancel: I did not complete this guide.
4 other people completed this guide.

Team

Cal Poly, Team S12-G6, Regan Fall 2019 Member of Cal Poly, Team S12-G6, Regan Fall 2019
CPSU-REGAN-F19S12G6
4 Members
96 Guides authored
1 Guide Comment
Hello Jules! I recently got one of these baby's and the power button on the rf board itself has been ripped not so cleanly off.
The xbox Refuses to stay booted with the board on or off, but I am able to get it to force boot for at most 3 or 4 seconds with a paperclip, the fan spins lightly once and the light flashes as it sounds its on chime then its just off. Could there be a short in the power supply or motherboard caused by this button rippage? The eject button that leads nowhere also boots with same results
