
Washer Dryer Not Drying (No Heat)

Luca De Nardi and 2 other contributors
Last updated on Sep 27, 2023
Views: 6.5K
View statistics:
- Past 24 Hours:
- 14
- Past 7 Days:
- 76
- Past 30 Days:
- 297
- All Time:
- 6,510
Comments: 4
1 comment on steps, 3 guide comments.
Go to guide commentsCompleted: 8 9
8 people have marked this guide "completed." Will you be next?
9 people have marked this guide "completed." Including you — great job!
Favorites: 0 1
No one has favorited (and subscribed to) this guide. Will you be the first?
1 person has favorited (and subscribed to) this guide — and that's you!
Bullets!
Better coordination with markups and the color/type of bullets will help make this guide more clear!
Community-Contributed Guide
An awesome member of our community made this guide. It was not created by iFixit staff.
Introduction
Go to step 1 ↓This guide shows how I removed lint buildup from the heating element of my washer dryer. The accumulated lint prevented a good airflow, causing the thermal switch to trip.
There is no lint trap in this machine, as the lint is supposed to be removed during the washing cycle - but clearly some of it still reached the hot air duct. The machine worked correctly for about one year of normal family use.
What you need
Tools
-
-
-
Zip Ties5


-
-
-
First things first: DISCONNECT MAINS PLUG !!
-
I removed the washing machine top cover. The heating element is clearly visible. Be careful as it gets really hot when working.
 Ask FixBot
-
-
-
The thermal protection switches. Lint caused the assembly to overheat as there was little to no airflow. I could press the little button and reset the switch (and heat started to be produced again), but it would trip again after a few minutes as the heating element became too hot.
-
-
-
Removing the heating assembly was easy. There are 5 easily accessible screws holding it. A few wires are connected to the heating element and you need to disconnect them first. Make sure you properly sign them so that you will know how to reassemble everything properly!
-
-
-
The air intake duct is now visible. A considerable amount of lint is restricting the airflow and causing the heating element to overheat. Try to remove all lint with a vacuum cleaner. If pieces of lint fall inside, they will be washed away during the next washing cycle, but big lumps could clog the filter, so try to take everything out from above.
-
-
-
-
Here is the air duct with no lint inside. You can now reassemble everything. Put the heating element in place, fix it with the screws and reconnect the wires, double-checking the connectors using the picture with the numbers that you saved before.
-
-
-
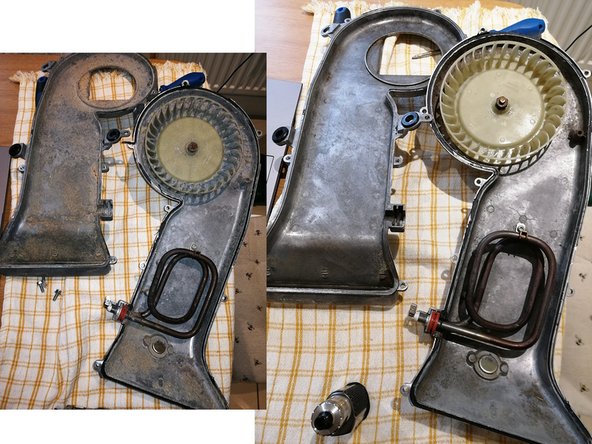
This is the heating element, removed. It's basically a hollow aluminum horn with a fan and a heating resistor inside.
-
It was quite clean inside, but I decided to open it anyway, while it was on my table. It was really not necessary as you can see from the pictures.
-
If you decide to go for it, be careful when separating the shells, and also be careful not to overtighten the screws when reassembling it, as the body is made of aluminum.
-
I really put the pictures here only for the sake of completeness.
-
-


To reassemble your device, follow these instructions in reverse order.
Cancel: I did not complete this guide.
8 other people completed this guide.

