
Violin Strings Replacement

Brittany Preston and 2 other contributors
Last updated on Mar 4, 2020
Views: 17K
View statistics:
- Past 24 Hours:
- 7
- Past 7 Days:
- 38
- Past 30 Days:
- 159
- All Time:
- 16,566
Comments: 1
1 guide comment.
Go to guide commentsCompleted: 5 6
5 people have marked this guide "completed." Will you be next?
6 people have marked this guide "completed." Including you — great job!
Favorites: 1 2
1 person has favorited (and subscribed to) this guide. Will you be next?
2 people have favorited (and subscribed to) this guide — including you!
Introduction
Go to step 1 ↓This guide is intended to help users through the process of fixing broken or worn out violin strings. A violin has four strings: E, A, D, & G. The order of the strings from left to right is G, D, A, & E. The G string is the deepest pitched string and the E is the highest pitched string. The purpose of this guide is to enable violin players to restring their violin on their own instead of having it done at a music store.
-
-
-
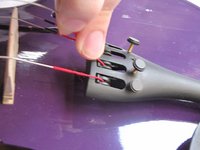
Turn the peg belonging to the string you are wanting to change to loosen the string.
 Ask FixBot
-
-
-




To reassemble your device, follow these instructions in reverse order.
Cancel: I did not complete this guide.
5 other people completed this guide.

Team

USF Sarasota-Manatee, Team 1-1, Stewart Spring 2017 Member of USF Sarasota-Manatee, Team 1-1, Stewart Spring 2017
USFSM-STEWART-S17S1G1
19 Members
180 Guides authored
1 Guide Comment
Thanks for this very clear set of instructions with clear images. I am an amateur violinist and broke a string while tuning. Even I could use these instructions and it was as easy as the post says. Thanks for posting and to ifixit in general.
