Free Shipping on Domestic Orders $75+

Turtle Beach Stealth Ultra Battery Replacement

What you need

    1. Turtle Beach Stealth Ultra Battery Replacement, Back Plate: step 1, image 1 of 2 Turtle Beach Stealth Ultra Battery Replacement, Back Plate: step 1, image 2 of 2
      • Use tweezers to pull out rubber pieces in front of the screws.

      Ask FixBot

      Add Comment

    2. Turtle Beach Stealth Ultra Battery Replacement: step 2, image 1 of 2 Turtle Beach Stealth Ultra Battery Replacement: step 2, image 2 of 2
      • Remove the 10 mm screws using a Phillips #00 screwdriver.

      Ask FixBot

      Add Comment

    3. Turtle Beach Stealth Ultra Battery Replacement: step 3, image 1 of 2 Turtle Beach Stealth Ultra Battery Replacement: step 3, image 2 of 2
      • Remove the sticker on the back of the plate.

      • Remove the 10 mm screws from the back plate using a Phillips #00 screwdriver.

      Ask FixBot

      Add Comment

    4. Turtle Beach Stealth Ultra Battery Replacement: step 4, image 1 of 3 Turtle Beach Stealth Ultra Battery Replacement: step 4, image 2 of 3 Turtle Beach Stealth Ultra Battery Replacement: step 4, image 3 of 3
      • Use an iFixit opening tool to pry the front button plate and analog stick plate off.

      • Use a Phillips #00 screwdriver to remove the screws from the front plate on both sides of the controller.

      • Be cautious not to break the LCD screen while you move the opening tool around.

      Ask FixBot

      Add Comment

    5. Turtle Beach Stealth Ultra Battery Replacement: step 5, image 1 of 3 Turtle Beach Stealth Ultra Battery Replacement: step 5, image 2 of 3 Turtle Beach Stealth Ultra Battery Replacement: step 5, image 3 of 3
      • Use an opening tool to detach the front plate from the back.

      • You may need to work the opening tool all the way around the seam between the two plates.

      Ask FixBot

      Add Comment

    1. Turtle Beach Stealth Ultra Battery Replacement, Motherboard: step 6, image 1 of 2 Turtle Beach Stealth Ultra Battery Replacement, Motherboard: step 6, image 2 of 2
      • Use a Phillips #00 screwdriver to remove the 10 mm screws connecting the handles to the controller frame.

      Ask FixBot

      Add Comment

    2. Turtle Beach Stealth Ultra Battery Replacement: step 7, image 1 of 1
      • Detach the cables from the motherboard.

      Ask FixBot

      Add Comment

    3. Turtle Beach Stealth Ultra Battery Replacement: step 8, image 1 of 1
      • Remove the yellow ribbon cable from the handle.

      Ask FixBot

      Add Comment

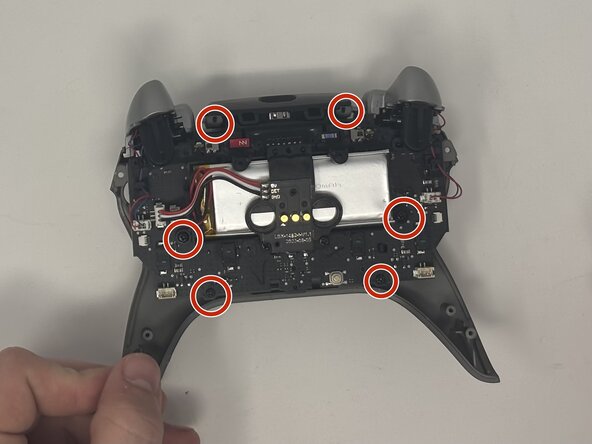
    4. Turtle Beach Stealth Ultra Battery Replacement: step 9, image 1 of 2 Turtle Beach Stealth Ultra Battery Replacement: step 9, image 2 of 2
      • Remove the six 10 mm screws connected to the motherboard using a Phillips #00 screwdriver.

      Ask FixBot

      Add Comment

    5. Turtle Beach Stealth Ultra Battery Replacement: step 10, image 1 of 1
      • Gently pull the motherboard away from the frame.

      Ask FixBot

      Add Comment

    1. Turtle Beach Stealth Ultra Battery Replacement, Battery: step 11, image 1 of 2 Turtle Beach Stealth Ultra Battery Replacement, Battery: step 11, image 2 of 2
      • Use the Phillips #00 screwdriver to remove the 10 mm screws from the black battery bracket.

      • Pull the battery bracket off of the battery.

      • Detach the cable connector from the motherboard.

      Ask FixBot

      Add Comment

    2. Turtle Beach Stealth Ultra Battery Replacement: step 12, image 1 of 1
      • Pull the battery off of the motherboard.

      Ask FixBot

      Add Comment

Conclusion

To reassemble your device, follow these instructions in reverse order.

Cancel: I did not complete this guide.

One other person completed this guide.

Dominic Dodge

Member since: 09/09/25

856 Reputation

7 Guides authored

Team

0 Guide Comments

Add Comment

View Statistics:

Past 24 Hours: 13

Past 7 Days: 44

Past 30 Days: 101

All Time: 529