Free Shipping on Domestic Orders $75+

Turtle Beach Pure Air Optical Sensor Replacement

Views: 212

View statistics:

Past 24 Hours:
2
Past 7 Days:
14
Past 30 Days:
59
All Time:
212
Comments: 0

No one has left comments on this guide. Will you be first?

Go to guide comments
Completed: 0

No one has marked this guide "completed." Will you be the first?

Favorites: 0

No one has favorited (and subscribed to) this guide. Will you be the first?

Time Required: 30 minutes
Difficulty: Difficult
Turtle Beach Pure Air Optical Sensor Replacement

Introduction

Go to step 1 ↓

Use this guide to replace the optical sensor in the Turtle Beach Pure Air Wireless Mouse. A failing sensor can cause tracking loss, inconsistent cursor movement, or complete failure to detect surface input, which you can confirm using the troubleshooting page.

Review iFixit’s How to Solder and Desolder Connections guide before beginning: How To Solder and Desolder Connections. Power off the device and follow all safety precautions while working around delicate circuitry and soldered joints.

    1. Turtle Beach Pure Air Optical Sensor Replacement, Bottom Cover: step 1, image 1 of 2 Turtle Beach Pure Air Optical Sensor Replacement, Bottom Cover: step 1, image 2 of 2
      • Power off the mouse by moving the power switch to the center.

      Ask FixBot

      Add Comment

    2. Turtle Beach Pure Air Optical Sensor Replacement: step 2, image 1 of 2 Turtle Beach Pure Air Optical Sensor Replacement: step 2, image 2 of 2
      • Peel back the mouse feet.

      • Remove the three 1.6mm screws using a JIS #000 screwdriver.

      • Remove the single 1.6mm screws using remove using a 1.3 mm hex screwdriver.

      Ask FixBot

      Add Comment

    3. Turtle Beach Pure Air Optical Sensor Replacement: step 3, image 1 of 2 Turtle Beach Pure Air Optical Sensor Replacement: step 3, image 2 of 2
      • Carefully remove the bottom cover of the mouse.

      • Be cautious of the cable connecting the bottom cover to the rest of the mouse.

      Ask FixBot

      Add Comment

    4. Turtle Beach Pure Air Optical Sensor Replacement: step 4, image 1 of 3 Turtle Beach Pure Air Optical Sensor Replacement: step 4, image 2 of 3 Turtle Beach Pure Air Optical Sensor Replacement: step 4, image 3 of 3
      • Disconnect the ribbon cable securing the upper shell to the motherboard.

      • Lift the locking clip to release the cable from its connector.

      Ask FixBot

      Add Comment

    1. Turtle Beach Pure Air Optical Sensor Replacement, Motherboard: step 5, image 1 of 3 Turtle Beach Pure Air Optical Sensor Replacement, Motherboard: step 5, image 2 of 3 Turtle Beach Pure Air Optical Sensor Replacement, Motherboard: step 5, image 3 of 3
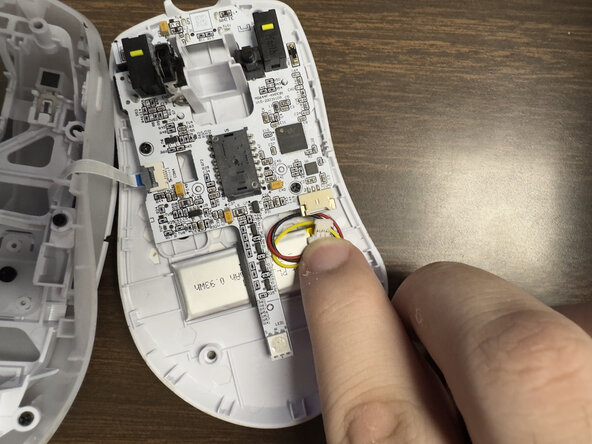
      • Carefully disconnect the battery clip from the motherboard socket by softly pulling the bottom of the clip.

      Ask FixBot

      Add Comment

    2. Turtle Beach Pure Air Optical Sensor Replacement: step 6, image 1 of 2 Turtle Beach Pure Air Optical Sensor Replacement: step 6, image 2 of 2
      • Remove the two 1.6 mm screws on the middle left and lower right sides with a JIS000 screwdriver to disconnect the motherboard from the lower shell.

      Ask FixBot

      Add Comment

    3. Turtle Beach Pure Air Optical Sensor Replacement: step 7, image 1 of 2 Turtle Beach Pure Air Optical Sensor Replacement: step 7, image 2 of 2
      • Gently lift the motherboard out of the housing.

      Ask FixBot

      Add Comment

    1. Turtle Beach Pure Air Optical Sensor Replacement, Scroll Wheel: step 8, image 1 of 3 Turtle Beach Pure Air Optical Sensor Replacement, Scroll Wheel: step 8, image 2 of 3 Turtle Beach Pure Air Optical Sensor Replacement, Scroll Wheel: step 8, image 3 of 3
      • Pull the scroll wheel out of its mounting.

      Ask FixBot

      Add Comment

    1. Turtle Beach Pure Air Optical Sensor Replacement, Optical Sensor: step 9, image 1 of 2 Turtle Beach Pure Air Optical Sensor Replacement, Optical Sensor: step 9, image 2 of 2
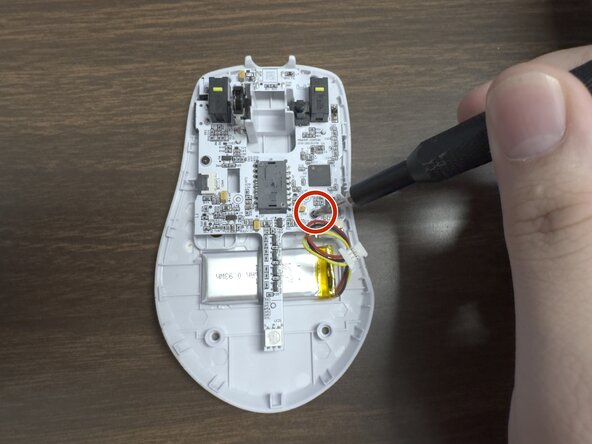
      • Use a pointed soldering iron to desolder the sensor’s pins from the motherboard.

      Ask FixBot

      Add Comment

Conclusion

To reassemble your device, follow these instructions in reverse order.

Cancel: I did not complete this guide.

0 Guide Comments

Add Comment

View Statistics:

Past 24 Hours: 2

Past 7 Days: 14

Past 30 Days: 59

All Time: 212