
Toniebox Broken Ear Repair

twayne Markinson and 2 other contributors
Last updated on Jul 10, 2024
Views: 93K
View statistics:
- Past 24 Hours:
- 24
- Past 7 Days:
- 210
- Past 30 Days:
- 890
- All Time:
- 92,511
Comments: 28
12 comments on steps, 16 guide comments.
Go to guide commentsCompleted: 15 16
15 people have marked this guide "completed." Will you be next?
16 people have marked this guide "completed." Including you — great job!
Favorites: 0 1
No one has favorited (and subscribed to) this guide. Will you be the first?
1 person has favorited (and subscribed to) this guide — and that's you!
Community-Contributed Guide
An awesome member of our community made this guide. It was not created by iFixit staff.
Introduction
Go to step 1 ↓Use this guide if one of the ears has stopped working.
If your button is not broken and only the cable has been torn off, skip the steps to replace the button.
If your button is broken but your cable is not torn off, skip the steps to repair the cable.
What you need
Parts
Tools


-
-
-
Put the Toniebox on a flat surface (e.g. a desk or a workbench).
-
Apply some pressure and turn the Toniebox counterclockwise to unlock the two clips beneath the bottom plate.
 Ask FixBot
-
-
-
-
-
Pull the inner-plastic part out of the body
-
Loosen the two screws on the battery compartment and then carefully remove the battery compartment.
-
-
-
-
-
Remove the ears from the Toniebox according to the basic instructions for the Toniebox Teardown. Be especially careful not to damage the connector on the PCB.
-
Gently pull the inner ears down and out. Do not pull on the cable!
-
Use a pair of tweezers to carefully pull the defective button and PCB out of the silicone ear. If the cable is not torn off, be careful not to damage it.
-
-
-
Solder the defective button from the PCB. The best way to do this is to use a hot air gun/ soldering iron around 360 ° C
-
Remove the excess solder with desoldering braid.
-
-
-
-
Use lead free solder to reattach the replacement button
-
-
-
Remove the remains of the torn strand from the solder pads with the soldering iron
-
Isolate approx. 3mm from each wire of the line
-
Tin each pad and solder them on the back of the PCB. One wire on each pad. Be careful that the wire has no contact with outer copper surfaces.
-
-
-
Carefully put the circuit board back into the ear.
-
Lay the strand in the designated channels.
-
Push the inner ears back into the ear sleeve using the buttons.
-
-


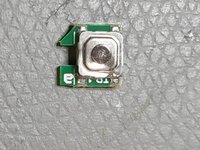


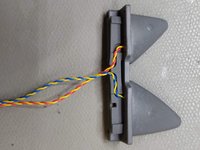
To reassemble your device, follow these instructions in reverse order.
Cancel: I did not complete this guide.
15 other people completed this guide.
Special thanks to these translators:
100%


These translators are helping us fix the world! Want to contribute?
Start translating ›

16 Guide Comments
Bei unserer Box ist der Schalter samt Platine weg. Kann man das Kabel auch direkt am Schalter anlöten oder hat die Platine eine Funktion?
Hi,
die Platine hat keine elektrische Funktion. Sie dient nur mechanisch dazu den Taster zu stützen. Wenn du es schaffst den direkt anzulöten geht das auch, ich weiss allerdings nicht wie gut das Veralten beim drücken ist oder ob das wider kaputt geht. Hier habe Ich neue Platinen gesehen die man allerdings selbst noch etwas bearbeiten muss:
Hier gibt es auch neue Platinen:
http://www.ebay-kleinanzeigen.de/s-anzei...
Ansonsten hat die keine Funktion. Ihr könnt die Kabel auch an die Taster direkt löten.
