Free Shipping on Domestic Orders $75+

The Claw Item Replacement

Views: 2.2K

View statistics:

Past 24 Hours:
2
Past 7 Days:
16
Past 30 Days:
91
All Time:
2,164
Comments: 0

No one has left comments on this guide. Will you be first?

Go to guide comments
Completed: 0

No one has marked this guide "completed." Will you be the first?

Favorites: 0

No one has favorited (and subscribed to) this guide. Will you be the first?

Time Required: 5 - 10 minutes
Difficulty: Easy
Mismatched Prerequisites

This guide does not have a proper prerequisite guide. Help match it to its ideal partner by finding it or writing one!

The Claw Item Replacement

Introduction

Go to step 1 ↓

After repeated use of the claw machine, eventually you will run out of toys or candy to grab. In order to complete this task you will need to remove the top cover of your claw machine. Follow this user friendly guide to assist you with this task.

What you need

Parts

Tools

    1. The Claw Item Replacement, Top Cover: step 1, image 1 of 1
      • Place The Claw machine in the up-right position with the control knobs facing you.

      Ask FixBot

      Add Comment

    2. The Claw Item Replacement: step 2, image 1 of 1
      • Turn The Claw machine upside-down placing the top cover on the surface of your work area.

      Ask FixBot

      Add Comment

    3. The Claw Item Replacement: step 3, image 1 of 1
      • Remove all ten 6mm phillips #1 screws underneath the top cover using your #1 phillips head screwdriver.

      • It is helpful to choose a clear, well lit work space. There are multiple tiny screws that are easy to lose.

      Ask FixBot

      Add Comment

    4. The Claw Item Replacement: step 4, image 1 of 1
      • Turn The Claw machine back to the upright position with controls facing you.

      Ask FixBot

      Add Comment

    5. The Claw Item Replacement: step 5, image 1 of 1
      • Remove the top cover of The Claw machine.

      Ask FixBot

      Add Comment

    6. The Claw Item Replacement: step 6, image 1 of 2 The Claw Item Replacement: step 6, image 2 of 2
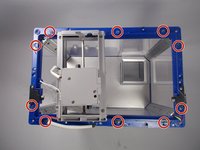
      • Remove the ten 6 mm phillips #1 screws from the top flange.

      Ask FixBot

      Add Comment

    7. The Claw Item Replacement: step 7, image 1 of 1
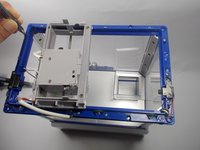
      • Lift the flange upward and off to the side of the machine.

      • There is enough wire connecting the flange to the machine that you will not need to cut the wire. The flange can be moved off to the side of the machine while you are working.

      • Cutting or ripping out the wire will cause damage to the machine so try not to put much tension on the wire.

      Ask FixBot

      Add Comment

    1. The Claw Item Replacement, Overfill: step 8, image 1 of 1
      • After emptying out contents have The Claw machine facing you

      Ask FixBot

      Add Comment

    2. The Claw Item Replacement: step 9, image 1 of 1
      • View the Claw machine from the top

      Ask FixBot

      Add Comment

    3. The Claw Item Replacement: step 10, image 1 of 1
      • Place thumb on grip section and pull away from the Claw machine.

      Ask FixBot

      Add Comment

    4. The Claw Item Replacement: step 11, image 1 of 1
      • Place items in the Claw machine.

      Ask FixBot

      Add Comment

Conclusion

To reassemble your device, follow these instructions in reverse order.

Cancel: I did not complete this guide.

Alain Pierre

Member since: 03/22/16

1,188 Reputation

9 Guides authored

Team

0 Guide Comments

Add Comment

View Statistics:

Past 24 Hours: 2

Past 7 Days: 16

Past 30 Days: 91

All Time: 2,164