This translation was generated by a machine and has not been reviewed by a person yet. Speak this language? Review it.

Tempest Weather Station replacement battery replacement

RepairDad and one other contributor
Last updated on Sep 2, 2026
Views: 334
View statistics:
- Past 24 Hours:
- 6
- Past 7 Days:
- 43
- Past 30 Days:
- 187
- All Time:
- 334
Comments: 0
No one has left comments on this guide. Will you be first?
Go to guide commentsCompleted: 1 2
1 person has marked this guide "completed." Will you be next?
2 people have marked this guide "completed." Including you — great job!
Favorites: 0 1
No one has favorited (and subscribed to) this guide. Will you be the first?
1 person has favorited (and subscribed to) this guide — and that's you!
Needs More Images
A few more images would make this guide's procedures crystal clear.
Community-Contributed Guide
An awesome member of our community made this guide. It was not created by iFixit staff.
Introduction
Go to step 1 ↓This guide shows the replacement of the LTO (Lithium-Titanium-Oxide) replacement battery of a Tempest Weather Station WF-TWS01.
The required spare part is not very easy to obtain (LTO replacement battery 2.4V, 18650 format, min. 1300mAh or higher).
You should avoid using a standard Li-ion battery, as these are not designed for the wide temperature range.
What you need


-
-
-
Turn off the weather station and completely remove the 4 Phillips screws. Then, carefully lift out the bottom part using a flathead screwdriver.
 Ask FixBot
-
-
-
After carefully pulling the PCB out, completely release the 3 Phillips screws.
-
-
-
Note the polarity with which the replacement battery is soldered onto the PCB (or take a photo).
-
Before you begin desoldering, use a tissue and tweezers to remove the dielectric grease from the solder joints of the replacement battery on the underside.
-
Now desolder the replacement battery from the underside; it is highly recommended to use a solder pump and subsequently desoldering wick for this.
-
-
-
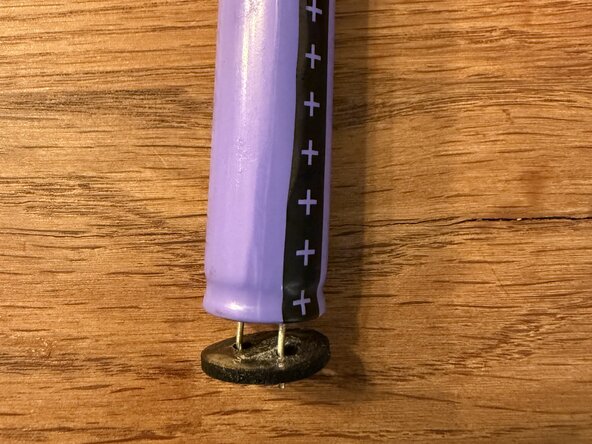
Save the rubber spacer that was mounted under the old battery and slide it onto the battery tabs of the new replacement battery.
-
-
-
-
Place the replacement battery with the rubber spacer onto the circuit board, ensuring the correct polarity, and then solder it in place.
-
Trim the solder tabs to approximately 2 mm from the circuit board, then apply a small amount of fresh solder to the cut ends of the tabs to prevent corrosion.
-
-
-
Optional, but highly recommended to prevent corrosion: apply some dielectric grease to the solder joints of the newly soldered replacement battery.
-
-




Work through the steps in reverse order to reassemble your device.
Cancel: I did not complete this guide.
One other person completed this guide.

