
Super Nintendo Cartridge Maintenence

BWest and 4 other contributors
Last updated on Mar 26, 2026
Views: 39K
View statistics:
- Past 24 Hours:
- 10
- Past 7 Days:
- 51
- Past 30 Days:
- 227
- All Time:
- 38,763
Comments: 5
4 comments on steps, 1 guide comment.
Go to guide commentsCompleted: 23 24
23 people have marked this guide "completed." Will you be next?
24 people have marked this guide "completed." Including you — great job!
Favorites: 33 34
33 people have favorited (and subscribed to) this guide. Will you be next?
34 people have favorited (and subscribed to) this guide — including you!
Community-Contributed Guide
An awesome member of our community made this guide. It was not created by iFixit staff.
Introduction
Go to step 1 ↓When games have been in storage or used for years on end, they need to get a good dose of TLC. In extreme cases you need to crack them open to get everything. It can be tense opening up a loved game in the fear that you'll destroy it.
Alternatively, you can open up a game no one liked and make it into an innocuous enclosure for something else.
What you need
Fix Kit
This kit contains all the parts and tools needed to complete this guide.

Parts

Tools

-
-
-
On the bottom front corners of the cartridge you should see two screws using the 3.8mm "Gamebit" screwdriver bit. A 3.0U Spanner bit can also get them out.
-
Once the screws are out, slide the front part of the plastic casing down to clear the tabs on the top of the case.
-
The two halves of the case should open easily.
 Ask FixBot
-
-
-
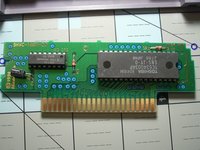
At this point the game board and pins are freely accessible.
-
Here you can fully clean the pin set and inspect for damage to the circuit board.
-
Cleaning the pins is the easiest part; use a cotton swab and either a rich mixture isopropyl alcohol or Brasso. Other people swear by an eraser(the white kind), but it can lead to damage if you're not careful. Personally, Brasso works the best.
-
-
-
-
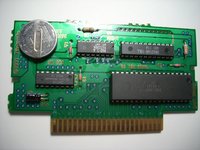
Games with battery backup (allowing for save games to be stored in SRAM) allow access to the battery at this point for replacement. Most of the time the battery is a button cell: CR2032.
-
-


To reassemble the cartridge, follow these instructions in reverse order.
Cancel: I did not complete this guide.
23 other people completed this guide.


