Free Shipping on Domestic Orders $75+

Sun King Solo Solar Lantern Device Seals Replacement

What you need

    1. Sun King Solo Solar Lantern Device Seals Replacement, Locate and Remove the Screws: step 1, image 1 of 1
      • Place the lamp LED side down on a clean workspace.

      • Remove the screws holding the casing together using a Phillips #1 Screwdriver.

      Ask FixBot

      Add Comment

    2. Sun King Solo Solar Lantern Device Seals Replacement, Separate the Device: step 2, image 1 of 1
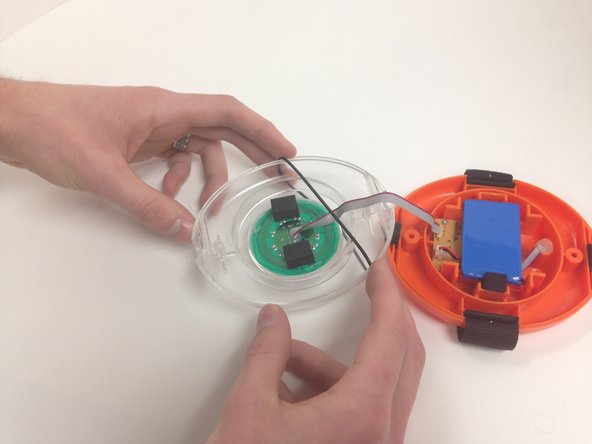
      • Gently pull the two halves of the lamp apart.

      Ask FixBot

      Add Comment

    1. Sun King Solo Solar Lantern Device Seals Replacement, O-ring Replacement: step 3, image 1 of 2 Sun King Solo Solar Lantern Device Seals Replacement, O-ring Replacement: step 3, image 2 of 2
      • On the clear upper half, remove the black O-ring

      • Place the new O-ring, making sure it is smooth all the way around

      Ask FixBot

      Add Comment

    2. Sun King Solo Solar Lantern Device Seals Replacement, Stand Holder Replacements: step 4, image 1 of 1
      • Remove the rubber stand holders.

      • Place the new stand holders, making sure the wings of the holder are in the second opening

      Ask FixBot

      Add Comment

Conclusion

To reassemble your device, follow these instructions in reverse order.

Cancel: I did not complete this guide.

Josef Simek

Member since: 10/23/14

132 Reputation

1 Guide authored

Team

Michigan Tech, Team 1-3, Lauer Fall 2014 Member of Michigan Tech, Team 1-3, Lauer Fall 2014

MTU-LAUER-F14S1G3

3 Members

35 Guides authored

0 Guide Comments

Add Comment

View Statistics:

Past 24 Hours: 2

Past 7 Days: 10

Past 30 Days: 48

All Time: 947