Free Shipping on Domestic Orders $75+

Stapler Spring Replacement

Views: 326K

View statistics:

Past 24 Hours:
276
Past 7 Days:
1,560
Past 30 Days:
6,432
All Time:
326,150
Comments: 20

6 comments on steps, 14 guide comments.

Go to guide comments
Completed: 15

15 people have marked this guide "completed." Will you be next?

Favorites: 0

No one has favorited (and subscribed to) this guide. Will you be the first?

Time Required: 10 - 15 minutes
Difficulty: Easy
Stapler Spring Replacement

Introduction

Go to step 1 ↓

If your stapler isn’t stapling, then there’s a good chance the spring is damaged. This guide's purpose is to assist users in replacing the stapler spring.

If you don’t replace the spring yourself, you’ll either have a broken stapler cluttering up your work space or will end up buying a new stapler altogether.

Before using this guide, check to see if the spring itself is damaged. Another possibility of a stapler not working is a staple jam. Be careful when handling the stapler, since it’s possible to staple yourself. We recommend that you empty the staples beforehand.

What you need

Parts

Tools

    1. Stapler Spring Replacement, Spring: step 1, image 1 of 2 Stapler Spring Replacement, Spring: step 1, image 2 of 2
      • Open the stapler by gripping the handle to access the spring.

      Ask FixBot

      Add Comment

    2. Stapler Spring Replacement: step 2, image 1 of 1
      Tool used on this step:
      Tweezers
      $4.99
      Buy
      • Pry open the hook found on the pusher using the tweezers.

      • Hold the handle firmly to prevent the stapler from snapping back.

      Ask FixBot

      Add Comment

    3. Stapler Spring Replacement: step 3, image 1 of 1
      • Unhook the end of the spring from the pusher.

      • Pinch the spring firmly between your fingers to keep it from snapping back.

      Ask FixBot

      Add Comment

    4. Stapler Spring Replacement: step 4, image 1 of 2 Stapler Spring Replacement: step 4, image 2 of 2
      • Unhook the other end of the spring from the inside of the handle.

      • The spring should be unthreaded from the holes on the handle's metal part.

      Ask FixBot

      Add Comment

    5. Stapler Spring Replacement: step 5, image 1 of 2 Stapler Spring Replacement: step 5, image 2 of 2
      • Press down on the metal part inside the handle with your thumbs until it will not go down anymore.

      Ask FixBot

      Add Comment

    6. Stapler Spring Replacement: step 6, image 1 of 2 Stapler Spring Replacement: step 6, image 2 of 2
      • Push the hammer, the rectangular piece, up and away from the metal part.

      Ask FixBot

      Add Comment

    7. Stapler Spring Replacement: step 7, image 1 of 1
      • Release the metal part inside the handle so it comes away from the hammer.

      • Keep hold of the metal part to keep it from snapping closed.

      Ask FixBot
      Add Comment

    8. Stapler Spring Replacement: step 8, image 1 of 1
      • Hook one end of the new spring onto the pusher's hook.

      Ask FixBot

      Add Comment

    9. Stapler Spring Replacement: step 9, image 1 of 1
      • Clamp the pusher's hook closed using your thumb.

      Ask FixBot

      Add Comment

    10. Stapler Spring Replacement: step 10, image 1 of 1
      • Thread the other end of the new spring through the top rectangular hole toward the back.

      Ask FixBot

      Add Comment

    11. Stapler Spring Replacement: step 11, image 1 of 1
      • Thread the new spring through the bottom hole, bringing the end of spring toward you.

      • The spring should create a loop when done threading.

      Ask FixBot

      Add Comment

    12. Stapler Spring Replacement: step 12, image 1 of 2 Stapler Spring Replacement: step 12, image 2 of 2
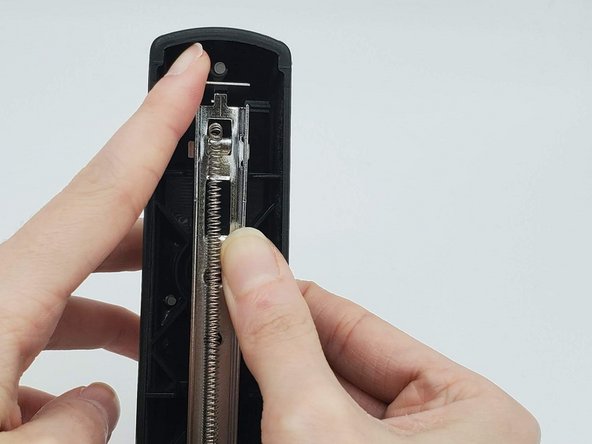
      • Hook the new spring to the hook on the inside of the handle's metal part.

      Ask FixBot

      Add Comment

    13. Stapler Spring Replacement: step 13, image 1 of 2 Stapler Spring Replacement: step 13, image 2 of 2
      • Press the metal part down with your thumbs until it aligns with the hammer's hole.

      Ask FixBot

      Add Comment

    14. Stapler Spring Replacement: step 14, image 1 of 2 Stapler Spring Replacement: step 14, image 2 of 2
      • Reattach the hammer back onto the metal part.

      Ask FixBot

      Add Comment

    15. Stapler Spring Replacement: step 15, image 1 of 2 Stapler Spring Replacement: step 15, image 2 of 2
      • Close the handle until it clicks back into place.

      • Be careful not to staple your fingers when closing the stapler.

      Ask FixBot

      Add Comment

Conclusion

To reassemble your device, follow these instructions in reverse order.

Cancel: I did not complete this guide.

15 other people completed this guide.

14 Guide Comments

Just what I needed. Thank you! Super clear

Daniela Labra - Reply Share

Can I replace the black rubber piece that goes on my swingling desk top stapler 70 sheet it came off and my dog chewed it up.

Edith Corkell - Reply Share

fron this sale ski o donde venden los repuestos de esta engrapadora en Venezuela gran caracas

Romulo - Reply Share

Wie funktioniert das für große Klammermaschinen wie dieser hier?

Matthias Jünger - Reply Share

Where do I obtain a replacement spring for this stapler?

John Drake - Reply Share

Add Comment

View Statistics:

Past 24 Hours: 276

Past 7 Days: 1,560

Past 30 Days: 6,432

All Time: 326,150