
Free Shipping on Domestic Orders $75+

Sony Walkman D-EJ360 Laser Module Replacement

What you need

  1. Sony Walkman D-EJ360 Laser Module Replacement, Lid: step 1, image 1 of 1
    • Open the lid on the Walkman by pressing the open button on the device.

  2. Sony Walkman D-EJ360 Laser Module Replacement: step 2, image 1 of 3 Sony Walkman D-EJ360 Laser Module Replacement: step 2, image 2 of 3 Sony Walkman D-EJ360 Laser Module Replacement: step 2, image 3 of 3
    • Grip the thin end of each spring using a pair of tweezers, slide it out of the lid notch, then press down on the main coil to release and remove it.

  3. Sony Walkman D-EJ360 Laser Module Replacement: step 3, image 1 of 3 Sony Walkman D-EJ360 Laser Module Replacement: step 3, image 2 of 3 Sony Walkman D-EJ360 Laser Module Replacement: step 3, image 3 of 3
    • Insert the metal spudger in the crevice between the blue lid and the white body of the Walkman.

    • There is a notch where the lid is held under to stay in place. With the spudger, push the blue lid portion down and out.

    • This may require some harder force. You will hear a popping sound when you successfully push the lid out under the notch.

    • Repeat the same tactic on the other side. The other side should become easier to pop off.

    • Remove the lid.

  4. Sony Walkman D-EJ360 Laser Module Replacement, Laser Module: step 4, image 1 of 2 Sony Walkman D-EJ360 Laser Module Replacement, Laser Module: step 4, image 2 of 2
    • Remove the eight 6.1 mm screws using a Phillips #00 screwdriver.

    • Open the battery cover to reveal the last screw.

    • Remove the ninth 6.1 mm screw using a Phillips #00 screwdriver.

  5. Sony Walkman D-EJ360 Laser Module Replacement: step 5, image 1 of 2 Sony Walkman D-EJ360 Laser Module Replacement: step 5, image 2 of 2
    • Insert a Jimmy into the seam between the upper and lower cases and pry apart.

    • Avoid initially prying near buttons, or the laser assembly.

    • Pry until the there is an audible click. The halves should visibly separate roughly 1/4 in.

    • Work around the seam in a circular path, separating the halves completely.

    • The motherboard and turn table module are only held in by gravity in the blue shell. Do not tip the device while separating the shells.

  6. Sony Walkman D-EJ360 Laser Module Replacement: step 6, image 1 of 2 Sony Walkman D-EJ360 Laser Module Replacement: step 6, image 2 of 2
    • Using tweezers, gently lift the the locking flap on the laser module ribbon connector.

    • Gently remove the ribbon cable from the connector.

  7. Sony Walkman D-EJ360 Laser Module Replacement: step 7, image 1 of 3 Sony Walkman D-EJ360 Laser Module Replacement: step 7, image 2 of 3 Sony Walkman D-EJ360 Laser Module Replacement: step 7, image 3 of 3
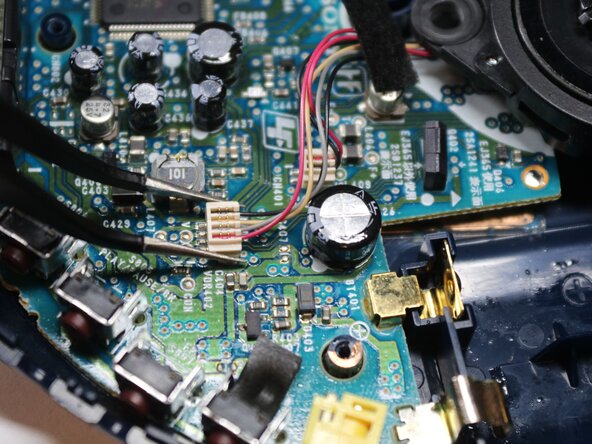
    • Using tweezers, squeeze the upper half of the four wire connector, and lift straight up to remove the connector.

    • The connector may make a tactile click when disengaged.

    • Repeat the step for the two wire connector.

  8. Sony Walkman D-EJ360 Laser Module Replacement: step 8, image 1 of 2 Sony Walkman D-EJ360 Laser Module Replacement: step 8, image 2 of 2
    • Ensure the ribbon cable, two, and four wire cables are all removed and not tangled with the motherboard.

    • Gently lift the laser module and place aside.

Conclusion

To reassemble your device, follow these instructions in reverse order.

Kristen Gismondi

Member since: 11/12/14

104,596 Reputation

266 Guides authored

0 Guide Comments

Add Comment

View Statistics:

Past 24 Hours: 0

Past 7 Days: 3

Past 30 Days: 21

All Time: 95