
Free Shipping on Domestic Orders $75+

Sony Vaio Duo 11 SSD Replacement

What you need

  1. Sony Vaio Duo 11 SSD Replacement, SSD: step 1, image 1 of 1
    • Make a system backup!

    Ask FixBot

    Add Comment

  2. Sony Vaio Duo 11 SSD Replacement: step 2, image 1 of 2 Sony Vaio Duo 11 SSD Replacement: step 2, image 2 of 2
    • Using a spudger, remove the rubber screw covers.

    • Gently remove the speaker covers.

    Ask FixBot

    Add Comment

  3. Sony Vaio Duo 11 SSD Replacement: step 3, image 1 of 1
    • Use a sharp tool to lift up the laptop's cover

    Ask FixBot

    Add Comment

  4. Sony Vaio Duo 11 SSD Replacement: step 4, image 1 of 1
    • Remove cover

    Ask FixBot

    Add Comment

  5. Sony Vaio Duo 11 SSD Replacement: step 5, image 1 of 1
    • Remove all the screws. (Attention: these screws are different! Save them.)

    Ask FixBot

    Add Comment

  6. Sony Vaio Duo 11 SSD Replacement: step 6, image 1 of 2 Sony Vaio Duo 11 SSD Replacement: step 6, image 2 of 2
    • Remove the cover carefully. One side is attached with a short, flat, white cable. (Attention: Don't detach the white cable.)

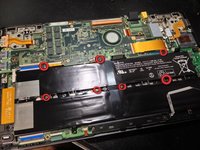
    • Remove the screws (circled in red) and remove the battery.

    • When reassembling : Remember to hide the piece of plastic beside the battery (circled in the second picture) behind the plastic. Otherwise you will not be able to press the right mouse button.

    Ask FixBot

    Add Comment

  7. Sony Vaio Duo 11 SSD Replacement: step 7, image 1 of 1
    • Detach flat cable. To do so, you have to lift the black plastic bar, then release the orange ribbon.

    Ask FixBot

    Add Comment

  8. Sony Vaio Duo 11 SSD Replacement: step 8, image 1 of 1
    • Remove these screws to make it easier to remove the SSD.

    Ask FixBot

    Add Comment

  9. Sony Vaio Duo 11 SSD Replacement: step 9, image 1 of 1
    • The remove of the ssd

    • Remove the SSD (gently)

    • Replace the SSD ( it is a mSATA SSD )

    • Put back the screws and close the unit

    Ask FixBot

    Add Comment

Conclusion

To reassemble your device, follow these instructions in reverse order.

Cancel: I did not complete this guide.

26 other people completed this guide.

Zero

Member since: 01/08/13

880 Reputation

1 Guide authored

14 Guide Comments

Mind BLOWING!!!!!!!!!!!!! Job, Bro..... It Helped me a Lot.....

Anwar - Reply Share

1TB ssd here I come!!!!

jamice4u - Reply Share

It worked! Can't believe it. I exchanged my 128GB one with a Crucial 500 GB one. Used the Acronis True Image that came with the new SSD. Still getting used to having so much free space :D

scorpiotide - Reply Share

Hi, I tried to upgrade to a 256GB SSD using shadowprotect and EaseUS to restore the image, but the drive would never boot. The SSD was not the problem as it worked fine when installing Windows from scratch. Did you simply restore a disk image with Acronis?

gps - Reply Share

Thanks for this tutorial. I typically avoid working on my laptops and gadgets due to overwhelming hidden gotchas. This made swapping out my broken hard drive quick and painless. Thanks again!

Nathan Price - Reply Share

Add Comment

View Statistics:

Past 24 Hours: 1

Past 7 Days: 31

Past 30 Days: 101

All Time: 43,149