Free Shipping on Domestic Orders $75+

Sony SRS-XB23 Battery Replacement

What you need

  1. Sony SRS-XB23 Battery Replacement, Speaker Mesh Cover: step 1, image 1 of 3 Sony SRS-XB23 Battery Replacement, Speaker Mesh Cover: step 1, image 2 of 3 Sony SRS-XB23 Battery Replacement, Speaker Mesh Cover: step 1, image 3 of 3
    • Hold the speaker and insert the flat end of a spudger into the seam next to the end of the rubber button strip.

    • Use a spudger to release each clip along the seams of the device.

    • Make sure not to force it open; the cover should pop off smoothly.

    Ask FixBot

    Add Comment

  2. Sony SRS-XB23 Battery Replacement: step 2, image 1 of 2 Sony SRS-XB23 Battery Replacement: step 2, image 2 of 2
    • Repeat the process in Step 1 on the other side of the button strip.

    Ask FixBot

    Add Comment

  3. Sony SRS-XB23 Battery Replacement: step 3, image 1 of 2 Sony SRS-XB23 Battery Replacement: step 3, image 2 of 2
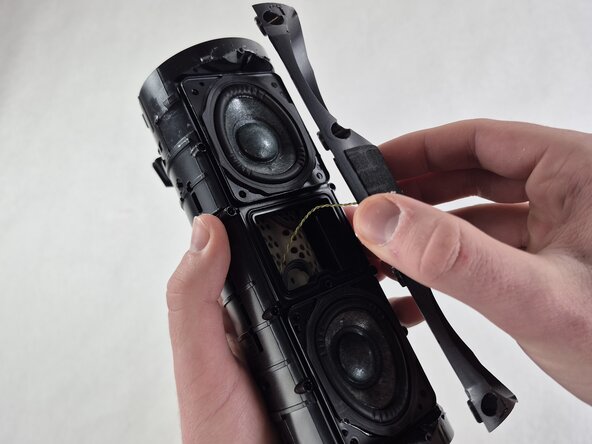
    • Remove mesh cover fully.

    • Note the small nub on the inside of the mesh cover. This will need to be aligned to the hole on the speaker body when reattaching the mesh.

    Ask FixBot

    Add Comment

  4. Sony SRS-XB23 Battery Replacement, Speaker Driver: step 4, image 1 of 2 Sony SRS-XB23 Battery Replacement, Speaker Driver: step 4, image 2 of 2
    • Use a Phillips #1 screwdriver to remove the two 5.0 mm screws holding each end cap in place.

    Ask FixBot

    Add Comment

  5. Sony SRS-XB23 Battery Replacement: step 5, image 1 of 3 Sony SRS-XB23 Battery Replacement: step 5, image 2 of 3 Sony SRS-XB23 Battery Replacement: step 5, image 3 of 3
    • Use the metal spudger to pry the rubber pad off the bottom end cap.

    • This pad uses adhesive to stay in place and will need to be kept clean to ensure it reattaches properly.

    Ask FixBot

    Add Comment

  6. Sony SRS-XB23 Battery Replacement: step 6, image 1 of 1
    • Use a Phillips #1 screwdriver to remove the two 10.0 mm screws holding the end cap in place.

    • The screws might not come out when first loosened. They will fall out when the end cap is removed from the body, so make sure to keep track of them.

    Ask FixBot

    Add Comment

  7. Sony SRS-XB23 Battery Replacement: step 7, image 1 of 3 Sony SRS-XB23 Battery Replacement: step 7, image 2 of 3 Sony SRS-XB23 Battery Replacement: step 7, image 3 of 3
    • Use the heavy-duty spudger to pry one of the tabs holding the end cap to the speaker body.

    • Hold the tab up and insert a blue opening pick into the space to keep the retaining clips from reengaging.

    • Repeat this for each retaining clip, and pull the end caps off the speaker body.

    • Repeat to remove the other end cap.

    Ask FixBot

    Add Comment

  8. Sony SRS-XB23 Battery Replacement: step 8, image 1 of 2 Sony SRS-XB23 Battery Replacement: step 8, image 2 of 2
    • Remove the eight 8.0 mm PH1 screws holding the front plate of the speakers in place.

    • Gently remove the face plate.

    • Do NOT pull on the front plate as it is connected to the motherboard with a wire.

    • Set the face plate close to the side of the speaker.

    • Once the upper speaker driver is removed, you can disconnect the cable connecting the faceplate to the circuit board.

    Ask FixBot

    Add Comment

  9. Sony SRS-XB23 Battery Replacement: step 9, image 1 of 3 Sony SRS-XB23 Battery Replacement: step 9, image 2 of 3 Sony SRS-XB23 Battery Replacement: step 9, image 3 of 3
    • Lift the top speaker driver from the device.

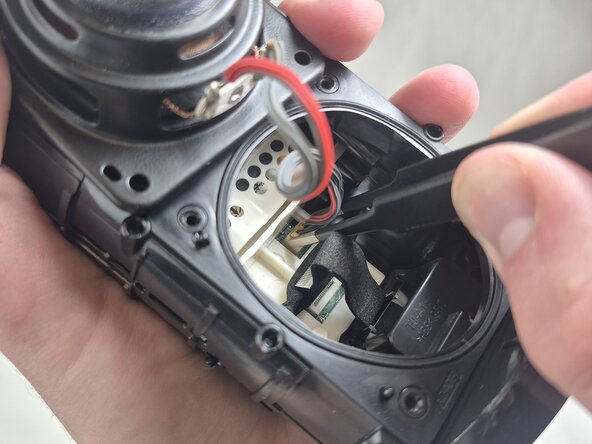
    • Use tweezers to firmly grasp the connector on the end of the speaker cable.

    • Pull outward while wiggling the tweezers slightly to disconnect the speaker cable from the socket.

    Ask FixBot

    Add Comment

  10. Sony SRS-XB23 Battery Replacement: step 10, image 1 of 1
    • Use tweezers to grip the white cable connector and gently wiggle it while pulling it out of the socket to disconnect the yellow and gray faceplate cable.

    Ask FixBot

    Add Comment

  11. Sony SRS-XB23 Battery Replacement: step 11, image 1 of 3 Sony SRS-XB23 Battery Replacement: step 11, image 2 of 3 Sony SRS-XB23 Battery Replacement: step 11, image 3 of 3
    • Remove the lower speaker driver from the frame.

    • Grip the orange connector on the lower speaker cable with tweezers and gently wiggle it while pulling outward to disconnect it.

    Ask FixBot

    Add Comment

  12. Sony SRS-XB23 Battery Replacement, Motherboard: step 12, image 1 of 1
    • Use tweezers to firmly grip the ribbon cable at the bottom of the speaker opening and gently pull it straight out of the socket.

    Ask FixBot

    Add Comment

  13. Sony SRS-XB23 Battery Replacement: step 13, image 1 of 2 Sony SRS-XB23 Battery Replacement: step 13, image 2 of 2
    • Rotate the speaker so that the top end side is facing you.

    • Use a Phillips #1 screwdriver to remove the four 5.0 mm silver screws holding the motherboard housing in place.

    Ask FixBot

    Add Comment

  14. Sony SRS-XB23 Battery Replacement: step 14, image 1 of 1
    • Use your fingers to grip the end of the white motherboard housing and pull it straight out.

    Ask FixBot

    Add Comment

  15. Sony SRS-XB23 Battery Replacement: step 15, image 1 of 2 Sony SRS-XB23 Battery Replacement: step 15, image 2 of 2
    • Use a Phillips #0 screwdriver to remove the three 3.0 mm black screws on the back of the motherboard.

    • Do not pull the motherboard off!

    • Carefully separate the motherboard from the white plastic housing.

    • Set the plastic housing with the battery on the table to make the next step easier.

    • Use the point of a spudger to push on alternating sides of the battery connector to "walk" it out of its socket.

    • It may take a lot of alternating before the connector comes out. Be patient, and don't pull on the cables.

    Ask FixBot

    Add Comment

  16. Sony SRS-XB23 Battery Replacement, Battery: step 16, image 1 of 1
    • Using the small plastic spudger, pry up the two white clips.

    • The black tape will rip and will not be repairable. Do not worry, as it is not necessary to put the device back together.

    Ask FixBot

    Add Comment

  17. Sony SRS-XB23 Battery Replacement: step 17, image 1 of 1
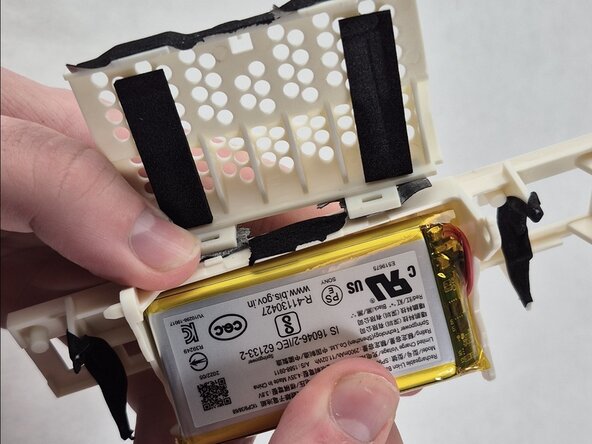
    • Open the battery case, it should swing open like a door.

    • Grasp the battery on either side and pull directly out.

    • Since the battery connection was removed in a previous step, there is nothing else holding the battery in place.

    Ask FixBot

    Add Comment

Conclusion

To reassemble your device, follow these instructions in reverse order.

Cancel: I did not complete this guide.

Ruggieri Dave Celestin

Member since: 03/23/26

85 Reputation

1 Guide authored

0 Guide Comments

Add Comment

View Statistics:

Past 24 Hours: 0

Past 7 Days: 4

Past 30 Days: 23

All Time: 90