Free Shipping on Domestic Orders $75+

Sony Handycam HDR-CX580V Lens Replacement

What you need

  1. Sony Handycam HDR-CX580V Lens Replacement, Battery: step 1, image 1 of 1
    • Locate the slider labeled "BATT" and pull it back from the battery with your thumb.

    Ask FixBot

    Add Comment

  2. Sony Handycam HDR-CX580V Lens Replacement: step 2, image 1 of 1
    • At this point, you should be able to remove the battery by simply lifting it from the camera.

    • The camera provided for guide-creation did not include a battery. However, the battery position should be the same.

    Ask FixBot

    Add Comment

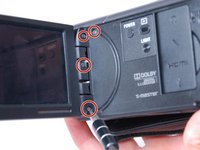
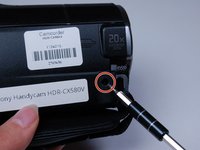
  3. Sony Handycam HDR-CX580V Lens Replacement, Recording Button: step 3, image 1 of 3 Sony Handycam HDR-CX580V Lens Replacement, Recording Button: step 3, image 2 of 3 Sony Handycam HDR-CX580V Lens Replacement, Recording Button: step 3, image 3 of 3
    • Use the Phillips #00 head to remove the following 5.5mm screws on the left-hand side.

    Ask FixBot

    Add Comment

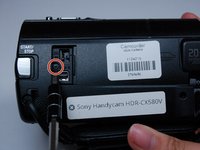
  4. Sony Handycam HDR-CX580V Lens Replacement: step 4, image 1 of 1
    • Use the Phillips #00 head to remove the following 5.5mm screws on the empty battery socket.

    Ask FixBot

    Add Comment

  5. Sony Handycam HDR-CX580V Lens Replacement: step 5, image 1 of 1
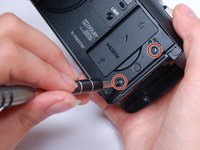
    • Use the Phillips #00 head to remove the following 5.5mm screws on the bottom.

    Ask FixBot

    Add Comment

  6. Sony Handycam HDR-CX580V Lens Replacement: step 6, image 1 of 1
    • Fold back the hinging panel on the top of the camera located near the lens.

    • Use the Phillips #00 head to remove the following 5.5mm screws on the top under the hinging panel.

    Ask FixBot

    Add Comment

  7. Sony Handycam HDR-CX580V Lens Replacement: step 7, image 1 of 2 Sony Handycam HDR-CX580V Lens Replacement: step 7, image 2 of 2
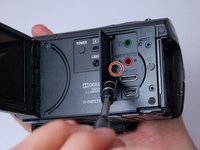
    • Slide back the cover for the DC and A/V ports on the right-hand side.

    • Use the Phillips #00 head to remove the following 5.5mm screws underneath the cover and on the right-hand side.

    Ask FixBot

    Add Comment

  8. Sony Handycam HDR-CX580V Lens Replacement: step 8, image 1 of 1
    • Use the plastic opener tool to loosen the casing on the bottom and the right-hand side.

    • At this point, the right-hand side should simply come off, although it will still be connected with internal wiring.

    • Be delicate with the wiring still attached to the side casing until you have access to removing them later.

    Ask FixBot

    Add Comment

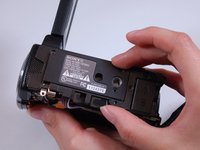
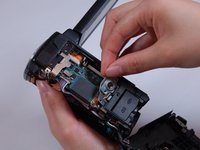
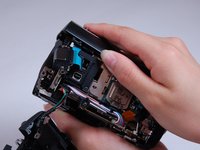
  9. Sony Handycam HDR-CX580V Lens Replacement: step 9, image 1 of 3 Sony Handycam HDR-CX580V Lens Replacement: step 9, image 2 of 3 Sony Handycam HDR-CX580V Lens Replacement: step 9, image 3 of 3
    • Carefully remove the bottom casing with your fingers.

    • Be careful not to loose the small metal stand-mount pieces that lay underneath the casing.

    Ask FixBot

    Add Comment

  10. Sony Handycam HDR-CX580V Lens Replacement: step 10, image 1 of 1
    • Look at the right side of the camera (the side with the recording button) while holding back the detached casing.

    • Use the Phillips #00 head to remove the following 5.5mm screws near the recording button.

    Ask FixBot

    Add Comment

  11. Sony Handycam HDR-CX580V Lens Replacement: step 11, image 1 of 1
    Tool used on this step:
    Tweezers
    $4.99
    Buy
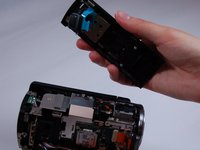
    • Use the curved tweezers to carefully detach the blue ribbon cable connector from the body of the camera.

    • The recording button and its blue ribbon cable connector should become detached from the body, but remain connected to the top casing.

    Ask FixBot

    Add Comment

  12. Sony Handycam HDR-CX580V Lens Replacement: step 12, image 1 of 2 Sony Handycam HDR-CX580V Lens Replacement: step 12, image 2 of 2
    • Pull off the top casing by lightly grabbing either side and pulling towards the back of the camera.

    Ask FixBot

    Add Comment

  13. Sony Handycam HDR-CX580V Lens Replacement: step 13, image 1 of 1
    • Use the Phillips #00 head to remove the following 5.5mm screws on the inside of the top casing.

    Ask FixBot

    Add Comment

  14. Sony Handycam HDR-CX580V Lens Replacement: step 14, image 1 of 1
    • Carefully remove the metal frame from the top casing.

    Ask FixBot

    Add Comment

  15. Sony Handycam HDR-CX580V Lens Replacement: step 15, image 1 of 1
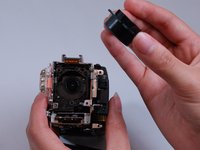
    • You are now free to remove the recording button, as well as its connection strip.

    Ask FixBot

    Add Comment

  16. Sony Handycam HDR-CX580V Lens Replacement, Lens: step 16, image 1 of 1
    • Use the Phillips #00 head to remove the following 5.5mm screws on the right-hand side near the lens.

    Ask FixBot

    Add Comment

  17. Sony Handycam HDR-CX580V Lens Replacement: step 17, image 1 of 1
    • Use the Phillips #00 head to remove the following 5.5mm screws on the top near the lens.

    Ask FixBot

    Add Comment

  18. Sony Handycam HDR-CX580V Lens Replacement: step 18, image 1 of 1
    • Carefully pop off the casing strip on the camera's left-hand side near the lens.

    Ask FixBot

    Add Comment

  19. Sony Handycam HDR-CX580V Lens Replacement: step 19, image 1 of 1
    • Use the Phillips #00 head to remove the following 5.5mm screws underneath the casing strip.

    Ask FixBot

    Add Comment

  20. Sony Handycam HDR-CX580V Lens Replacement: step 20, image 1 of 2 Sony Handycam HDR-CX580V Lens Replacement: step 20, image 2 of 2
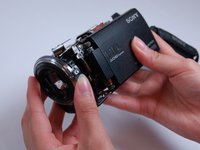
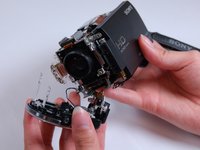
    • Carefully pull the lens cover and shutter assembly off of the front of the camera.

    • Do not pull the the wires out too strongly. Be sure to remove them from their base where they attach to the camera's body.

    Ask FixBot

    Add Comment

  21. Sony Handycam HDR-CX580V Lens Replacement: step 21, image 1 of 1
    • Use the Phillips #00 head to remove the following 5.5mm screws on the lens shell.

    Ask FixBot

    Add Comment

  22. Sony Handycam HDR-CX580V Lens Replacement: step 22, image 1 of 2 Sony Handycam HDR-CX580V Lens Replacement: step 22, image 2 of 2
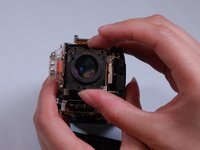
    • Carefully remove the lens from the body of the camera.

    • Make sure to avoid touching the lens itself directly in order to prevent scratches or dirtying.

    Ask FixBot

    Add Comment

Conclusion

To reassemble your device, follow these instructions in reverse order.

Cancel: I did not complete this guide.

Derek Fritz

Member since: 03/21/17

378 Reputation

3 Guides authored

Team

0 Guide Comments

Add Comment

View Statistics:

Past 24 Hours: 1

Past 7 Days: 5

Past 30 Days: 24

All Time: 1,025