
Smartab STJR700 Back Camera Lens Replacement

Fatu Woodson and 6 other contributors
Last updated on Jan 15, 2026
Views: 766
View statistics:
- Past 24 Hours:
- 3
- Past 7 Days:
- 17
- Past 30 Days:
- 90
- All Time:
- 766
Comments: 0
No one has left comments on this guide. Will you be first?
Go to guide commentsCompleted: 0 1
No one has marked this guide "completed." Will you be the first?
1 person has marked this guide "completed." It's you — great job!
Favorites: 0 1
No one has favorited (and subscribed to) this guide. Will you be the first?
1 person has favorited (and subscribed to) this guide — and that's you!
Needs More Images
A few more images would make this guide's procedures crystal clear.
Missing Steps
Oops! This guide is currently missing one or more important steps.
Slice and Dice
The steps in this guide should be split up and made into a series of prerequisite guides.
Missing Details
Some of this guide's details are missing. Help users by adding tools, difficulty, or time.
Introduction
Go to step 1 ↓If the main camera glass of your Smartab STJR700 camera is broken, you can either remove and replace the glass on the lens, or replace the whole camera lens.
Removing the glass on the lens while the Smartab STJR700 is still assembled may cause small pieces of glass to fall into the camera, but it is a faster method that requires less disassembly of the device.
Replacing the whole camera lens is a longer process, and requires removing the back panel, but it is less likely to damage the camera itself. This procedure includes replacing the glass lens and the camera bezel, and will require replacement rear glass adhesive.
What you need
Tools


-
-
-
FUse a screwdriver to remove the screws on the back cover of the Smartab.
-
Remove the cover to reveal the inside of the tablet.
 Ask FixBot
-
-
-
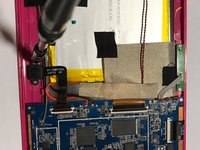
You will see that the camera is stabilized by screws. The digitizer is held in place using black tape.
-
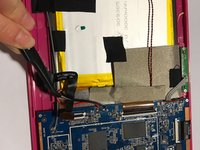
When the black tape is peeled back, you will see that the digitizer is also connected to the motherboard.
-
-
Tool used on this step:Tweezers$4.99
-
Use a screwdriver to unscrew the camera from the tablet.
-
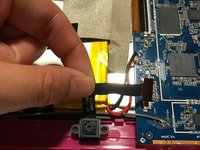
Use tweezers to remove the digitizer from the hard drive.
-
After the digitizer is removed and the camera is unscrewed, remove them from the tablet.
-
-
-
-
To replace the camera lens, start by removing the broken glass by using tweezers.
-
If the new lens has adhesive, make sure that all the old adhesive is removed from the frame so that the lens does not stick out, and so a tighter seal is formed.
-
Once the glass is removed, place the new camera lense by peeling off the upper film and align the glass with the ring.
-
-


To reassemble your device, follow these instructions in reverse order.

Team

UMass Dartmouth, Team S3-G4, Botvin Spring 2017 Member of UMass Dartmouth, Team S3-G4, Botvin Spring 2017
UMASSD-BOTVIN-S17S3G4
4 Members
60 Guides authored
