Free Shipping on Domestic Orders $75+

Sharp LC-42D62U T-Con Board Replacement

What you need

    1. Sharp LC-42D62U  T-Con Board Replacement, Remove the SD card cover: step 1, image 1 of 1
      • To replace the T-Con board it is not necessary to remove the base.

      • Lay the the TV flat on a padded surface.

      Ask FixBot

      Add Comment

    2. Sharp LC-42D62U  T-Con Board Replacement, Detach the rear cover: step 2, image 1 of 1
      • Remove 17 screws.

      Ask FixBot

      Add Comment

    3. Sharp LC-42D62U  T-Con Board Replacement, Remove the stand fixing angle: step 3, image 1 of 1
      • To reassemble all the parts easily, mark with a permanent marker the location of the screws you are removing.

      • 4 screws hold the nd fixing angle.

      Ask FixBot

      Add Comment

    4. Sharp LC-42D62U  T-Con Board Replacement, Remove left and right center angles: step 4, image 1 of 1
      • 2 screws hold each center angles.

      Ask FixBot

      Add Comment

    5. Sharp LC-42D62U  T-Con Board Replacement, Remove the main shield: step 5, image 1 of 1
      • 9 screws.

      Ask FixBot

      Add Comment

    6. Sharp LC-42D62U  T-Con Board Replacement, Disconnect connectors: step 6, image 1 of 1
      • Insert wisdom here.

      Ask FixBot

      Add Comment

    7. Sharp LC-42D62U  T-Con Board Replacement, Remove the tray chassis: step 7, image 1 of 1
      • 7 screws.

      Ask FixBot

      Add Comment

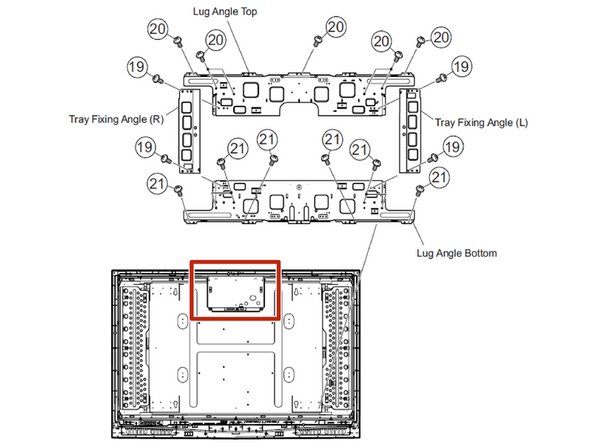
    8. Sharp LC-42D62U  T-Con Board Replacement, Remove the tray fixing angles and the lug angle top: step 8, image 1 of 1
      • Remove the 7 screws holding the lug angle top.

      • Then remove only the bottom screws from the tray fixing angles, leaving the top screws attached to the lug angle top.

      Ask FixBot

      Add Comment

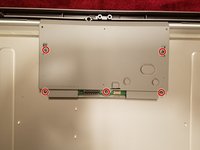
    9. Sharp LC-42D62U  T-Con Board Replacement, Remove the T-Con board shield: step 9, image 1 of 2 Sharp LC-42D62U  T-Con Board Replacement, Remove the T-Con board shield: step 9, image 2 of 2
      • 5 screws.

      Ask FixBot

      Add Comment

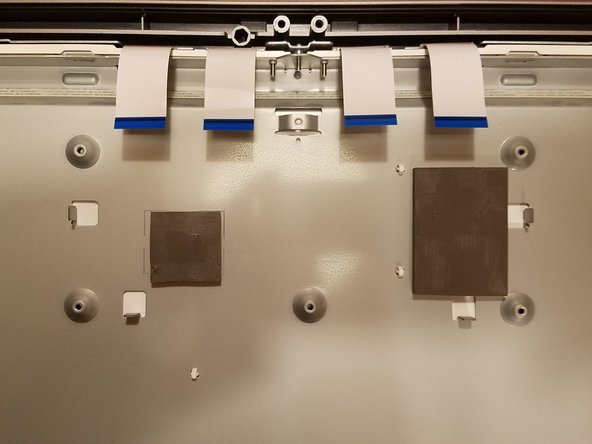
    10. Sharp LC-42D62U  T-Con Board Replacement, Remove the last screw and disconnect the 4 ribbon cables: step 10, image 1 of 1
      • To disconnect the ribbon cables, lift the brown tab on the connector.

      • Make sure the ribbons are positioned correctly in the connector when reassembling the new board.

      Ask FixBot

      Add Comment

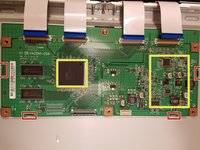
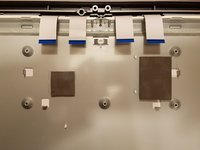
    11. Sharp LC-42D62U  T-Con Board Replacement, Remove the T-Con board: step 11, image 1 of 2 Sharp LC-42D62U  T-Con Board Replacement, Remove the T-Con board: step 11, image 2 of 2
      • There are two pads glued under the board (see yellow marks in the picture): use a heat gun to soften them and then gently pry them to detach the board from the frame.

      • There are also 4 tabs holding the board: gently pull the board to release it, after the pads are disconnected.

      • Reposition the pads on the chassis before installing the new board.

      Ask FixBot

      Add Comment

Conclusion

To reassemble your device, follow these instructions in reverse order.

Cancel: I did not complete this guide.

One other person completed this guide.

Emme

Member since: 06/15/17

927 Reputation

4 Guides authored

0 Guide Comments

Add Comment

View Statistics:

Past 24 Hours: 2

Past 7 Days: 14

Past 30 Days: 53

All Time: 1,791