Free Shipping on Domestic Orders $75+

Sharp Aquos Crystal Rear Camera Replacement

What you need

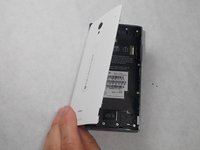
  1. Sharp Aquos Crystal Rear Camera Replacement, Back Panel: step 1, image 1 of 3 Sharp Aquos Crystal Rear Camera Replacement, Back Panel: step 1, image 2 of 3 Sharp Aquos Crystal Rear Camera Replacement, Back Panel: step 1, image 3 of 3
    • Peel back the back cover of the phone from the access point to remove it. It should come off easily using your hands.

    Ask FixBot

    Add Comment

  2. Sharp Aquos Crystal Rear Camera Replacement, USB Port: step 2, image 1 of 2 Sharp Aquos Crystal Rear Camera Replacement, USB Port: step 2, image 2 of 2
    • Remove seven 3mm Star #5 screws shown in the picture with a screwdriver.

    • Remove two 3.5mm Star #5 screws shown in the picture with a screwdriver.

    • Remove two 5mm Star #5 screws shown in the picture with a screwdriver.

    Ask FixBot

    Add Comment

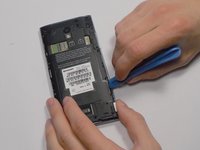
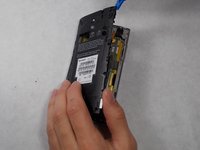
  3. Sharp Aquos Crystal Rear Camera Replacement: step 3, image 1 of 2 Sharp Aquos Crystal Rear Camera Replacement: step 3, image 2 of 2
    • Pry open the back panel using a plastic opening tool. Do this around the edges until you are able to lift it off.

    Ask FixBot

    Add Comment

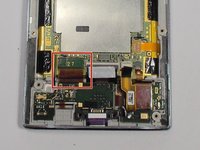
  4. Sharp Aquos Crystal Rear Camera Replacement: step 4, image 1 of 2 Sharp Aquos Crystal Rear Camera Replacement: step 4, image 2 of 2
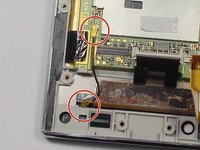
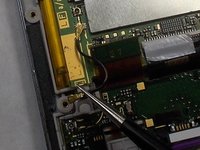
    • Disconnect the wire by lifting it up with a plastic opening tool.

    Ask FixBot

    Add Comment

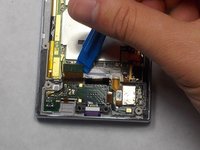
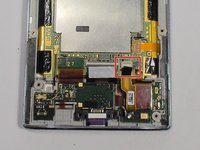
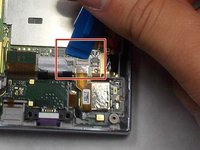
  5. Sharp Aquos Crystal Rear Camera Replacement: step 5, image 1 of 3 Sharp Aquos Crystal Rear Camera Replacement: step 5, image 2 of 3 Sharp Aquos Crystal Rear Camera Replacement: step 5, image 3 of 3
    • To disconnect the cable, use the tip of a spudger or your fingernail to flip up the small retaining flap. Then, you can safely pull the ribbon cable out.

    Ask FixBot

    Add Comment

  6. Sharp Aquos Crystal Rear Camera Replacement: step 6, image 1 of 1
    • After removing the wires, carefully snap out the usb port with your hands. It is held down by some plastic clips, so some force may be needed.

    Ask FixBot

    Add Comment

  7. Sharp Aquos Crystal Rear Camera Replacement, Motherboard: step 7, image 1 of 1
    • Peel off the black pieces of tape.

    Ask FixBot

    Add Comment

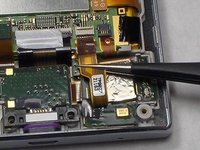
  8. Sharp Aquos Crystal Rear Camera Replacement: step 8, image 1 of 1
    Tool used on this step:
    Tweezers
    $4.99
    Buy
    • Use the tip of a spudger or your fingernail to flip up the small retaining flap. Then pull the cable out using tweezers.

    Ask FixBot

    Add Comment

  9. Sharp Aquos Crystal Rear Camera Replacement: step 9, image 1 of 2 Sharp Aquos Crystal Rear Camera Replacement: step 9, image 2 of 2
    • Remove the wire from the two marked connections using tweezers to pull the wire apart from the device.

    Ask FixBot

    Add Comment

  10. Sharp Aquos Crystal Rear Camera Replacement: step 10, image 1 of 1
    • Peel the tape off with your hands.

    Ask FixBot

    Add Comment

  11. Sharp Aquos Crystal Rear Camera Replacement: step 11, image 1 of 1
    • Lift the motherboard out with your hands.

    Ask FixBot

    Add Comment

  12. Sharp Aquos Crystal Rear Camera Replacement, Rear Camera: step 12, image 1 of 2 Sharp Aquos Crystal Rear Camera Replacement, Rear Camera: step 12, image 2 of 2
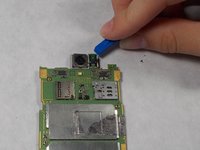
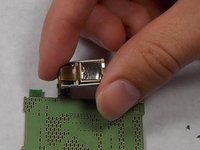
    • Disconnect the camera from the board using a plastic opening tool.

    • Remove the camera from the back of the circuit board.

    Ask FixBot

    Add Comment

Conclusion

To reassemble your device, follow these instructions in reverse order.

Cancel: I did not complete this guide.

Felicia Imbriano

Member since: 03/08/16

1,266 Reputation

8 Guides authored

Team

0 Guide Comments

Add Comment

View Statistics:

Past 24 Hours: 5

Past 7 Days: 10

Past 30 Days: 44

All Time: 1,647