
Seville Classics MSC10166 Buttons Replacement

Queena Phung and 11 other contributors
Last updated on Jun 8, 2023
Views: 5K
View statistics:
- Past 24 Hours:
- 0
- Past 7 Days:
- 16
- Past 30 Days:
- 96
- All Time:
- 4,995
Comments: 3
1 comment on steps, 2 guide comments.
Go to guide commentsCompleted: 2 3
2 people have marked this guide "completed." Will you be next?
3 people have marked this guide "completed." Including you — great job!
Favorites: 2 3
2 people have favorited (and subscribed to) this guide. Will you be next?
3 people have favorited (and subscribed to) this guide — including you!
Action Shots
Be an action hero! This guide needs images that better demonstrate how to perform specific actions.
Needs Better Images
Better photos will improve this guide. Help out by taking, editing, or uploading new ones!
Missing Details
Some of this guide's details are missing. Help users by adding tools, difficulty, or time.
Introduction
Go to step 1 ↓If the buttons on the Seville Classics MSC10166 Tower Fan become broken or sticky, you can use this guide to replace the buttons.
Broken buttons can make it hard turn on or change the settings, which can impact the functionality of your fan.
You will not need any special skills in order to complete this project.
Before you begin, make sure the fan is off and unplugged, as you will be touching wires and circuit boards.
What you need
Tools

-
-
-
Use the Phillips #2 screwdriver to remove the four 6 mm screws by unscrewing counterclockwise.
 Ask FixBot
-
-
-
Remove the Phillips 6 mm screw that holds the circuit board to the outer shell of the fan.
-
-
-
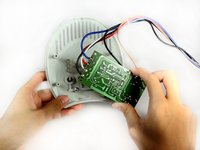
Remove the top cover containing the circuit board and the wires by pulling it away from the outer shell of the fan.
-
-
-
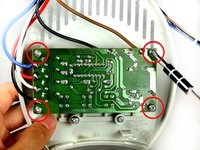
Remove the screws from the four corners of the circuit board.
-
Remove the circuit board from the top cover.
-
-
-
-
-
Remove the two 8 mm screws that attach the buttons to the top cover of the fan.
-
-
-




To reassemble your device, follow these instructions in reverse order.
Cancel: I did not complete this guide.
2 other people completed this guide.

Team

Cal Poly, Team 15-46, Forte Fall 2012 Member of Cal Poly, Team 15-46, Forte Fall 2012
CPSU-FORTE-F12S15G46
5 Members
72 Guides authored
2 Guide Comments
Great work but our problem is the micro switch itself, after exposing the circuit board I shorted the backside solder connections to cycle the fan on and off, everything works perfectly…..now I only need to know a part number so I can find a on/off micro switch.
any suggestions?
Thanks for any help you can provide
rickkingsbury@comcast.net
Is there a way to keep the fan in ALWAYS ON position. So I can control it’s ON/OFF using a smart plug?
