Introduction
You might want to read this
- Here is why your controller drifts (iFixit article)
- If you are out of warranty, my best idea right now, if you are comfortable with soldering, is to replace your potentiometers with Hall Effect Sensors and not paying shit tons of money to Scuf.
- For the Hall Effect sensors, just search Amazon / Aliexpress. They retail at around 3-5$ a piece. Yet this requires soldering, covered in detail by iFixit’s recent (july 2024) YouTube video: How to fix PS5 drift for good.
PS: Original input appear from bottom to top.
——
UPDATE 2, july 2024:
9 months later. My completely new «refurbished» unit started acting up already after 6 months moderate use. (I do not play a lot, neither am I a nasty controller citizen) This time, R3 that also sometimes clicked R2, making movement around Warzone pretty random. (You can see a diagnostics video i put up here (YouTube)
UPDATE 1
The jitter came back, and didn't leave. You might be lucky, but for all the fuzz required to get this working, I now recommend replacing the joystick modules with Hall Effect sensors.
I chose the lazy route, and did an RMA with Scuf directly, which cost me 70£ including freight. Next time I'll go that route ☝🏻.
In the hopes it can help someone, I'll leave this guide open, but consider yourself warned :/
----
Original post (resulting in this repair guide)
My Scuf Reflex FPS for PS5 started jittering out of all bounds, rendering it useless after only 9 months. I asked for a refund/replacement, but knowing it would take weeks, might not be covered by the warranty, and that their only service dept is in China = a hefty price tag, I decided to give it a go.
After some trial and error, I went from a useless to a 100% working unit, without purchasing any additional components. Your results may vary, and this might fail tomorrow, but at least it is a pretty simple test.
While there were a lot of other DualSense guides here, none addressed this common problem without a complete replacement, so for what it's worth, here are my five cents.
What you need
Video Overview
-
-
-
First, I recommend testing your unit on the free Gamepad Tester to see how it performs.
 Ask FixBot
-
-
-
Remove the Scuf top plate by pulling these nibs with your fingers.
-
-
Tool used on this step:Tweezers$4.99
-
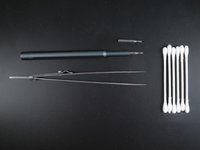
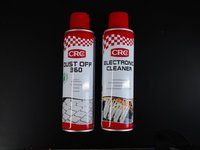
Get your gear. You should have
-
A pair of tweezers (ideally angled ones)
-
Q-tips
-
Standard small Philips screwdriver
-
Ideally an angled prodding tool (not displayed).
-
Electronic cleaner / rubbing alcohol
-
Compressed air
-
-
-
-
Remove the L1 / R1 buttons by inserting an angled prodder and pulling straight out. It should come easily.
-
Remove the marked screws as well.
-
-
-
When you have removed the top plate, Remove the sticks by pulling straight up.
-
-
-
Prod the device open. No images here, but use a prodding tool and take it slowly. Check out YouTube if you don't know how to progress.
-
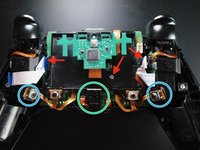
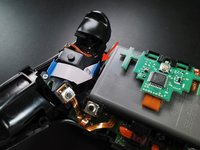
The inside of your Scuf controller will look something like this.
-
Unplug and remove the battery (see arrow)
-
-
-
Remove the screw from the battery plate
-
Optional, but will make the next step easier: Detach the left cable by pulling on the blue plastic tab.
-
Optional: Remove the right cable with your hand (no plastic tab here, so make sure you don't damage the cord)
-
Then, carefully lift the board out of place. Be aware that there is a light LED (not present in picture) in the green circle that you might have to reposition when reassembling
-
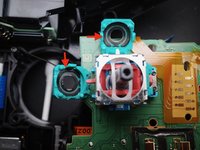
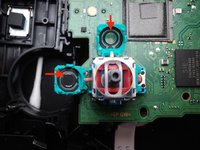
The board is partly held in place by two plastic rods that are mounted in a hole around the blue circles. These are completely loose and can be pulled straight up
-
-
-
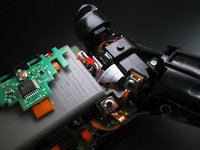
Use a small, flat and thin screwdriver to pry the joystick potentiometer slots open. Push the slots down about 80°. My screwdriver was was about 1,5mm in width and very thin.
-
Remove the potentiometer for the stick you have a problem with (remember the controller now might be mirrored)
-
Use a q-tip and electronic cleaner to clean the carbon track (everything on the inside of the green plastic) thoroughly.
-
Let it dry and do it again, with a new swab. I recommend doing this multiple times. It was first on my fifth attempt it worked without flaw.
-
Be careful not to let residue from the Q-tips get stuck.
-
-
-
Clean the wipers with a q-tip and electronic cleaner. Let it dry. Repeat.
-
Be aware: Do not let fingerprints or residue from the Q-tip get stuck.
-
I have no idea why they are so different in color. They were paired from top to bottom, but only one of my sticks was acting weirdly.
-
I tried removing the corrosion (?) soaking it in rubbing alcohol over night, but it looked the same. I guess these wear out pretty quickly, but they are 3$ for 10x on Aliexpress.
-
PS: After several hits and misses, I used the darker ones on the horizontal axis of the controller. Have no idea if this will help or not.
-
-
-
Test it on the Gamepad Tester.
-
After 7-8 tries of varying results, I was amazed that it worked.
-
Disclaimer: I am guessing that this might be a temporary fix. Although I don't quite know the initial state of the carbon tracks, the seem worn and I'm afraid the jitter might return.
-
If so, I would definitely try to replace the carbon tracks and washers first before going into soldering town.
-
Good luck!
-
-







To reassemble your device, follow these instructions in reverse order.
Cancel: I did not complete this guide.
6 other people completed this guide.

7 Guide Comments
Thanks for the tip! I’ve tried this over and over but my stick drift is just worse now and maybe I’m putting the wipers in incorrectly but I’m not sure. How many tries until you got it right?
Hiya, @charliepeacock. I almost gave up myself, thought it was undoable. It also worsened for me, but on the fourth or fifth try, everything suddenly worked. That being said, I was correct in my assumption that it would only be a temporary fix, as it has since gone back to error state. Now, I believe I would do the process, but replace rather than clean the wipers as this is super cheap and provably easier ± freight time for the spare parts.
Hello and thank you for the tip.
It has been worse for me as well.
I can't believe a 300€ controller being so bad quality.
To whoever reads this, don't buy Scuf.
Yea, that´s because they just put in their components very cheap (different cases were the soldering was really bad). They do only the minimum they have to do and in the end you buy some cheap tuning kits for a lot of money. Techdemy, an YTber from Australia covers that in different Videos when he repairs Scuf controllers.
Wow, I'm very grateful.
