
Samsung NP N310 HAA2US Back Panel Replacement

Amir Afridi and 2 other contributors
Last updated on Dec 14, 2016
Views: 888
View statistics:
- Past 24 Hours:
- 2
- Past 7 Days:
- 24
- Past 30 Days:
- 89
- All Time:
- 888
Comments: 0
No one has left comments on this guide. Will you be first?
Go to guide commentsCompleted: 0 1
No one has marked this guide "completed." Will you be the first?
1 person has marked this guide "completed." It's you — great job!
Favorites: 0 1
No one has favorited (and subscribed to) this guide. Will you be the first?
1 person has favorited (and subscribed to) this guide — and that's you!
Markup Mishap
This guide needs better markups. Help out by correcting or making some markup annotations.
Introduction
Go to step 1 ↓This guide will show how to remove the back cover from the laptop in order to access the parts inside the computer.
This guide will be a pre-requisite guide for replacing the hard drive, and cooling fan.
What you need
Tools


-
-
-
Slide the battery switch to the unlock symbol, and the battery will pop up.
-
Remove the battery.
 Ask FixBot
-
-
-
-
-
-
Locate, and unscrew the 11 Phillips 8mm back cover screws, and 1 Phillips 5mm screw on the RAM cover. Use a #1 Philips screw driver to remove the screws.
-
-
-
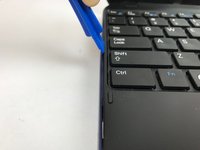
Insert the plastic opening tool in the break between the back panel, and the keyboard.
-
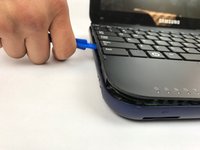
Drag the opening tool around the edge to separate it.
-
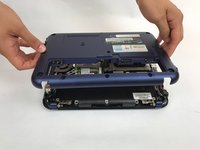
Pull the back panel off of the laptop.
-
-


To reassemble your device, follow these instructions in reverse order.

Team

USF Tampa, Team 4-1, Passmore Fall 2016 Member of USF Tampa, Team 4-1, Passmore Fall 2016
USFT-PASSMORE-F16S4G1
4 Members
72 Guides authored
