Free Shipping on Domestic Orders $75+

Samsung Instinct LCD screen Replacement

What you need

  1. Samsung Instinct LCD screen Replacement, Battery: step 1, image 1 of 1
    • Apply pressure to the back cover and slide it forward towards the camera.

    • Lift the back cover off the phone.

    Ask FixBot

    Add Comment

  2. Samsung Instinct LCD screen Replacement: step 2, image 1 of 1
    • Holding the phone firmly, use the notches to grip and lift up the battery.

    Ask FixBot

    Add Comment

  3. Samsung Instinct LCD screen Replacement, Back Case: step 3, image 1 of 1
    • Remove the four 4.45mm screws at the corners of the phone.

    Ask FixBot

    Add Comment

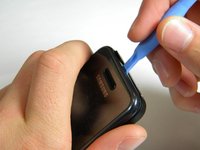
  4. Samsung Instinct LCD screen Replacement: step 4, image 1 of 2 Samsung Instinct LCD screen Replacement: step 4, image 2 of 2
    • Use the plastic opening tool to unhinge the locks around the edges of the phone.

    • Do not worry about the inner components of the phone; they are not connected to this case.

    Ask FixBot

    Add Comment

  5. Samsung Instinct LCD screen Replacement: step 5, image 1 of 1
    • Lift the casing off of the phone.

    Ask FixBot

    Add Comment

  6. Samsung Instinct LCD screen Replacement, Antenna: step 6, image 1 of 1
    • With the screws removed, locate the antenna.

    Ask FixBot

    Add Comment

  7. Samsung Instinct LCD screen Replacement: step 7, image 1 of 1
    • Using a Phillips head screwdriver, remove the 4.50mm screw holding the antenna in place.

    Ask FixBot

    Add Comment

  8. Samsung Instinct LCD screen Replacement: step 8, image 1 of 1
    • Using the plastic opener tool, squeeze gently on the antenna cable connector and lift to remove the connector from its position.

    Ask FixBot

    Add Comment

  9. Samsung Instinct LCD screen Replacement: step 9, image 1 of 1
    • Gently lift up on the antenna and remove it from the back of the device.

    Ask FixBot

    Add Comment

  10. Samsung Instinct LCD screen Replacement, Front Case: step 10, image 1 of 1
    • Remove the two 3.50mm screws connecting the motherboard to the case.

    Ask FixBot

    Add Comment

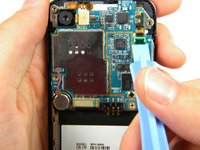
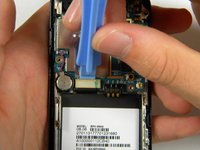
  11. Samsung Instinct LCD screen Replacement: step 11, image 1 of 3 Samsung Instinct LCD screen Replacement: step 11, image 2 of 3 Samsung Instinct LCD screen Replacement: step 11, image 3 of 3
    • Use the plastic opener tool to detach the three ribbons on the motherboard.

    Ask FixBot

    Add Comment

  12. Samsung Instinct LCD screen Replacement: step 12, image 1 of 1
    • Lift out the top right ribbon from its slot on the motherboard.

    Ask FixBot

    Add Comment

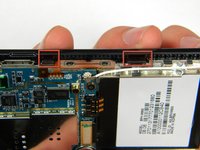
  13. Samsung Instinct LCD screen Replacement: step 13, image 1 of 2 Samsung Instinct LCD screen Replacement: step 13, image 2 of 2
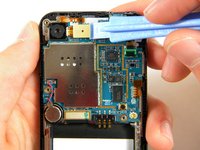
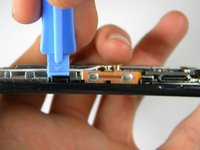
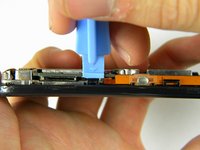
    • Use the plastic opener tool to unhinge the the locks on the side of the motherboard connecting it to the front casing.

    Ask FixBot

    Add Comment

  14. Samsung Instinct LCD screen Replacement: step 14, image 1 of 1
    • Lift the motherboard away from the front casing.

    Ask FixBot

    Add Comment

  15. Samsung Instinct LCD screen Replacement: step 15, image 1 of 1
    • After removing lifting up on the motherboard, the front casing and center frame should be separated as shown.

    Ask FixBot

    Add Comment

  16. Samsung Instinct LCD screen Replacement, LCD screen: step 16, image 1 of 1
    • Using the plastic opener tool, detach the ribbon located on the bottom of the phone below the battery compartment.

    Ask FixBot

    Add Comment

  17. Samsung Instinct LCD screen Replacement: step 17, image 1 of 1
    • Lift the microchip (located at the bottom of the phone) and insert the plastic opener tool under the screen.

    • Lift up the screen. The microchip is attached to the screen and will be lifted out with the screen.

    Ask FixBot

    Add Comment

  18. Samsung Instinct LCD screen Replacement: step 18, image 1 of 1
    • After lifting out the LCD screen, the screen and its housing should be separated as shown.

    Ask FixBot

    Add Comment

Conclusion

To reassemble your device, follow these instructions in reverse order.

Cancel: I did not complete this guide.

One other person completed this guide.

Patrick

Member since: 10/11/11

75 Reputation

2 Guides authored

Team

Cal Poly, Team 3-13, Regan Fall 2011 Member of Cal Poly, Team 3-13, Regan Fall 2011

CPSU-REGAN-F11S3G13

4 Members

24 Guides authored

0 Guide Comments

Add Comment

View Statistics:

Past 24 Hours: 1

Past 7 Days: 4

Past 30 Days: 25

All Time: 1,902