
Samsung Gear 2 Neo Display Replacement

Victor Yore and 5 other contributors
Last updated on Aug 11, 2017
Views: 6.7K
View statistics:
- Past 24 Hours:
- 1
- Past 7 Days:
- 13
- Past 30 Days:
- 83
- All Time:
- 6,677
Comments: 0
No one has left comments on this guide. Will you be first?
Go to guide commentsCompleted: 5 6
5 people have marked this guide "completed." Will you be next?
6 people have marked this guide "completed." Including you — great job!
Favorites: 0 1
No one has favorited (and subscribed to) this guide. Will you be the first?
1 person has favorited (and subscribed to) this guide — and that's you!
Introduction
Go to step 1 ↓If your display is failing, has distorted color problems, or is cracked, and you'd like to replace it then follow these step by step instructions. This requires close attention of the display and can be somewhat difficult with a rating of 5 out of 10 but should only take about 15 minutes or less if instructions are followed properly. Be careful because it'e possible to damage the case, and display.
What you need


-
-
-
Remove the wristband by sliding the metal pins located on both sides of the wrist band, and pulling the wristband off.
 Ask FixBot
-
-
-
Use a T5 Torx Screwdriver to remove the 4 (0.4 mm) screws located on the back of the watch.
-
-
-
Slide the opening tool in between the two halves of the case and slide along the edge of the watch while gently prying the back cover away from the face of the watch.
-
-
Tool used on this step:Tweezers$4.99
-
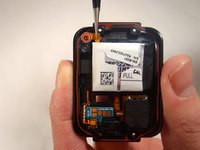
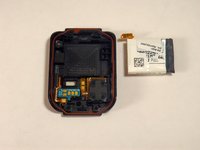
Use a pair of tweezers to peel the battery ribbon cable off of the back cover.
-
The pin is located, and marked on the picture.
-
Pull up on the tab that says, “Pull”, the battery will lift straight out.
-
-
-
-
-
Using the plastic opening tool, pull up on the flex connector. It will come off the motherboard, but will stay attached to the cover like a hinge.
-
-
-
Place the plastic opening tool underneath the motherboard at this location. Gently pry the motherboard away from the front cover. It should pop off and be free from the cover.
-
-
-
-
-
Use the spudger and apply pressure to the back of the AMOLED display.
-
-
-
-
Once part of the display begins detaching from the front cover, place the spduger in between the display and the front cover.
-
-
-
Use the spudger to scrape off the adhesive located on the bottom side of the display, attaching the display to the front cover.
-
-
-
After the adhesive has been removed, apply pressure with the spudger to the back of the AMOLED display; the display should pop right out.
-
-




To reassemble your device, follow these instructions in reverse order.
Cancel: I did not complete this guide.
5 other people completed this guide.

Team

USF Tampa, Team 5-6, Blackwell Fall 2015 Member of USF Tampa, Team 5-6, Blackwell Fall 2015
USFT-BLACKWELL-F15S5G6
3 Members
60 Guides authored
