
Samsung Galaxy TabPro S Front-Facing Camera Replacement

Mitchell Caister and 4 other contributors
Last updated on May 7, 2024
Views: 860
View statistics:
- Past 24 Hours:
- 2
- Past 7 Days:
- 26
- Past 30 Days:
- 80
- All Time:
- 860
Comments: 0
No one has left comments on this guide. Will you be first?
Go to guide commentsCompleted: 0 1
No one has marked this guide "completed." Will you be the first?
1 person has marked this guide "completed." It's you — great job!
Favorites: 0 1
No one has favorited (and subscribed to) this guide. Will you be the first?
1 person has favorited (and subscribed to) this guide — and that's you!
Action Shots
Be an action hero! This guide needs images that better demonstrate how to perform specific actions.
Needs More Images
A few more images would make this guide's procedures crystal clear.
Better Introduction
Improve this guide by completing or revising its introduction.
Introduction
Go to step 1 ↓For the Samsung Galaxy TabPro S, model SM-W700NZKAXAR, it is important for the front-facing camera to be functional and not broken. The front-facing camera allows to take pictures with the front side of the tablet. Thus, the ability to capture real-time memories is lost without the front-facing camera.
What you need
Tools
-
Tweezers4.9


-
-
-
Remove the back of the tablet by prying the plastic back using a flat tool.
-
When the tool has been inserted under the back, slide it all the way around the tablet to fully unclip it.
 Ask FixBot
-
-
Tool used on this step:Tweezers$4.99
-
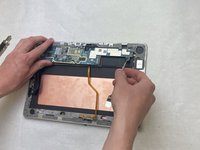
Once the back has been removed, disconnect all cables using a pair of tweezers to avoid damaging any components.
-
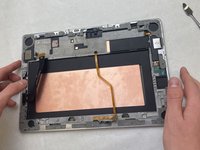
Once the cables have been disconnected, remove the battery using a flat plastic tool (not the metal spudger).
-
-
-
Use a Phillips #0 screwdriver to remove the screws that secure the motherboard.
-
Remove the metal plate once the screws are gone and the motherboard will be ready to be replaced.
-
-
-
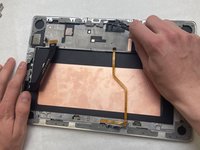
Remove motherboard by prying it up with a flat plastic opening tool (not metal spudger).
-
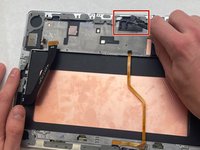
Be sure that all components have been disconnected beforehand, especially the front-facing camera (located above the motherboard in the top center of the frame).
-
-
-
-
Once the camera has been disconnected from the motherboard, it can be removed using a pair of pliers.
-
-




To reassemble your device, follow these instructions in reverse order.

Team

IUPUI, Team 3-4, Harley Spring 2022 Member of IUPUI, Team 3-4, Harley Spring 2022
IUPUI-HARLEY-S22S3G4
3 Members
36 Guides authored
