Introduction
If your screen is cracked, or parts of the display do not work normally, pixelated, or the screen will not function at all, use this guide to replace the screen.
Before starting the process, make sure that you troubleshoot your display to rule out other possible solutions, and potentially any need for replacement. Check out this page for more details on how to troubleshoot the display: Samsung Galaxy Tab A8 Screen Is Blank Or Unresponsive
The screen may become unresponsive due to slow processing, or go blank from something like the battery running out of power. The display is simply a place for the computer inside to output information, and can be affected by many different device components. If it seems that the device isn’t charging properly, check out this guide for battery replacement: [insert link here]
The screen can also degrade over time. Common issues are due to dirt, grime and other contaminants soiling the screen. Be sure to clean the display before attempting to replace the display.
Below are some video and step-by-step instructions for replacing the screen, with images to serve as visual aids should the video fail to load.
What you need
Video Overview
-
-
Fully power off the device.
-
Orient the screen so it is face-up.
-
Apply anti-clamp or other suction device to apply constant upward force on the screen.
-
Heat the screen to soften the adhesive with a heat gun or blow dryer. Be sure to heat all sides as evenly as possible.
 Ask FixBot
-
-
-
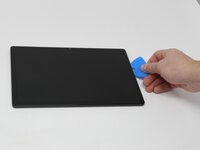
Use plastic opening picks, or a Jimmy if necessary, to remove the adhesive and get under the screen.
-
Using the plastic opening picks, move around the screen slowly, one corner at a time. Every few inches, leave an additional opening pick behind where you are working to hold the screen open while continuing to remove the adhesive.
-
-
-
-
Continue to pry the screen off with the opening picks, using additional tools if more leverage is required.
-
-
-
Using a Phillips #000 screwdriver, remove the 1.8mm screw holding the clamp that holds the screen ribbon in place.
-
Remove the battery connector ribbon to help prevent short circuiting of the device and/or shock hazards.
-
-
-
Disconnect the screen ribbon wire connector.
-
Remove the screen from the tablet.
-


To reassemble your device, follow these instructions in reverse order.
Cancel: I did not complete this guide.
5 other people completed this guide.
2 Guide Comments
Great video, I have a samsung 5se with a screen starting to lift and thinking about attempting to repair. It works perfectly just starting to see glue in places. I am curious as to the type of adhesive you used on this repair and if it can be purchased on this site?
Great stuff. Was really easy to repair. My cable was torn, and it cost me about 8 Euros and 10 minutes to repair. Love it.