Free Shipping on Domestic Orders $75+

Samsung Galaxy S Viberant Replacement

What you need

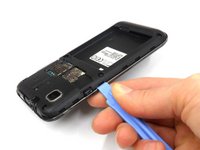
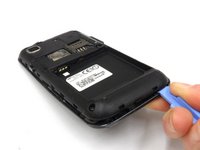
    1. Samsung Galaxy S Viberant Replacement, Battery: step 1, image 1 of 3 Samsung Galaxy S Viberant Replacement, Battery: step 1, image 2 of 3 Samsung Galaxy S Viberant Replacement, Battery: step 1, image 3 of 3
      • Locate the small slit on the bottom edge of the device between the back and front cases.

      • Pop the back case off by inserting your finger and pulling the case away from the phone.

      • If necessary (it shouldn't be), use the Plastic Opening Tools to pry the back case off.

      Ask FixBot

      Add Comment

    2. Samsung Galaxy S Viberant Replacement: step 2, image 1 of 2 Samsung Galaxy S Viberant Replacement: step 2, image 2 of 2
      • Remove the battery by pushing the bottom edge of the battery up and away from the phone

      • If you would prefer, you may use the Plastic Opening Tools for this step as well.

      Ask FixBot

      Add Comment

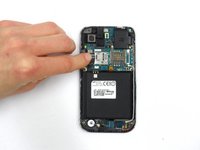
    1. Samsung Galaxy S Viberant Replacement, Midframe: step 3, image 1 of 1
      • Remove SIM card by pushing down and away from the slot, then pulling it out toward the bottom edge of the phone.

      Ask FixBot

      Add Comment

    2. Samsung Galaxy S Viberant Replacement: step 4, image 1 of 1
      • Remove the seven 4.5 mm Phillips #00 screws along the perimeter of the phone.

      Ask FixBot

      Add Comment

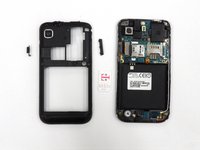
    3. Samsung Galaxy S Viberant Replacement: step 5, image 1 of 3 Samsung Galaxy S Viberant Replacement: step 5, image 2 of 3 Samsung Galaxy S Viberant Replacement: step 5, image 3 of 3
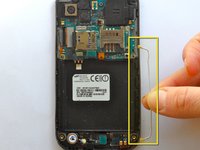
      • Staring near the power button, use a plastic opening tool to disengage the plastic clips securing the midframe.

      • Work carefully, and disengage all of the clips before removing the midframe.

      • The power button and the volume control button on the sides of the phone will fall out when the midframe is removed.

      Ask FixBot

      Add Comment

    4. Samsung Galaxy S Viberant Replacement: step 6, image 1 of 2 Samsung Galaxy S Viberant Replacement: step 6, image 2 of 2
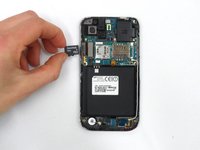
      • Slide the SD card out of its slot.

      Ask FixBot

      Add Comment

    1. Samsung Galaxy S Viberant Replacement, Camera Lens: step 7, image 1 of 1
      Tool used on this step:
      Tweezers
      $4.99
      Buy
      • Disconnect the ribbon cable and camera lens by tugging gently at the base of the ribbon cable either by pinching with fingers or with the Tweezers.

      • Only use the pinching method when the camera lens is already broken so as to avoid damage.

      Ask FixBot

      Add Comment

    1. Samsung Galaxy S Viberant Replacement, Unhooking Antenna Cable: step 8, image 1 of 3 Samsung Galaxy S Viberant Replacement, Unhooking Antenna Cable: step 8, image 2 of 3 Samsung Galaxy S Viberant Replacement, Unhooking Antenna Cable: step 8, image 3 of 3
      Tool used on this step:
      Tweezers
      $4.99
      Buy
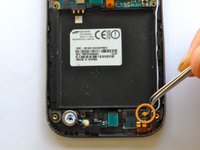
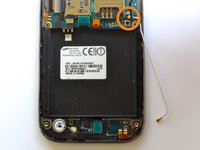
      • Disconnect the antenna using Tweezers. Do the lower end first, and then the upper.

      • Do the lower end first, and then the upper.

      • Pull the antenna cable out.

      Ask FixBot

      Add Comment

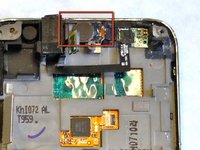
    1. Samsung Galaxy S Viberant Replacement, Headphone Jack/Ear Speaker: step 9, image 1 of 2 Samsung Galaxy S Viberant Replacement, Headphone Jack/Ear Speaker: step 9, image 2 of 2
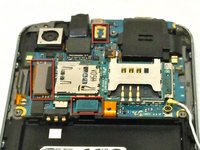
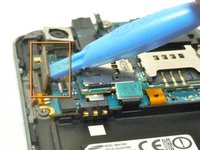
      • Locate the three snap on ribbon cable connectors on the motherboard.

      • Carefully disconnect the ribbon cable connectors using the Plastic Opening Tools.

      Ask FixBot

      Add Comment

    2. Samsung Galaxy S Viberant Replacement: step 10, image 1 of 1
      • With the three ribbon cable connectors detached, the motherboard can be folded over to the left.

      • Take care when moving the motherboard not to allow any of the ribbon cables to be pulled on.

      • The motherboard will still be connected to the body of the phone by the power button's ribbon cable, which is glued in place.

      Ask FixBot

      Add Comment

    3. Samsung Galaxy S Viberant Replacement: step 11, image 1 of 1
      • Remove the power button ribbon cable from the body of the phone by using the Plastic Opening Tools.

      • Take care to not damage the button itself or its connecting ribbon cable when detaching the button.

      • The glue which holds the button in place will remain tacky allowing the button to be replaced without the need for additional glue.

      Ask FixBot

      Add Comment

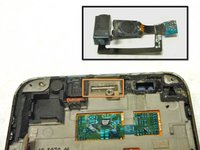
    4. Samsung Galaxy S Viberant Replacement: step 12, image 1 of 2 Samsung Galaxy S Viberant Replacement: step 12, image 2 of 2
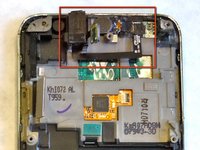
      • With the motherboard removed, the Headset Jack and Ear Speaker are now accessible.

      • Use the Plastic Opening Tools to gently pry up the Headphone Jack to remove it from the body of the phone.

      • The Headphone Jack is held in place with adhesive that will remain tacky after being removed, allowing it to be replace without the need for additional glue.

      Ask FixBot

      Add Comment

    5. Samsung Galaxy S Viberant Replacement: step 13, image 1 of 2 Samsung Galaxy S Viberant Replacement: step 13, image 2 of 2
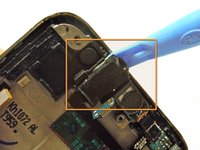
      • Disconnect the Ear Speaker from the body of the phone be gently prying up the speaker using the Plastic Opening Tools.

      • The connection holding the Ear Speaker in place is the same kind as the snap on ribbon cables that were disconnected in a previous step.

      • With the Headphone Jack and Ear Speaker both disconnected from the body of the phone, they can be removed from the phone and set aside.

      Ask FixBot

      Add Comment

    1. Samsung Galaxy S Viberant Replacement, LCD Screen: step 14, image 1 of 1
      • Use a heat gun or hairdryer to loosen the adhesive that secures the touch panel to the screen assembly.

      • Wear heat resistant gloves when removing the screen.

      Ask FixBot

      Add Comment

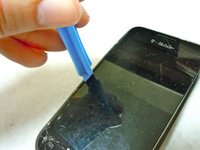
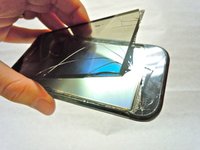
    2. Samsung Galaxy S Viberant Replacement: step 15, image 1 of 2 Samsung Galaxy S Viberant Replacement: step 15, image 2 of 2
      • Use a plastic opening tool or guitar pick to carefully remove the touch panel from the screen assembly.

      • Start from the top edge and carefully wedge your tool between the screen and frame.

      • Carefully slide your tool along the framework.

      • If the screen is cracked, cover the face in masking tape to prevent broken glass from chipping off.

      • You may need to reheat the adhesive as you work around the edges.

      Ask FixBot

      Add Comment

    1. Samsung Galaxy S Viberant Replacement, Battery: step 16, image 1 of 3 Samsung Galaxy S Viberant Replacement, Battery: step 16, image 2 of 3 Samsung Galaxy S Viberant Replacement, Battery: step 16, image 3 of 3
      • Locate the small slit on the bottom edge of the device between the back and front cases.

      • Pop the back case off by inserting your finger and pulling the case away from the phone.

      • If necessary (it shouldn't be), use the Plastic Opening Tools to pry the back case off.

      Ask FixBot

      Add Comment

    2. Samsung Galaxy S Viberant Replacement: step 17, image 1 of 2 Samsung Galaxy S Viberant Replacement: step 17, image 2 of 2
      • Remove the battery by pushing the bottom edge of the battery up and away from the phone

      • If you would prefer, you may use the Plastic Opening Tools for this step as well.

      Ask FixBot

      Add Comment

    1. Samsung Galaxy S Viberant Replacement, Loud Speaker: step 18, image 1 of 1
      Tool used on this step:
      Phillips #00 Screwdriver
      $5.49
      Buy
      • Locate the seven screws on the plastic casing.

      • Using the Phillips #00 Screwdriver, remove all seven screws.

      • Be careful not to lose any of these small screws.

      Ask FixBot

      Add Comment

    2. Samsung Galaxy S Viberant Replacement: step 19, image 1 of 1
      • Once all seven screws have been removed, use the Plastic Opening Tools to gently release the plastic snaps around the seam of the black casing.

      • Be careful not to break any of the plastic snaps.

      Ask FixBot

      Add Comment

    3. Samsung Galaxy S Viberant Replacement: step 20, image 1 of 1
      • After all the plastics snaps have been released, the black plastic casing will come off easily.

      • Locate the speaker.

      Ask FixBot

      Add Comment

    4. Samsung Galaxy S Viberant Replacement: step 21, image 1 of 1
      • Using the Plastic Opening Tools, carefully lift the golden-brown clamp holding down the speaker's ribbon cable.

      • Remove the speaker by gently pulling it.

      Ask FixBot

      Add Comment

Conclusion

To reassemble your device, follow these instructions in reverse order.

Cancel: I did not complete this guide.

Tilly

Member since: 02/26/26

265 Reputation

3 Guides authored

0 Guide Comments

Add Comment

View Statistics:

Past 24 Hours: 1

Past 7 Days: 6

Past 30 Days: 28

All Time: 91