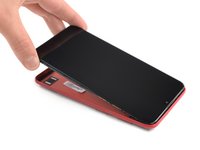
Free Shipping on Domestic Orders $75+

Samsung Galaxy A10 Back Cover Replacement

What you need

  1. Samsung Galaxy A10 Back Cover Replacement, Samsung Galaxy A10 SIM Tray Replacement: step 1, image 1 of 2 Samsung Galaxy A10 Back Cover Replacement, Samsung Galaxy A10 SIM Tray Replacement: step 1, image 2 of 2
    • Insert a SIM card eject tool, a SIM eject bit or a straightened paper clip into the hole on the SIM tray located at the left side of the phone.

    • Press firmly to eject the tray.

    Ask FixBot

    Add Comment

  2. Samsung Galaxy A10 Back Cover Replacement: step 2, image 1 of 2 Samsung Galaxy A10 Back Cover Replacement: step 2, image 2 of 2
    • Remove the SIM card tray.

    • When reinserting the cards, make sure to properly orient them in the tray.

    Ask FixBot

    Add Comment

  3. Samsung Galaxy A10 Back Cover Replacement, Back Cover: step 3, image 1 of 2 Samsung Galaxy A10 Back Cover Replacement, Back Cover: step 3, image 2 of 2
    • The back cover is held in place by plastic clips.

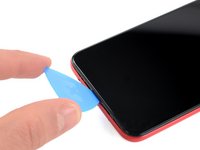
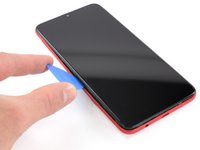
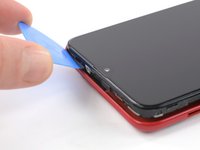
    • Insert an opening pick between the screen and the back cover on the bottom of the phone where the charging port is located.

    Ask FixBot

    Add Comment

  4. Samsung Galaxy A10 Back Cover Replacement: step 4, image 1 of 3 Samsung Galaxy A10 Back Cover Replacement: step 4, image 2 of 3 Samsung Galaxy A10 Back Cover Replacement: step 4, image 3 of 3
    • Slide the opening pick to the bottom left corner to release the clips.

    Ask FixBot

    Add Comment

  5. Samsung Galaxy A10 Back Cover Replacement: step 5, image 1 of 3 Samsung Galaxy A10 Back Cover Replacement: step 5, image 2 of 3 Samsung Galaxy A10 Back Cover Replacement: step 5, image 3 of 3
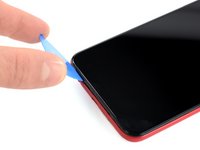
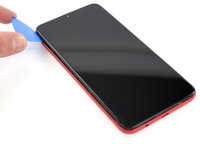
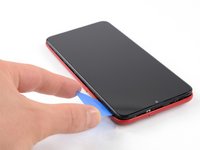
    • Slide the opening pick along the left edge to the top left corner of the phone, to release the clips.

    Ask FixBot

    Add Comment

  6. Samsung Galaxy A10 Back Cover Replacement: step 6, image 1 of 3 Samsung Galaxy A10 Back Cover Replacement: step 6, image 2 of 3 Samsung Galaxy A10 Back Cover Replacement: step 6, image 3 of 3
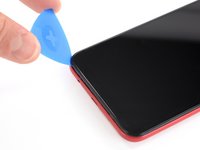
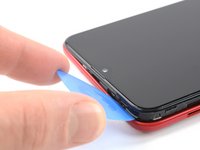
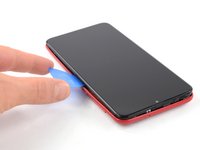
    • Slide the opening pick from the top left corner to the top right corner to release the plastic clips.

    Ask FixBot

    Add Comment

  7. Samsung Galaxy A10 Back Cover Replacement: step 7, image 1 of 3 Samsung Galaxy A10 Back Cover Replacement: step 7, image 2 of 3 Samsung Galaxy A10 Back Cover Replacement: step 7, image 3 of 3
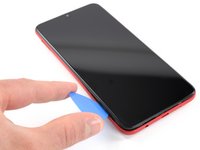
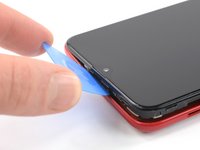
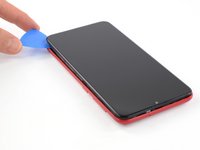
    • Slide the opening pick from the top left corner to the bottom right corner to release the remaining clips.

    Ask FixBot

    Add Comment

  8. Samsung Galaxy A10 Back Cover Replacement: step 8, image 1 of 2 Samsung Galaxy A10 Back Cover Replacement: step 8, image 2 of 2
    • Remove the back cover.

    Ask FixBot

    Add Comment

Conclusion

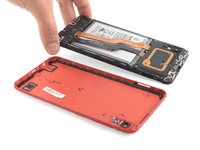
To reassemble your device, follow these instructions in reverse order.

Repair didn’t go as planned? Try some basic troubleshooting, or ask our Answers community for help.

Cancel: I did not complete this guide.

35 other people completed this guide.

Adriana Zwink

Member since: 12/18/19

67,525 Reputation

167 Guides authored

Team

iFixit Member of iFixit

Staff

122 Members

26,593 Guides authored

1 Guide Comment

why is this moderate

LambdaMisc - Reply Share

Add Comment

View Statistics:

Past 24 Hours: 8

Past 7 Days: 45

Past 30 Days: 160

All Time: 20,070