Free Shipping on Domestic Orders $75+

SYNOLOGY DS220 +: a complete disassembly in rules

What you need

  1. SYNOLOGY DS220 +: a complete disassembly in rules, Presentation : the different faces of the case: step 1, image 1 of 2 SYNOLOGY DS220 +: a complete disassembly in rules, Presentation : the different faces of the case: step 1, image 2 of 2
    • Here are the different interesting sides of the case: front (disk bay, LEDs), rear (connectors and fans).

    • power button

    • 2 x RJ45 Gb ports

    • Disk and system activity LEDs

    • Kensington security slot (K-lock)

    • 1 x power supply port

    • 2 x USB 3 ports (1 front and 1 back)

    • 1 x reset button

    Ask FixBot

    Add Comment

  2. SYNOLOGY DS220 +: a complete disassembly in rules, Disassembly : disk cage removal: step 2, image 1 of 1
    • nothing complicated ... remove the cage from the SIN while pressing the push button

    Ask FixBot

    Add Comment

  3. SYNOLOGY DS220 +: a complete disassembly in rules, Backplane and memoy access: step 3, image 1 of 3 SYNOLOGY DS220 +: a complete disassembly in rules, Backplane and memoy access: step 3, image 2 of 3 SYNOLOGY DS220 +: a complete disassembly in rules, Backplane and memoy access: step 3, image 3 of 3
    • 2 x SATA port

    • Only the empty memory slot is accessible.

    • Evolution since v2018: internal memory (2 GB) is soldered on board.

    Ask FixBot

    Add Comment

  4. SYNOLOGY DS220 +: a complete disassembly in rules, Case : removing the cover: step 4, image 1 of 3 SYNOLOGY DS220 +: a complete disassembly in rules, Case : removing the cover: step 4, image 2 of 3 SYNOLOGY DS220 +: a complete disassembly in rules, Case : removing the cover: step 4, image 3 of 3
    • Use a screwdriver (flat tool) to unlock the two plastic lugs.

    • These are two locking notches (on the front, left side) to be "unlocked" or "unlatched".

    • Be careful not to bend the metal bar.

    • then slide the two parts of the shell parallel to each other, as shown in the pictures.

    • then separate the two parts from each other perpendicularly.

    • the removal of the rear screws (fan, plate) is not mandatory ...

    Ask FixBot

    Add Comment

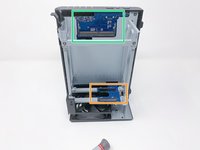
  5. SYNOLOGY DS220 +: a complete disassembly in rules, Teardown : internal parts: step 5, image 1 of 3 SYNOLOGY DS220 +: a complete disassembly in rules, Teardown : internal parts: step 5, image 2 of 3 SYNOLOGY DS220 +: a complete disassembly in rules, Teardown : internal parts: step 5, image 3 of 3
    • orange : internal SATA ports

    • yellow : fan connector

    • blue : fan

    • green : free memory slot

    Ask FixBot

    Add Comment

  6. SYNOLOGY DS220 +: a complete disassembly in rules, Teardown: spacer holding cage and case: step 6, image 1 of 2 SYNOLOGY DS220 +: a complete disassembly in rules, Teardown: spacer holding cage and case: step 6, image 2 of 2
    • simply unscrew the screw to remove the spacer.

    • You will notice the guides for positioning the spacer.

    Ask FixBot

    Add Comment

  7. SYNOLOGY DS220 +: a complete disassembly in rules, Teardown: spacer holding fan: step 7, image 1 of 1
    • same as above ... unscrew the screw to remove the plastic spacer

    • you will also notice the markers ...

    Ask FixBot

    Add Comment

  8. SYNOLOGY DS220 +: a complete disassembly in rules, Teardown: motherboard removal 1/2: step 8, image 1 of 2 SYNOLOGY DS220 +: a complete disassembly in rules, Teardown: motherboard removal 1/2: step 8, image 2 of 2
    • to remove the motherboard from the case, unscrew the 4 screws as follows ...

    • There are 4 x screws to fix the metal support of the motherboard. 4 x screws to fix the motherboard to the metal support. And finally 4 x screws to fix the disk bay cage to the metal support of the motherboard. Pay attention!

    Ask FixBot

    Add Comment

  9. SYNOLOGY DS220 +: a complete disassembly in rules, Teardown: motherboard removal 2/2: step 9, image 1 of 1
    • once the screws are removed, pull the front panel (at the USB port) slightly outwards ...

    • This allows the connectors to pass through.

    • then lift up the motherboard with the disk cage.

    Ask FixBot

    Add Comment

  10. SYNOLOGY DS220 +: a complete disassembly in rules, Teardown: removal of the disk bay: step 10, image 1 of 2 SYNOLOGY DS220 +: a complete disassembly in rules, Teardown: removal of the disk bay: step 10, image 2 of 2
    • remove the yellow marked screws (x4)

    • no specific photographs ... nothing very complex!

    • This step is not mandatory to access the motherboard

    Ask FixBot

    Add Comment

  11. SYNOLOGY DS220 +: a complete disassembly in rules, Teardown: removal of the mobo's metal support: step 11, image 1 of 1
    • Remove the yellow marked screws (x4)

    Ask FixBot

    Add Comment

  12. SYNOLOGY DS220 +: a complete disassembly in rules, Internal parts : case, motherboard: step 12, image 1 of 3 SYNOLOGY DS220 +: a complete disassembly in rules, Internal parts : case, motherboard: step 12, image 2 of 3 SYNOLOGY DS220 +: a complete disassembly in rules, Internal parts : case, motherboard: step 12, image 3 of 3
    • 1 - motherboard on the processor side

    • 2 - motherboard memory side

    • 3 - empty case

    Ask FixBot

    Add Comment

  13. SYNOLOGY DS220 +: a complete disassembly in rules, Thanks !: step 13, image 1 of 1
    • Photograph showing one of the phases of dismantling the NAS.

    Ask FixBot

    Add Comment

Conclusion

To reassemble your device, follow the instructions in reverse order.

Cancel: I did not complete this guide.

4 other people completed this guide.

Special thanks to these translators:

fr en

100%

These translators are helping us fix the world! Want to contribute?
Start translating ›

Sébastien

Member since: 12/14/15

4,739 Reputation

6 Guides authored

Team

AEM (ANIMA EX MACHINA) Member of AEM (ANIMA EX MACHINA)

Business

1 Member

16 Guides authored

2 Guide Comments

Bonjour,

Savez-vous s'il est possible d'acheter la Carte Mère de ce model?

Merci d'avance pour votre réponse

Léo - Reply Share

Bonjour,

N'oubliez pas qu'en mettant les disques dans une baie plus récente,

le NAS va migrer le système avec les données.

De fait, sauf pour une application très particulière,

il ne semble pas y avoir un intérêt économique à racheter une carte mère de 2020

Sinon il faudrait l'acheter / la trouver très peu cher …

D'ailleurs, pas certain qu'elle soit encore produite (j'en doute fortement même).

Cela dit, demandez à Synology directement (leur site n'en parle pas : https://www.synology.com/fr-fr/products/...)

Ils ont leur réseau de distributeur et depuis que maintenant ils proposent de la maintenance c'est possible qu'il le reste du stock (ca reste un modèle grand public donc pas certain).

Sinon il reste l'occasion … avec les risques associés …

Bref pas si simple …

Sébastien - Reply Share

Add Comment

View Statistics:

Past 24 Hours: 11

Past 7 Days: 51

Past 30 Days: 227

All Time: 10,057