
Ridgid R350RHE 2012 Magazine Replacement

Alejandro Jimenez Enero and 4 other contributors
Last updated on Jun 25, 2024
Views: 612
View statistics:
- Past 24 Hours:
- 3
- Past 7 Days:
- 12
- Past 30 Days:
- 57
- All Time:
- 612
Comments: 0
No one has left comments on this guide. Will you be first?
Go to guide commentsCompleted: 1 2
1 person has marked this guide "completed." Will you be next?
2 people have marked this guide "completed." Including you — great job!
Favorites: 0 1
No one has favorited (and subscribed to) this guide. Will you be the first?
1 person has favorited (and subscribed to) this guide — and that's you!
Featured Student Guide
This guide has been the hard work of our awesome students and is found to be exceptionally cool by the iFixit staff.
Introduction
Go to step 1 ↓The magazine holds the various fasteners available for the Rigid R350RHE nail gun. When the magazine is damaged such as when the nail gun has been dropped and bent the magazine out of shape the easiest option is to replace the magazine. A damaged magazine can be responsible for misfires and jams and will be a severe impediment to proper usage of the nail gun.
You will need a 5/32" to remove all screws in this guide keep track of them since they have different lengths depending on their location.
What you need
Tools

-
-
-
Remove the single 25 mm hex screw that secures the workpiece contact cover with a 5/32" Allen wrench.
-
Remove the single 14 mm hex screw that secures the magazine to the lower handle with a 5/32" Allen wrench
 Ask FixBot
-
-
-
Remove the work piece contact cover by pulling it perpendicular to the nail gun.
-
-
-


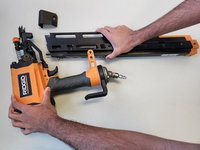
To reassemble your device, follow these instructions in reverse order.
Cancel: I did not complete this guide.
One other person completed this guide.

Team

University of North Texas, Team 3-2, Kilpatrick Spring 2024 Member of University of North Texas, Team 3-2, Kilpatrick Spring 2024
UNT-KILPATRICK-S24S3G2
4 Members
60 Guides authored
