Introduction
Use this guide to replace the joystick module in a Retroid Pocket Flip handheld gaming console. The joystick controls directional movement and input during gameplay. Over time, the joystick may begin to drift, respond inconsistently, or stop registering movement, which may require replacement.
No advanced technical experience is required, but you will need basic tools to open the device.
For your safety, power off the device completely and remove the microSD card before starting this process.
Follow Electrostatic Discharge when working inside the device to avoid damaging internal components.
What you need
-
-
-
Remove the four 5.9 mm screws from the backplate of the device with a 1.3mm hex screwdriver.
-
Use a plastic opening pick to carefully separate the back cover from the device.
 Ask FixBot
-
-
-
Use a plastic spudger to carefully lift and disconnect the battery connector.
-
Use tweezers to disconnect the connector from its socket.
-
-
-
-
-
-
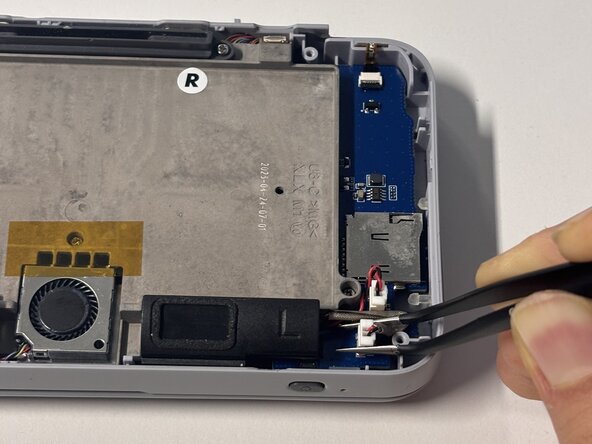
Use tweezers or a spudger to disconnect the two speaker cables at the bottom of the board and remove them.
-
-
-
-
-
Remove the two 3.2 mm screws securing the top of the shield with a JIS #000 screwdriver.
-
Remove the five 3.2mm screws securing the plastic insulating shield to the motherboard.
-
-
-
Carefully lift and unstick the fan module using a plastic spudger, then remove it.
-
Remove the sticky ribbon connectors on each side of the plate with a plastic spudger.
-
Use a plastic spudger to carefully separate the shield from the board.
-
-
-
Use tweezers to unclip and remove the two ribbon cables on each joystick module.
-
Use a plastic spudger to lift and remove the joystick modules; they are secured with double sided tape.
-
-




To reassemble your device, follow these instructions in reverse order.

Team

Université Paris Cité, Team 2-2, Grohan Winter 2026 Member of Université Paris Cité, Team 2-2, Grohan Winter 2026
UPARIS-GROHAN-W26S2G2
4 Members
72 Guides authored
